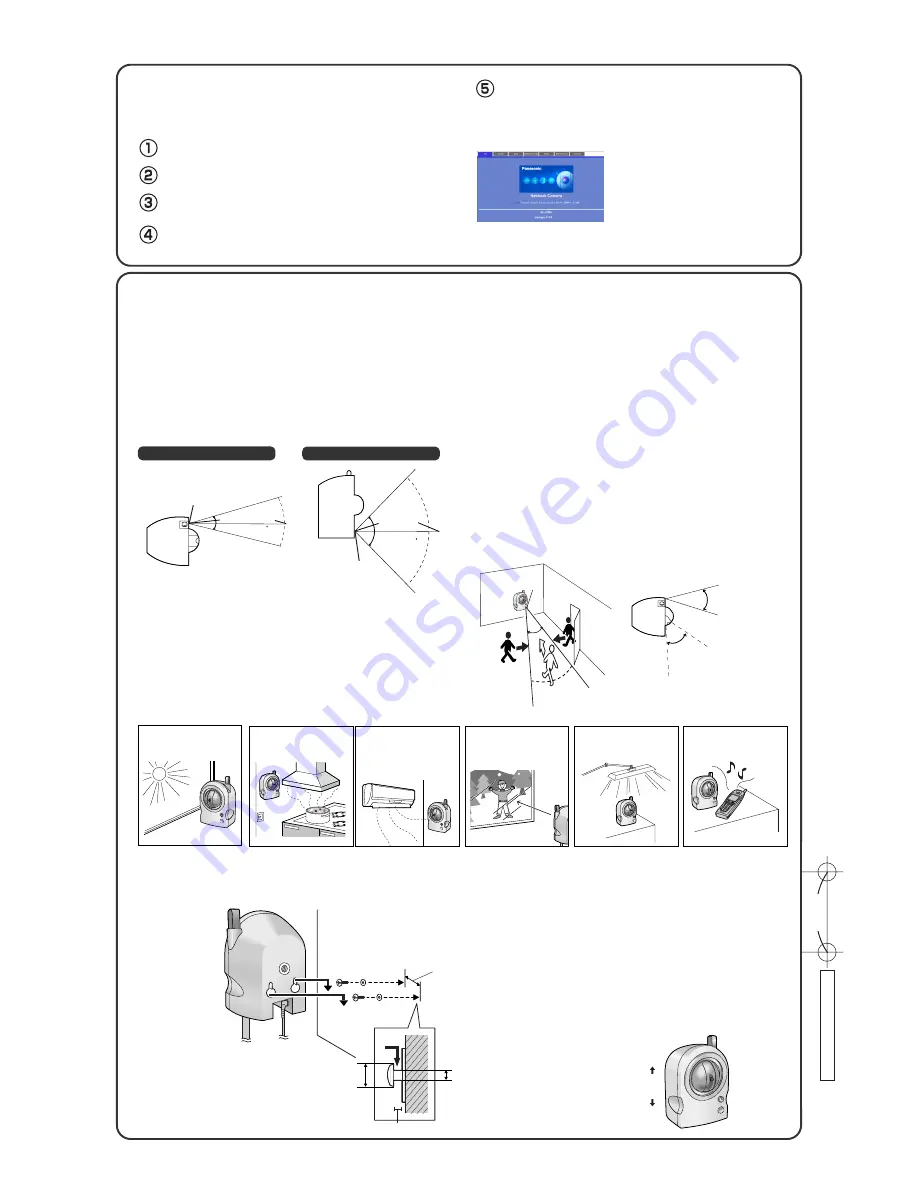
Easy to detect
Easy to detect
Horizontal Detection
Range (About 30
°
)
Horizontal Viewing Angle (43
°
)
Hard to detect
(Distance may be shortened below 5 m [16.4 feet])
Pyroelectric
Infrared Sensor
Figure 1
Figure 2
The len position is
not matchin the
sensor direction.
Notes
• The sensor can easily detect temperature differences of objects moving sideways
within the detection range, but cannot easily detect objects moving slowly towards
the sensor. Mount the camera where the objects often pass across the detection
range (see Figure 1).
• If the lens position does not match the sensor direction, the buffered or transferred
images may not capture the object detected by the sensor (see Figure 2). We recom-
mend you to set the pan/tilt range to match the sensor direction or to restrict the user's
access level to disable the pan/tilt operation.
Where the object is
exposed to strong light
Where there is an
obstacle such as glass
in front of the camera
6.
Mount the camera.
You should understand the detection range of the pyroelectric infrared sensor before mounting the camera. The camera can be mounted on the wall.
Screw the 2 screws (included accessories) with the 2 washers (included accessories) into the wall, and mount the camera.
29 mm
(1.14 inches)
1.8 mm (0.07 inches)
9 mm
(0.35 inches)
4.5 mm
(0.18 inches)
●
Drive mounting screws into the wall. Be careful to avoid touching any metalwork (metal/wire laths etc.), conduits or electrical
cables buried in the wall.
About 5 m (16.4 feet)
About 30
Pyroelectric Infrared Sensor
About 5 m
(16.4 feet)
About 85
Pyroelectric
Infrared Sensor
Horizontal Detection Range
Vertical Detection Range
Notes
• The included screws are only for a wooden wall.
• Mount the camera on the stable location such as a
wooden column. The camera may fall and break down.
• The camera is intended for indoor use only. Do not
mount the camera outside the house.
• To correctly control the pan/tilt operation, do not incline
the camera in mounting.
• Do not mount the camera upside down. The image
may be displayed upside down.
Up
Down
Notes
• Read the Installation/Troubleshooting before mounting the camera.
• Prepare the Ethernet cable with enough length before mounting the camera.
• You can view the image even in 1 lx illuminance. But if you feel hard to view the image, you had better use supplemental lighting.
■
About Pyroelectric Infrared Sensor
(See Panasonic Network Camera support website at http://panasonic.co.jp/pcc/products/en/netwkcam/ for details about the
pyroelectric infrared sensor.)
The sensor (pyroelectric infrared sensor) detects temperature differences with the infrared rays naturally emitted by human or animal bodies. The sensor trigger can acti-
vate buffering images to the internal memory or transferring images by E-mail or FTP. The detection range is about 30 ° horizontally, about 85 ° vertically and about 5-m
(16.4 feet) distance. Since the detection range is easily affected by the environment temperature or how fast the object speed is, consider your mounting location.
• If there is no temperature difference between human body and environment like in summer,
the sensor may not detect anything.
• If the object is less than about 1 m (40 inches) away from the camera, the camera may
detect the object outside the range.
• If the sensor is obstructed, the sensor does not detect anything. Remove the obstacle in
front of the sensor.
•
The sensor may malfunction in the following areas. Avoid these locations.
Where direct sunlight
hits the object
In a greasy or humid
place like a kitchen
Where there are sharp
temperature changes
like near an air condi-
tioner
Near a radio wave emit-
ting device
Example
W
all Mount Siz
e
29 mm
(1.14 inches)
About Location
■
Wall Mount
Caution
Do not mount the camera on a soft material. The camera
may fall and break down.
After setting each item for the wireless LAN, confirm that the camera works
correctly.
Unplug the Ethernet cable and turn off the power (disconnect
the AC plug).
Set the switch on the bottom of the camera to wireless.
Turn on the power by connecting the AC plug to the power outlet.
• The camera switches from wired to wireless.
Start up the web browser on the PC.
Enter "http://IP address (or URL):Port No." in the address field
and press [Enter].
Confirming the Wireless LAN Setup
• If the Top Page was not displayed, the settings
for the camera are not identical with those for the
router. Check the settings by using wired connec-
tion.
If the settings are correct and you use a proxy
server, set the web browser not to access the
proxy server.
If the Top Page is not displayed even after trying
these methods, contact the retailer.
• It takes about 1 minute for the new settings to be
effective.
• It is not possible to access the camera simultane-
ously by both wired and wireless connection.
(When port number is 80 (default), you do not need to enter port
number.)
• When the following Top Page is displayed, the wireless LAN setup is
successful.


