background image

Operating Instructions

84

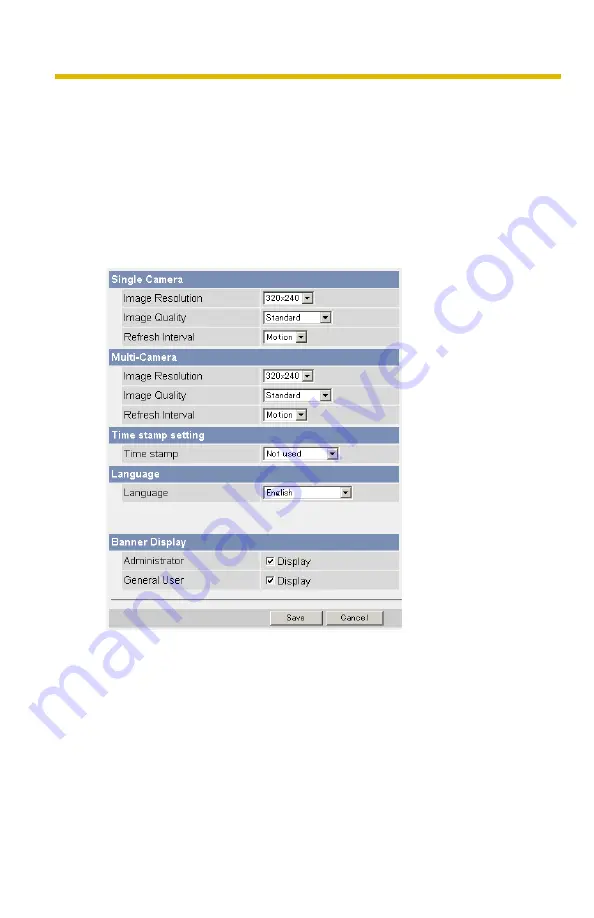
2.16 Changing Initial Settings on the Single 

Camera page or the Multi-Camera page

The Image Display page allows you to change initial settings (display settings when 
a user accesses the camera) of image resolution, image quality and refresh 
interval. You can display a time stamp on the image. The initial language can be 
selected from eight languages. The banner can be displayed for administrator or 
general users or both.

1.

Click [Image Display] at the top of the page.

2.

Set each parameter.

Clicking [Cancel] cancels your settings without saving changes.

Summary of Contents for BB-HCM371A - Outdoor Wireless Network Camera

Page 1: ...se read this manual before using and save this manual for future reference Network Camera Panasonic Network Camera Website http www panasonic com netcam for customers in the USA or Puerto Rico Model N...

Page 2: ...Your Panasonic Network Camera now provides 2 way audio between the camera and your PC You will be able to hear the person on camera and respond using a microphone connected to your PC s sound card cus...

Page 3: ...al detection of door sensor or light About 58 000 images 320 x 240 resolution and standard quality can be recorded to 1 GB SD memory card If you enable 1 minute interval timer buffer transfer you can...

Page 4: ...uage Display Top page Single Camera and Multi Camera page can be displayed inEnglish French German Italian Spanish Russian Simplified Chinese or Japanese The Setup Maintenance and Support pages are di...

Page 5: ...Camera is called Camera in this Operating Instructions Trademarks Adobe Acrobat and Reader are either registered trademarks or trademarks of Adobe Systems Incorporated in the United States and or othe...

Page 6: ...XP Microsoft Windows 2000 Microsoft Windows Me Microsoft Windows 98SE CPU For viewing single camera Pentium III 800 MHz or greater is recommended For viewing multiple cameras Pentium 4 1 8 GHz or grea...

Page 7: ...on Operating System Microsoft Windows XP Service Pack 1 or later CPU For viewing single camera Pentium III 800 MHz or greater is recommended For viewing multiple cameras Pentium 4 1 8 GHz or greater i...

Page 8: ...lugs convenience receptacles and the point where they exit from the unit 9 The AC cord is used as the main disconnect device ensure that the socket outlet is located installed near the equipment and i...

Page 9: ...a unique User Name and secret Password is an important tool that will help limit unauthorized individuals from accessing the camera If you choose to disable this tool and choose not to limit access by...

Page 10: ...1 6 Viewing Still Images on Your Cell Phone 37 2 Various Camera Features 39 2 1 Using Camera Features 39 2 2 Connecting the Camera to Your IPv4 Network 42 2 3 Connecting the Camera to Your IPv6 Networ...

Page 11: ...26 Changing Indicator Display 116 3 Camera Maintenance 117 3 1 Maintenance page 117 3 1 1 Confirming the Status 118 3 1 2 Confirming the Wireless Status 118 3 1 3 Restarting the Camera 119 3 1 4 Updat...

Page 12: ...146 3 10 2 Setting UPnP to Display Camera Shortcut in My Network Places 149 3 10 3 Setting the Internet Temporary File Setting on Web Browser 149 3 11 ASCII Character Table 150 3 12 File Size and Numb...

Page 13: ...r For IPv6 connection see page 15 and page 16 and prepare the requirements Enter the http IPv6 registered URL Port Number on the address bar If the camera image is not displayed see page 55 and page 5...

Page 14: ...not be displayed If View Multi Camera page or View Buffered Image page is not permitted on the General User page Multi Camera or Buffered Image tab will not be displayed 5 Close the web browser A To...

Page 15: ...the web browser You need to enter IPv6 URL registered in the domain name service We recommend Viewnetcam com service see page 29 of the Installation Troubleshooting as a domain name service Ask your I...

Page 16: ...ssories Command Prompt Command Prompt window is displayed 2 Enter ipv6 install Succeeded is displayed Note If Windows XP Service Pack 1 or later is not installed Succeeded will not be displayed Instal...

Page 17: ...g or IPsec will also slow refresh interval When displaying video Motion JPEG the camera allows up to 30 simultaneous accesses When trying more than 30 accesses the 31st user will see a gray screen Max...

Page 18: ...en trying to display a video for the first time Security Warning window will be displayed When using Windows XP or Windows 2000 log in as an administrator to install it If you cannot install ActiveX C...

Page 19: ...be used for security purposes It is possible that this may prevent motion video from being displayed In this situation we suggest Contact your network administrator Try using regularly refreshed imag...

Page 20: ...es The banner is displayed when Yes is checked for Allow Access from the Internet on the Automatic Setup page or when Enable is checked for Auto Port Forwarding on the UPnP page for the Connection Mod...

Page 21: ...selected point in the center of the screen 1 Move the cursor to the desired point 2 Click it The clicked point is centered See page 24 for the pan tilt operation Notes When End Display appears on the...

Page 22: ...and select a resolution to display an image 2 Click the capture image button The camera image opens in another window 3 Right click the image and select Save Picture As Save as dialog box is displayed...

Page 23: ...e camera direction to a preset position You can preset 8 positions see page 25 page 28 Alarm Position When the External I O detects a signal the camera can be set up to turn to this position Only an a...

Page 24: ...he pan tilt reaches the end a shadow may be displayed partially This is not a problem Pan tilt scan buttons automatically move the lens horizontally from 60 to 60 and vertically from 45 to 20 and retu...

Page 25: ...When Triggered setting is set see page 102 the camera takes a alarm position after the External I O detects a signal See page 129 for the External I O 1 Click Program Program switches to Cancel Click...

Page 26: ...saving changes 2 Pan and tilt the camera to a desired position 3 Click a preset button 1 8 to register E g Setting Middle for the preset 5 4 Enter the preset name Maximum 15 characters Enter ASCII ch...

Page 27: ...800 272 7033 27 Viewing the Image 1 Click the home position alarm position or registered preset button The camera takes each position and the image is displayed Alarm Position Pan Tilt Putting the cur...

Page 28: ...ck the home position alarm position or a preset button 1 8 4 Click Save after setting the preset name or click Delete If you quit to change or delete settings click Back and then Cancel If Success is...

Page 29: ...lk feature is stopped during listening Talk feature can be used only for a user Listen feature can be used for maximum 10 users If the audio is interrupted reduce the max bandwidth see page 42 and pag...

Page 30: ...hen the camera is accessed via a proxy server If you cannot listen to the audio or talk from your PC see 2 6 Audio Problems in the Troubleshooting section of the Installation Troubleshooting If you us...

Page 31: ...io may be distorted when the line level is input Audio distortion will be solved if you insert the following circuits Under no circumstance should high level audio such as from a speaker be connected...

Page 32: ...Notes When selecting All at the View Type all images are displayed in 160 x 120 pixels resolution and the Audio Control Bar is not displayed Capture Image Button see page 22 Switches cameras to displ...

Page 33: ...3 to 4 Mbps bandwidth If the bandwidth is not enough the refresh interval may slow down When the image is not displayed on the Multi Camera page Confirm that the Internet IP address is specified for...

Page 34: ...e 100 You can view buffered images on this Buffered Image page Note Sound cannot be buffered on the Buffered Image page 1 Access the camera see page 13 The Top page is displayed 2 Click the Buffered I...

Page 35: ...and the standard quality the camera buffers about 125 frames If 3 triggers are enabled maximum 5 triggers the internal memory or the SD memory card capacity is divided into 3 sections In this case eac...

Page 36: ...ou click Save on the Image Buffer Transfer page all buffered images on the SD memory card are deleted If you are buffering images on the internal memory the following operations also delete all buffer...

Page 37: ...ot be displayed Notes Audio feature does not work on cell phones If the features are not permitted on the General User page the buttons related with the features are not displayed see page 81 E g http...

Page 38: ...port password authentication See the Panasonic Network Camera support website at http panasonic co jp pcc products en netwkcam for a cell phone model list and the compatibility level which has been ve...

Page 39: ...the Security Administrator page click Login tab and log in as an administrator When users other than an administrator are accessing the camera the Setup and Maintenance tabs are not displayed If View...

Page 40: ...sition and color night view settings see page 71 9 Audio Sets output volume PC audio input timeout input camera microphone sensitivity and mute during pan tilt settings see page 75 Account 10 Administ...

Page 41: ...Sets image buffer or transfer by timer or alarm see page 91 or page 100 15 Operation Time Sets time period to display camera images see page 113 16 External Output Sets the digital output terminal of...

Page 42: ...43 3 Enter each parameter in the proper data field Automatic Setup The camera automatically obtains the network settings subnet mask default gateway and DNS server address utilizing a DHCP feature on...

Page 43: ...k Restart The camera restarts and the Top page is displayed If the camera is restarted all buffered images on the internal memory are deleted The buffered images on the SD memory card are not deleted...

Page 44: ...ing the network settings clear the check box Port Number Static DHCP Only The port number is 80 by default When you use multiple cameras with a router on your network each camera must be assigned its...

Page 45: ...ransferring camera images by E mail or FTP Setting cameras by their host names on the Multi Camera Setup page Using the Viewnetcam com service If you have the assigned DNS server addresses by your ISP...

Page 46: ...ion Auto Negotiation must be selected If you cannot access the camera see page 55 The Top page is not displayed in the Installation Troubleshooting This setting is valid in both IPv4 IPv6 1 If you aut...

Page 47: ...d your ISP must support IPv6 before you can use this feature 1 Click Network IPv6 on the Setup page 2 Click a connection mode 3 Enter each parameter in the proper data field Automatic Setup The camera...

Page 48: ...ra can be accessed only from the LAN that has an same IPv6 prefix as the camera Clicking Cancel takes you back to the previous page without saving changes 4 Click Save when finished New settings are s...

Page 49: ...rom the LAN that has an same IPv6 prefix as the camera Port Number Static Only The port number is 80 by default The port number must be unique for each terminal on your network Do not set the followin...

Page 50: ...andwidth can be restricted Select the maximum bandwidth usage from Unlimited to 0 1 Mbps This setting is valid in both IPv4 IPv6 Note Set the maximum bandwidth usage seeing the following file sizes Th...

Page 51: ...ing IPsec feature Item Supported Feature IKEv1 Pre shared Key Method Phase 1 mode Phase 2 mode Cipher Algorithm Message Digest Algorithm Main mode 1 Quick mode DES CBC 3DES CBC AES CBC 128 192 256 bit...

Page 52: ...uirements Item Supported Feature PC Operating System Web Browser ISP Service Windows XP Service Pack 1 or later Internet Explorer 6 0 or later Services for multiple global addresses A global address m...

Page 53: ...Browser Windows XP Windows 2000 Windows Me Windows 98SE in IPv4 Windows XP Service Pack 1 or later in IPv6 Internet Explorer 6 0 or later Router ISP Service in IPv4 ISP Service in IPv6 Static global...

Page 54: ...c on the Setup page 2 Click Camera in the Transport column If you use transport mode in E mail or FTP transfer click No in the Buffer Transfer column 3 Enter each parameter in the data field The displ...

Page 55: ...name see page 150 But Space and are not available Note If the pre shared key leaks to a third party it may lead to illegal access private information leak or interference To protect your security and...

Page 56: ...If you can access the camera the IPsec setup is complete Notes In IPsec communications IPsec is displayed on the Top page or the Single Camera page If you cannot communicate using IPsec see 2 10 IPsec...

Page 57: ...sec tunnel mode Notes Do not set IPsec on the PCs under the VPN router Communications may be blocked If you use IPsec refresh interval slows down The camera can be accessed only from the PCs under the...

Page 58: ...e not available Note If the pre shared key leaks to a third party it may lead to illegal access private information leak or interference To protect your security and privacy pay attention to the follo...

Page 59: ...oding strength for IPsec can be selected If you select Standard DES or NULL is valid as an algorithm and then the data will become easier to be decrypted IKE Items Settings Phase 1 Authentication Meth...

Page 60: ...the IPsec features Phase 2 Mode Quick mode PFS Specifies either of Off D H Group 1 or D H Group 2 Cipher Algorithm Select from DES CBC 3DES CBC AES CBC 128 192 256 bits or NULL Multiple selections are...

Page 61: ...ses The SSID is limited to 32 characters alpha numeric and is case sensitive Communication mode In 802 11b there are a lot of 802 11b compliant products and they are inexpensive They are widely preval...

Page 62: ...aracters 152 bit ASCII 5 characters 64 bit ASCII 13 characters 128 bit or ASCII 16 characters 152 bit on the list Selecting WEP at Cipher enables you to set WEPKey1 4 One or all of the four keys can b...

Page 63: ...Encryption is a help to avoid being read the data within wireless LAN by others Enter both the MAC addresses for the camera itself and the camera s wireless module to enable the MAC address filtering...

Page 64: ...for auto port forwarding Note The camera s UPnPTM does not support IPv6 Use this feature in IPv4 1 Click UPnP on the Setup page 2 Set up UPnP Setting Description Auto Port Forwarding If the network se...

Page 65: ...erating Instructions For assistance please call 1 800 272 7033 65 3 Click Save when finished New settings are saved When finished Success is displayed 4 Click Go to UPnP page The UPnP page is displaye...

Page 66: ...ge 2 Check Enable Clicking Cancel cancels your settings without saving changes 3 Click Save when finished New settings are saved When finished Success is displayed 4 Click Go to Viewnetcam com page Th...

Page 67: ...Internet see page 13 When the Top page is displayed the Viewnetcam com registration is complete Notes It may take a maximum of 30 minutes for the registered URL to work If Expired is displayed at the...

Page 68: ...amps on the buffered image Note Saving the date and time settings deletes all buffered images on the internal memory The buffered images on the SD memory card are not deleted 1 Click Date and Time on...

Page 69: ...such as 192 168 0 253 But 0 0 0 0 and 255 255 255 255 are not available In IPv6 set 8 hexadecimal digits divided with Consecutive 0s can be abbreviated as Or set a host name 1 255 characters Select yo...

Page 70: ...Operating Instructions 70 Note Date and time settings become incorrect depending on the length of power on time or the internal temperature Using the Automatic Time Adjustment is recommended...

Page 71: ...anging Camera Settings The Camera page allows you to set the camera name white balance pan tilt range return to specified position and color night view settings 1 Click Camera on the Setup page 2 Set...

Page 72: ...Indoor Electric bulb 2800 K Fixed Fluorescent White White 3600 K Fixed Fluorescent Daylight Daylight 4000 K Fixed Outdoor Solar light 6000 K Hold Setting Hold keeps the current white balance Note Whi...

Page 73: ...he range after the setup Return to Specified Position If the camera is not operated during the specified period the camera turns to the specified position Note If you did not set any presets the camer...

Page 74: ...Single Camera page and the Camera page side to side 4 Set the pan tilt range Selecting Current Settings displays the current angle of the camera Select each value while adjusting the pan tilt on the...

Page 75: ...2 Adjusting Audio The Audio page allows you to adjust the built in microphone the use of external speaker microphone sensitivity and external speaker volume 1 Click Audio on the Setup page 2 Set each...

Page 76: ...o external speaker PC Audio Input Timeout You can set the time to consecutively perceive the audio from your PC 1 60 minutes Input It controls audio input from the built in microphone or external micr...

Page 77: ...following points Set the user name and password as many characters as possible Change the password regularly IMPORTANT It is important to limit access to the camera by use of a unique User Name and a...

Page 78: ...ow in camera access All guest users can view the image without user name and password Note If you set Permit access from guest users Login is displayed at the top of the page After you log in as an ad...

Page 79: ...3 user levels administrator general users and guest users Note Guest users mean unregistered users Set Permit access from guest users on the Security Administrator page see page 77 Items Administrato...

Page 80: ...After you log in as an administrator you can access the Setup page and the Maintenance page 1 Click Login at the top of the page 2 Check the login mode and click Login Note The authentication window...

Page 81: ...dministrator page the access level can be set for guest users Note For general users the Setup and Maintenance tabs are not displayed 1 Click General Users on the Setup page 2 If you create a general...

Page 82: ...ion User ID List Up to 50 general users can be registered The list is used to modify or delete general user settings User Name Password User Name 6 to 15 characters Enter the user name Password 6 to 1...

Page 83: ...mitted Unlimited 10 seconds 60 minutes In the refresh interval set the refresh interval after the video changes to still images 3 60 seconds See each page for the following features Pan Tilt Control s...

Page 84: ...when a user accesses the camera of image resolution image quality and refresh interval You can display a time stamp on the image The initial language can be selected from eight languages The banner c...

Page 85: ...mat or 24H format Note If you enable this feature the time is also stamped on the buffered image Language Select the initial language from English French German Italian Spanish Russian Simplified Chin...

Page 86: ...Operating Instructions 86 4 Click Go to Image Display page The Image Display page is displayed...

Page 87: ...onfigured 1 Click Multi Camera on the Setup page 2 Click Add Notes If you click the camera number the modification page is displayed The camera setting can be modified or deleted on it If you configur...

Page 88: ...ress 1 or Host Name 2 Set the IP address or the host name to enable the camera Port No Set the port number 1 65535 Camera Name 3 This camera name is displayed only on the Multi Camera page 1 In IPv4 s...

Page 89: ...mory card Notes You can confirm the SD memory capacity on the Status page see page 118 1 Insert the SD memory card see page 40 of the Installation Troubleshooting 2 Click Buffer Transfer on the Setup...

Page 90: ...ecording starts again see page 40 of the Installation Troubleshooting 1 Click Buffer Transfer on the Setup page 2 Click SD video recording stop 3 Click OK on the confirmation window The SD memory reco...

Page 91: ...mory card refresh interval slows down 1 Click Buffer Transfer on the Setup page 2 Click No to enable buffer transfer 3 Check Enable Image Buffer Transfer select Timer for trigger and click Next Note I...

Page 92: ...back to the Image Buffer Transfer page without saving changes Setting Description Enable Image Buffer Transfer Check the box to enable the buffer transfer Clear the box to disable it Trigger Selecting...

Page 93: ...k to the Image Buffer Transfer page without saving changes Setting Description Image Resolution Select image resolution 640 x 480 320 x 240 default or 160 x 120 pixels to buffer or transfer Image Qual...

Page 94: ...ay and DNS server addresses are assigned correctly see page 42 and page 47 Setting Description No Transfer No Memory Overwrite If the internal memory or the SD memory card is full the camera stops the...

Page 95: ...1 800 272 7033 95 When you set FTP for Transfer Method Select FTP and click Next The following page is displayed Clicking Back takes you back to the previous page Clicking Cancel takes you back to the...

Page 96: ...et it 0 63 characters Login Timing Select the login timing to an FTP server If you set One Time during 1 minute transfer the camera logs in to the server only once and can reduce the time to log in or...

Page 97: ...click Next The following page is displayed Clicking Back takes you back to the previous page Clicking Cancel takes you back to the Image Buffer Transfer page without saving changes Note The camera wor...

Page 98: ...t available If your ISP requires a login ID to log in to a POP3 server set it 0 63 characters Password 2 If your ISP requires a password to log in to a POP3 server set it 0 63 characters Reply E mail...

Page 99: ...er page The Image Buffer Transfer page is displayed Notes If you click Save on the Image Buffer Transfer page all buffered images on the SD memory card are deleted If you are buffering images on the i...

Page 100: ...er Transfer on the Setup page 2 Click No to enable buffer transfer 3 Check Enable Image Buffer Transfer select Alarm 1 or 2 for trigger select Rising GND to Open High or Falling Open High to GND and c...

Page 101: ...Timer enables the camera to buffer transfer the image by timer Selecting Alarm 1 or 2 enables the camera to buffer transfer the image by alarm signal Alarm enable condition Select Rising GND to Open H...

Page 102: ...icking Cancel takes you back to the Image Buffer Transfer page without saving changes Setting Description Lens Position When Triggered Set Move to alarm position to move the lens to the alarm position...

Page 103: ...t saving changes Setting Description Enable Pre trigger Image Buffer Check the box to enable the setting The camera buffers or transfers the image right before the alarm signal is detected Set an inte...

Page 104: ...ay and DNS server addresses are assigned correctly see page 42 and page 47 Setting Description No Transfer No Memory Overwrite If the internal memory or the SD memory card is full the camera stops the...

Page 105: ...800 272 7033 105 When you set FTP for Transfer Method Select FTP and click Next The following page is displayed Clicking Back takes you back to the previous page Clicking Cancel takes you back to the...

Page 106: ...et it 0 63 characters Login Timing Select the login timing to an FTP server If you set One Time during 1 minute transfer the camera logs in to the server only once and can reduce the time to log in or...

Page 107: ...click Next The following page is displayed Clicking Back takes you back to the previous page Clicking Cancel takes you back to the Image Buffer Transfer page without saving changes Note The camera wo...

Page 108: ...ot available If your ISP requires a login ID to log in to a POP3 server set it 0 63 characters Password 2 If your ISP requires a password to log in to a POP3 server set it 0 63 characters Reply E mail...

Page 109: ...age 107 and page 108 When finished click Next and go to step 10 10 Click Save after confirming the settings New settings are saved When finished Success is displayed Note If you click Save all buffere...

Page 110: ...arm transfer stops its operations until the camera finishes all transfers For example if the camera transfers 3 images per minute and 6 images in total the alarm detection will be in the following ope...

Page 111: ...wing requirements See page 54 and set up the E mail or FTP server Item Supported Feature E mail or FTP Server Operating System ISP Service IPsec supported Services for multiple static global addresses...

Page 112: ...VPN Router ISP Service in IPv4 ISP Service in IPv6 Services for static global addresses A global address must be set up to the WAN side IPv4 IPv6 Dual Stack or IPv6 over IPv4 Tunneling service Camera...

Page 113: ...otes If you wrongly set the time period your privacy may be seen Confirm the time period after the setup If you access the camera as an administrator you can view the image outside the time period 1 C...

Page 114: ...other settings the camera can be operated on both Monday and Tuesday Note An administrator can view images anytime regardless of the setting for the operation time Setting Description Enable Check th...

Page 115: ...d 3 Click Go to External Output Control page The External Output Control page is displayed Setting Description External Device Control Output If you check Open the internal transistor turns off and th...

Page 116: ...Click Indicator Control on the Setup page 2 Select indicator option Clicking Cancel cancels your settings without saving changes Notes See page 12 in the Installation Troubleshooting for indicator dis...

Page 117: ...Wireless Status Displays wireless information see page 118 3 Restart Restarts the camera see page 119 4 Update Firmware Updates the camera firmware see page 120 5 Save Settings Creates a configuratio...

Page 118: ...llowing page Note See Panasonic Network Camera support website at http panasonic co jp pcc products en netwkcam for details about status information 3 1 2 Confirming the Wireless Status The Wireless S...

Page 119: ...ted by pressing the RESTART button or by disconnecting the power cord from the outlet and reconnecting it again Note When the camera restarts the buffered images will be deleted The buffered images on...

Page 120: ...uffered images on the internal memory will be deleted after the firmware update The buffered images on the SD memory card are not deleted The firmware version is displayed on the Top page and the Stat...

Page 121: ...ware 5 Select the firmware including directory information and click Open The firmware file name is displayed 6 Confirm the firmware file name and click Update Firmware Clicking Cancel takes you back...

Page 122: ...Operating Instructions 122 7 Confirm that the version number on the Top page is updated If the version number is updated the firmware update is complete Updated version...

Page 123: ...tenance page 2 Click Save 3 Click Save on the File Download dialog box 4 Specify the location and click Save on the Save As dialog box The configuration file is saved in the location Notes The file ex...

Page 124: ...you try to update the camera create a configuration file after updating the firmware If there is a firmware version difference between the camera that you create a configuration file from and the cam...

Page 125: ...er name password IP address subnet mask etc are reset to factory default If the camera is reset to factory default the network connection mode changes to Automatic Setup Reconfigure the camera seeing...

Page 126: ...ng 1 to 6 items Clicking Help on the Support page displays the next page Support 1 Help Displays the Help page see page 126 2 Wireless Help Displays the Wireless Help page see page 127 3 Product Infor...

Page 127: ...nd Wireless Status Clicking Wireless Help on the Support page displays the next page Note Wireless Help is displayed only when logging in as an administrator 3 2 3 Seeing Product Information You can s...

Page 128: ...nformation You can see support information on the Panasonic Network Camera support website Clicking Support Information on the Support page displays the URL click it Note If the camera is not connecte...

Page 129: ...minal is controlled only by External Output Control page on page 115 Pin Features G GND pin 1 External Sensor Input 1 Use it by opening or GND short circuit G GND pin 2 External Sensor Input 2 Use it...

Page 130: ...to the camera may result if a device is connected to the external I O that exceeds its electrical capability see page 129 The low voltage current circuits and high voltage current circuits are in the...

Page 131: ...e Pressing the RESTART button restarts the camera Notes After removing the sunshade press the RESTART button All buffered images on the internal memory are deleted when restarting the camera The buffe...

Page 132: ...ULT RESET button for 1 second when the camera is on The indicator blinks orange and then turns off for 5 seconds Do not turn off the camera until the indicator lights green Notes After removing the su...

Page 133: ...DHCP only Enable Port No Static DHCP only 80 20 21 25 and 110 is not available IP address Static only 192 168 0 253 When setting Static 1 Subnet Mask Static only 255 255 255 0 When setting Static 1 Ho...

Page 134: ...vailable IP address Static only Blank When setting Static 1 Default Gateway Static only Blank When using Gateway 1 DNS Server 1 DNS Server 2 Blank When using DNS 1 Max Bandwidth Usage Mbps Unlimited 0...

Page 135: ...entication Open System WEPKey 1 4 ASCII 13 Characters 128 bit UPnP Auto Port Forwarding Disable Display Shortcut Icon in My Network Places Enable Viewnet cam com Enable No check Date and Time Time Set...

Page 136: ...nimum 45 degrees 45 20 degrees Home Position 0 degrees 45 20 degrees Maximum 20 degrees 45 20 degrees Return to Specified Position Time Do not move Do not move 10 30 min 1 h Specified Position Home Po...

Page 137: ...g administrator 6 15 characters 3 Retype Password Blank When setting administrator 6 15 characters 3 General User User ID List Blank User Name Blank When setting general user 6 15 characters 3 Passwor...

Page 138: ...3 5 10 30 60 s or Motion Multi Camera Image Resolution 320 x 240 160 x 120 or 320 x 240 Multi Camera Image Quality Standard Favor Clarity Standard or Favor Motion Multi Camera Refresh Interval Motion...

Page 139: ...ti Camera 1 15 characters 7 Buffer Transfer Status Off Trigger Timer Active Time of Trigger Always Image Setting Image Resolution 320 x 240 160 x 120 320 x 240 640 x 480 Image Quality Standard Favor C...

Page 140: ...of 1 65535 3 Enter ASCII characters see page 150 But Space and are not available 4 Enter ASCII characters for the host name see page 150 But Space and are not available 5 Enter ASCII characters for t...

Page 141: ...After taking away the sand or the dust on it wipe it with a dry cloth Notes Do not use alcohol polishing powder cleanser benzine thinner wax petroleum products or hot water to wipe the camera Also av...

Page 142: ...w Set the IP address in the range of the number specified in the class corresponding to your local network scale OS Steps Windows XP Start Settings Control Panel Network and Internet Connections Netwo...

Page 143: ...r a DHCP setting Disabling IPsec Displaying the Setup page Finding the camera 1 Insert the Setup CD ROM into the CD ROM drive of your PC If the Panasonic Network Camera Setup window does not appear cl...

Page 144: ...y to find multiple cameras each MAC address beside the Ethernet LAN port verifies which camera you are setting up See page 33 in the Installation Troubleshooting for the setup from the MAC address Aut...

Page 145: ...tion Troubleshooting for the local and Internet access setup Manual Setup window Set up each parameter seeing page 44 page 46 If more than 20 minutes have passed since the camera was turned on the cam...

Page 146: ...irewall of a proxy server in a corporate environment may prevent access to the camera Consult your network administrator Notes A proxy server is used to protect your network connected to the Internet...

Page 147: ...147 3 Click the Connections tab and click LAN Settings 4 See if the Use a proxy server check box is checked or not If checked click Advanced If not checked click Cancel Proxy settings are not required...

Page 148: ...e camera IP address into the Do not use proxy server for addresses beginning with data field Example 192 168 0 253 6 Click OK Note When accessing the camera via a proxy server the Talk Button is displ...

Page 149: ...g on Web Browser The old image may be displayed In this case set the web browser following the steps below OS Steps Windows XP Start Settings Control Panel Programs Windows Components Select Network S...

Page 150: ...ating Instructions 150 3 11 ASCII Character Table space 0 1 2 3 4 5 6 7 8 9 ASCII Character Table A B C D E F G H I J K L M N O P Q R S T U V W X Y Z _ a b c d e f g h i j k l m n o p q r s t u v w x...

Page 151: ...e Favor Clarity Standard Favor Motion Mobile Phone 640 x 480 pixels File Size About 60 KB About 50 KB About 33 KB About 20 KB Buffered Images About 40 About 60 About 100 320 x 240 pixels File Size Abo...

Page 152: ...00 About 47 000 About 23 000 About 11 000 Favor Clarity About 130 000 About 67 000 About 33 000 About 16 000 About 8 000 320 x 240 pixels Favor Motion About 110 000 About 58 000 About 29 000 About 14...

Page 153: ...Infinity Caliber Ratio F No F3 5 Horizontal Viewing Angle 53 Exposure Auto Wireless Specifications Items Specifications Communication mode Communication Standard IEEE 802 11b 802 11b g 802 11g exclus...

Page 154: ...x 30 frames second 320 x 240 or 160 x 120 Supported Protocols IPv4 IPv6 Dual Stack IPv4 TCP UDP IP HTTP FTP SMTP DHCP DNS ARP ICMP POP3 NTP IPsec UPnP IPv6 TCP UDP IP HTTP FTP SMTP DNS ICMPv6 POP3 NDP...

Page 155: ...ptor Input 120 V AC 60 Hz Output 12 V DC 750 mA Consumption wired About 3 W 6 5 W during pan tilt scan Consumption wireless About 6 W 10 W during pan tilt scan Temperature Operation 20 C 4 F to 50 C 1...

Page 156: ...Operating Instructions 156...

Page 157: ...Operating Instructions 157 Index...

Page 158: ...rnal Output page 115 F FACTORY DEFAULT RESET Button 132 For IPv4 Connection 6 For IPv6 Connection 7 G General User page 81 H Help page 126 Home Position 25 How to Use This Documentation 5 I Image Disp...

Page 159: ...Camera page 17 Specifications 153 Status page 118 Support Information page 128 Support page 126 System Requirements for your PC 6 T Talk 29 Timer Image Buffer Transfer 91 Top page 14 Trademarks 5 Tra...

Page 160: ...c Servicenters are listed in the servicenter directory Call 1 800 272 7033 for the location of an authorized servicenter This Network Camera is designed for use in the United States of America Sale or...

Reviews: