background image

63

Camera menu items

(continued)


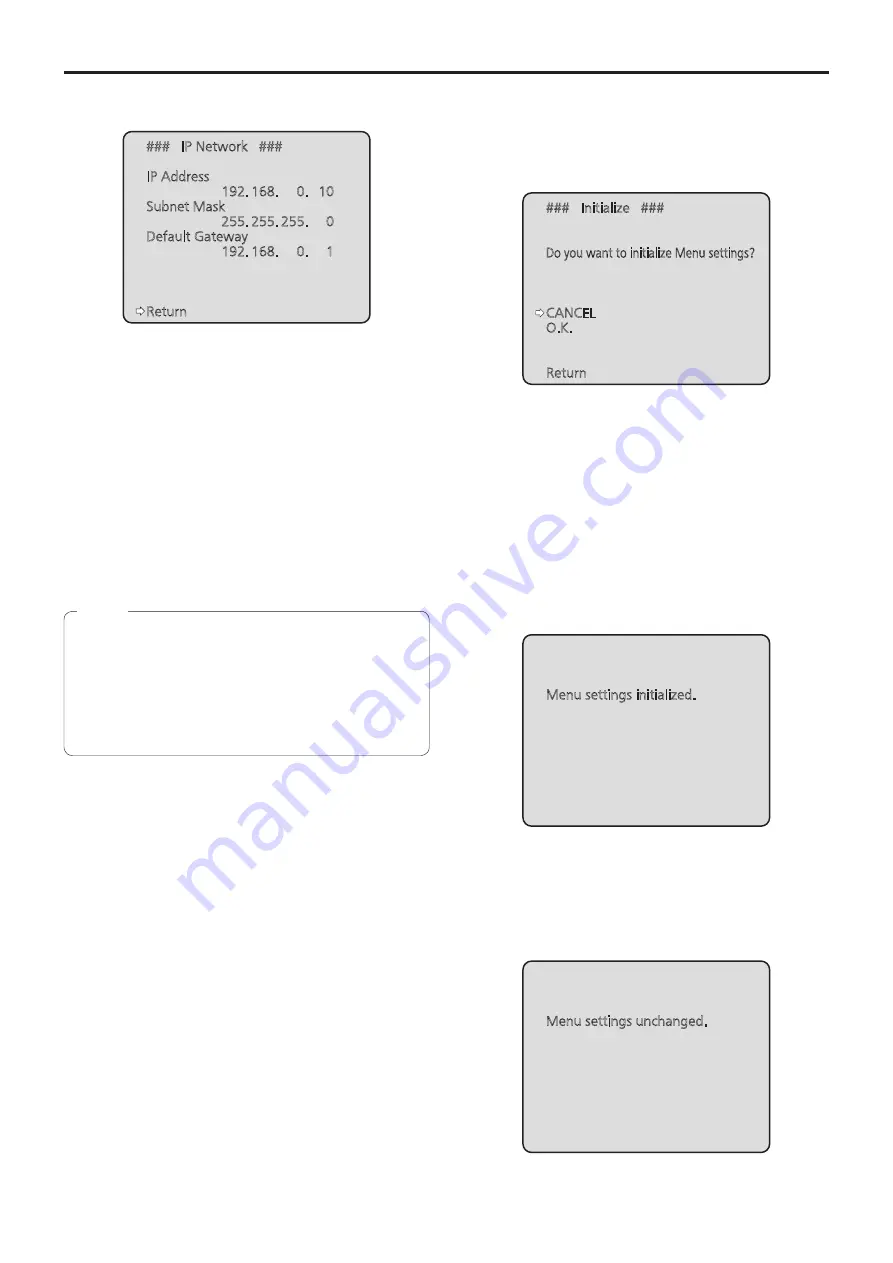
IP Network screen

 ###   IP Network   ###

 IP Address


192. 168.    0.   10

 Subnet Mask


255. 255. 255.    0

 Default Gateway


192. 168.    0.    1

 Return

IP Address

This is selected to display the IP address which has been 
set for the unit.

Subnet Mask

This is selected to display the subnet mask which has 
been set for the unit.

Default Gateway

This is selected to display the default gateway which has 
been set for the unit.


On this screen, the IP Address, Subnet Mask and 
Default Gateway settings can be displayed but they 
cannot be changed. 
To change an address, use “Network setup screen 
[Network]” (page 103) on the Web setting screen or 
“Use the Easy IP Setup Software to establish the unit’s 
settings” (page 25).

Note

Return

Use this to return to the previous menu.


Concerning initialization

When “Initialize” is selected on the Maintenance screen, the 
Initialize screen appears.

Initialize screen

 ###   Initialize   ###

 Do you want to initialize Menu settings?

 CANCEL

 O.K.

 Return


 When the cursor is moved to “O.K.” on the Initialize 
screen and the setting is entered, the Menu settings 
initialized screen is displayed for 5 seconds, and the 
camera settings are restored to the settings which were 
established when the camera was purchased (“Camera 
menu item table” (pages 64 to 66)). 
However, the Format settings and Frequency settings 
(page 55) and network settings are not initialized. 
When the initialization operation is completed, the 
Initialize screen is restored to the display.


The settings of the priority mode (page 56, 
page 77) are not initialized. 

Menu settings initialized screen

 Menu settings initialized.


 When the cursor is moved to “CANCEL” on the 
Initialize screen and the setting is entered, the Menu 
settings unchanged screen is displayed for 5 seconds, 
the initialization operation is not performed, and the 
Initialize screen returns to the display.

Menu settings unchanged screen

 Menu settings unchanged.

Summary of Contents for AW-HE42KP

Page 1: ...odel No AW HE42WE Model No AW HE42KE Operating Instructions HD Integrated Camera Before operating this product please read the instructions carefully and save this manual for future use Please carefully read the Read this first pages 2 to 8 of this Manual before use PJ EJ ...

Page 2: ...oying interference use the recommended accessories only CAUTION In order to maintain adequate ventilation do not install or place this unit in a bookcase built in cabinet or any other confined space To prevent risk of electric shock or fire hazard due to overheating ensure that curtains and any other materials do not obstruct the ventilation CAUTION The mains plug of the power supply cord shall re...

Page 3: ...RUCTIONS 1 Read these instructions 2 Keep these instructions 3 Heed all warnings 4 Follow all instructions 5 Do not use this apparatus near water 6 Clean only with dry cloth 7 Do not block any ventilation openings Install in accordance with the manufacturer s instructions 8 Do not install near any heat sources such as radiators heat registers stoves or other apparatus including amplifiers that pro...

Page 4: ...ese symbols are only valid in the European Union If you wish to discard the item s please contact your local authorities or dealer and ask for the correct method of disposal The symbols on this product including the accessories represent the following AC DC Class II equipment The construction of the product is double insulated ...

Page 5: ...ipment and shall be easily accessible To completely disconnect this equipment from the AC mains disconnect the power cord plug from the AC receptacle CAUTION Check the installation at least once a year An improper installation could cause the unit to fall off resulting in personal injury CAUTION Do not pick up and move the unit while the tripod is attached The fitting may break under the weight of...

Page 6: ...hielded cables which provide quality performance for high frequency applications as connecting cables for IEEE1394 and USB When connecting to the HDMI signal terminal use multilayer shielded cables which provide quality performance for high frequency applications If your apparatus is supplied with ferrite core s they must be attached on cable s following instructions in this manual 2 Performance l...

Page 7: ...emovable fuse cover you must ensure that it is refitted when the fuse is replaced If you lose the fuse cover the plug must not be used until a replacement cover is obtained A replacement fuse cover can be purchased from your local dealer Before use Remove the connector cover How to replace the fuse The location of the fuse differ according to the type of AC mains plug figures A and B Confirm the A...

Page 8: ...dance with your national legislation By disposing of them correctly you will help to save valuable resources and prevent any potential negative effects on human health and the environment For more information about collection and recycling please contact your local municipality Penalties may be applicable for incorrect disposal of this waste in accordance with national legislation Note for the bat...

Page 9: ...ic setup operations 44 Wireless remote control operations 44 When performing the operations using the wireless remote control 44 Camera menu items 45 Setting the camera menu items 45 Top Menu screen 45 Camera screen when Full Auto is selected 46 Camera screen when Manual1 to 3 is selected 47 Contrast 1 2 screen 47 Contrast 2 2 screen 48 Picture 1 3 screen 50 Picture 2 3 screen 51 Picture 3 3 scree...

Page 10: ...ce Distributing copying disassembling reverse compiling reverse engineering and also exporting in violation of export laws of the software provided with the unit are expressly prohibited Abbreviations The following abbreviations are used in this manual Microsoft Windows 7 Professional SP1 32 64 bit is abbreviated to Windows 7 Microsoft Windows 8 Pro 32 64 bit is abbreviated to Windows 8 Microsoft ...

Page 11: ...ers The unit is available in two color variations white or black to suit your intended application and environment Equipped with a codec engine the unit can output Full HD images at up to 60 fps via a network Changing the Priority Mode enables operation for various applications Required personal computer environment CPU When using 1080 60p 59 94Hz and 1080 50p 50Hz Intel CoreTM i7 3 4 GHz or highe...

Page 12: ...ited content and does not guarantee any content if recording or editing does not work properly Likewise the above also applies in a case where any type of repair is made to this unit Network security As you will use the unit connected to a network your attention is called to the following security risks A Leakage or theft of information through the unit B Use of the unit for illegal operations by ...

Page 13: ...mages are output in this case The iris will be fixed at open IP video output function featured The unit is equipped with image compression and IP transmission LSI capabilities IP video transmission in SD format is possible In addition output at up to 60 fps is possible for Full HD images Employing the functions of this chip together with IP control opens the door to uses in a wide range of applica...

Page 14: ...s the PoE standard IEEE802 3at compliant 2 If the AC adaptor and a PoE power supply are connected simultaneously the AC adaptor will have priority Use a category 5e cable or higher when using a PoE power supply The maximum length of the cable between the power supply unit and the unit is 100 meters 328 ft Using a cable that is lower than category 5e may result in reduced power supply capabilities ...

Page 15: ...ntion wire 1 already attached to the unit Bracket mounting screws bind head M4 10 mm 4 AC adaptor 1 Power cable for AW HE42WP AW HE42KP 1 for AW HE42WE AW HE42KE 3 For U K and Saudi Arabia For Continental Europe etc For India only This product is equipped with 3 types of AC mains cable Appropriate mains cable must be used in each local area since the other type of mains cable is not suitable Optio...

Page 16: ...ual operations will no longer be possible for some of the items When using the ATW auto tracking white adjustment function under fluorescent lights the white balance may vary In some situations it may be hard to focus at the auto setting In cases like this select the manual setting and focus manually The appropriate brightness may not be obtained when shooting bright objects using the auto setting...

Page 17: ...em parts The optical system parts are the very heart of the camera Under no circumstances must they be touched In the unlikely event that they have become dusty remove the dust by using a camera blower or by wiping them gently with a lens cleaning paper Do not point the camera directly at the sun or a laser beam no matter whether it is turned on or not Taking images of the sun laser beams or other...

Page 18: ...ensing directions in which the wireless remote control signals travel Note If the unit is installed near fluorescent lights plasma monitors or other such products or if the unit is exposed to sunlight the effects of the light may make it impossible for the unit to be operated using the wireless remote control Be sure to follow the steps below for installation and use Take steps to ensure that the ...

Page 19: ...r side eStatus display lamp This lights in the following way depending on the status of the unit Orange When the standby status is established Green When the power is on Red When trouble has occurred in the unit Green and blinks twice When a signal matched by the remote control ID has been received from the wireless remote control optional accessory while the power is on Orange and blinks twice Wh...

Page 20: ... clamp This is used to hold the cable connection to the DC IN connector and prevent it from becoming disconnected oGround connector Connects to the ground connector on a wall outlet ground bar etc for grounding Installation Instructions Connections Note on grounding pRS 422 connector RS 422 This RS 422 connector RJ 45 is connected when exercising serial control over the unit from an external devic...

Page 21: ...s OFF SW8 Communication connector RS 422 RS 232C OFF Perform switch settings before turning the unit on Cameras whose camera address setting switches are set to AUTO cannot coexist with cameras whose switches are set to 1 to 7 Manually setting multiple cameras to the same address will not allow you to control multiple cameras from a single controller simultaneously Notes Service switch settings 1 ...

Page 22: ... selected the unit corresponding to the selected button can be operated eSET button If this button is pressed when one of the Manual1 to 3 settings has been selected for Scene on the camera menu and the AWB A memory or AWB B memory has been selected by the white balance adjustment the white balance is automatically adjusted and registered in the selected memory fMODE button This is used to select ...

Page 23: ...tored kFOCUS buttons F N These are used to adjust the lens focus manually when the manual setting is established for the lens focus The focus is adjusted in the far using the F button and in the near using the N button lA FOCUS button This is used when automatically adjusting the lens focus mM FOCUS button This is used when manually adjusting the lens focus The FOCUS buttons F and N are used when ...

Page 24: ... these units using wireless remote controls set a different remote control ID for each control When using one unit set the remote control ID to CAM1 unless the setting needs to be changed Setting procedure Operate the unit s camera menu or the web screen to select a remote control ID CAM1 to CAM4 The camera s CAM1 to CAM4 settings correspond to the CAM1 to CAM4 buttons on the wireless remote contr...

Page 25: ...le camera Similarly do not perform the Auto IP setting operation of the remote camera controller AW RP50 at the same time The IP address settings may no longer be recognized as a result When you start the Easy IP Setup Software you may be asked for the administrator account password To enhance security the Easy IP Setup Software is designed so that when around 20 or more minutes have passed after ...

Page 26: ...eX must be installed in your personal computer When you display the Live screen Live on the personal computer for the first time the installation screen for the plug in viewer software ActiveX appears Follow the instructions on the screen to perform installation Depending on the operating environment of your computer you may need to start Internet Explorer with an administrator account during inst...

Page 27: ...ame and password Select 1 Administrator for the access level Then click Set button D Delete the default user name Click the Delete button after selecting the user name to be deleted admin 1 Depending on the model used the screens shown in the explanations may differ to the actual camera screens User name and password management Use a combination of characters and numbers that is difficult to guess...

Page 28: ...preferences When continuing to shoot in the same circumstances there is no need to select another mode 5 Start shooting After shooting turn off the power of all the units and devices in the system If Full Auto has been selected as the setting for Scene on the camera menu for example all the auto settings will be turned on and manual operations will no longer be possible for some of the items Note ...

Page 29: ...ay lamp Green after the initial setting operation is completed The pan tilt unit is moved to the position which was stored in the memory when the transition to the STANDBY mode was made POWER ON preset The pan tilt unit is moved to the setting which was established immediately prior to the transition to the STANDBY mode when the power has been turned on If the power is turned off without transferr...

Page 30: ...n also be controlled from a personal computer NDI HX Transmits video to NewTek NDI compatible software applications and hardware devices over a network The function supports H 264 IP transmission using NDI HX Functions that can be and functions that cannot be controlled simultaneously Priority Mode MJPEG IP streaming H 264 IP streaming Recording MP4 to SD card USB Video Class IP 1920 1080 1280 720...

Page 31: ...ions and suits your preferences The settings can be changed by menu operations The results of the white balance and other adjustments are stored in the memory separately by shooting mode Be absolutely sure to select the shooting mode before making any adjustments If Full Auto has been selected as the setting for Scene on the camera menu for example all the auto settings will be turned on and manua...

Page 32: ...he button The Camera sub menu is displayed on the monitor Camera Scene Full Auto Contrast Level 0 Auto Slow Shutter Off ND Filter Auto Day Night Day Night Day Level Return 5 Press the or button to bring the cursor to Scene 6 Press the button The shooting mode blinks 7 Press the or button to select the shooting mode Full Auto Manual1 Manual2 or Manual3 to be used and press the button to enter the s...

Page 33: ...Changing the direction or zoom at low speed Press the SLOW button When this button is held down the speed can be set to an even lower speed When it is tapped the normal speed low speed is restored The lens focus control speed is also changed at the same time When performing the operations using the controller Changing the camera s direction Moving the camera toward the left or right panning Tilt t...

Page 34: ...ss the A FOCUS button to switch to auto focusing The camera picture is too light or too dark 1 Press the A IRIS button to switch the lens iris adjustment to auto 2 Press the AUTO button of GAIN to switch the gain adjustment to auto Something is wrong with the coloring of the camera pictures Refer to Auto tracking white adjustment ATW page 41 and switch to ATW When performing the operations using t...

Page 35: ...ccurately Its setting also has an effect on the color tones of the entire screen It must be performed when using the unit for the first time or when the unit has not been used for a prolonged period It must be performed when the lighting conditions or brightness has changed Once the white balance has been attained no further adjustment is required provided that the unit is going to be used under t...

Page 36: ...o manual the subject may go out of focus during panning tilting and zooming Therefore the unit comes with a function which compensates for this Focus compensation during zooming function Focus ADJ With PTZ page 58 page 95 page 98 Note Manually adjusting the iris The lens iris can be adjusted manually When performing the operations using the wireless remote control 1 Press the M IRIS button to swit...

Page 37: ...g the gain There are two ways to adjust the gain One way involves using the buttons on the wireless remote control or controller the other way involves using the Camera menu or Web setting The gain can be adjusted more precisely using the Camera menu or Web setting For further details refer to the Gain item on page 48 and page 89 When Shooting mode Scene on the AW HE42 is set to Full Auto the gain...

Page 38: ...formed while the recalling of a preset is in progress However the preset actions will be canceled If a preset is recalled while the recalling of another preset is in progress the current preset actions are canceled and the newly selected preset is recalled Nothing will occur if a preset memory number to which a preset has not been registered is recalled Notes When performing the operations using t...

Page 39: ...essing the buttons on the controller provided that they are going to be used under the same conditions as the ones established when the values were set There is no need to set it again Once a new setting is entered the previous setting will be erased Use the two memories to store settings corresponding to different shooting conditions When Shooting mode Scene on the AW HE42 is set to Full Auto the...

Page 40: ...e displayed Press the MODE button to switch to the camera picture When the adjustment has failed an error message such as OUT RANGE NG HIGH LIGHT NG LOW LIGHT NG ATW NG 3200K NG 5600K NG or VAR NG is displayed However this does not appear when OSD Status is set to Off in the camera menu In Night mode page 46 page 49 the white balance adjustment cannot be used Notes When performing the operations u...

Page 41: ... out of adjustment when a different kind of light source such as sunlight or fluorescent lighting applies When switching from Night mode to Day mode the white balance may shift out of adjustment Notes 3200K and 5600K presets When 3200K or 5600K is selected for the white balance the white balance is set using a color temperature of 3200K equivalent to halogen light or 5600K equivalent to daylight r...

Page 42: ...n 2 Press the or button to bring the cursor to Picture 3 Press the button The Picture 1 3 sub menu is displayed Picture 1 3 Chroma Level 0 White Balance Mode VAR Color Temperature 3200K R Gain 0 B Gain 0 Pedestal 0 Return 4 Press the or button to bring the cursor to White Balance Mode 5 Press the button White Balance Mode starts blinking 6 Press the or button to change the White Balance Mode to AW...

Page 43: ... the procedure in How to select the shooting mode page 32 under Selecting the shooting modes scene files 4 Press the or button to bring the cursor to Picture 5 Press the button The Picture 1 3 sub menu is displayed Picture 1 3 Chroma Level 0 White Balance Mode VAR Color Temperature 3200K R Gain 0 B Gain 0 Pedestal 0 Return 6 Press the or button and bring the cursor to Pedestal Picture 1 3 Chroma L...

Page 44: ...o confirm Canceling setting changes Press the MENU button hold for less than 2 seconds while the setting value is blinking Exiting camera menu operations Press and hold the MENU button for about 2 seconds When performing the operations using the wireless remote control 1 Press the CAM1 CAM2 CAM3 or CAM4 button to select the unit which is to be operated 2 Press the MENU button for 2 seconds The Top...

Page 45: ... hierarchical level whereas Camera and Maintenance indicate that the second hierarchical level is now displayed Menu items accompanied by a mark indicate data which is stored on a scene by scene basis menu items accompanied by a mark indicate data which is stored together for one camera regardless of the scenes Top Menu screen Top Menu Camera Scene Full Auto System Maintenance Camera Select this t...

Page 46: ...is can only be configured when Scene is set to Full Auto ND Filter Auto Through 1 4 1 16 1 64 Adjust light intensity by switching between optical ND filters that are built into the unit Auto Automatically switches ND filters depending on the lighting conditions of the subject and shooting location This can only be configured when Scene is set to Full Auto Through ND filter is not used 1 4 Reduces ...

Page 47: ... and frame addition are controlled and the camera brightness is adjusted automatically Manual Operations are performed using the manually set values Contrast Level 10 to 10 Set here is the contrast level when the image brightness is adjusted This item can be set when Auto has been selected as the Contrast Mode setting Auto Shutter Limit For 59 94Hz Off 1 60 1 100 1 120 1 250 For 50Hz Off 1 50 1 10...

Page 48: ...as the Shutter Mode item setting When frame addition is performed it will appear as if the images are missing some frames Auto F Mix Max Gain 0dB 6dB 12dB 18dB When Auto for the Contrast Mode or Auto for the Frame Mix is selected the maximum frame addition amount can be set If frame addition is performed at the Auto setting it will appear as if the images are missing some frames Return Use this to...

Page 49: ... focus to auto Even when Auto is selected shooting may not switch between Day and Night mode as expected depending on the subject In such cases perform the following adjustments Switching from Day mode to Night mode Switch when the gain value and frame storage value are at their maximum due to brightness adjustment When the shooting mode Scene is Manual1 to Manual3 you can adjust the AGC Max Gain ...

Page 50: ...escent lighting is used as the light source VAR Specify a color temperature from 2400K to 9900K Color Temperature 2400K to 9900K Specify a color temperature from 2400K to 9900K in increments of about 100K This is enabled when White Balance Mode is set to VAR R Gain B Gain 30 to 30 When AWB A AWB B or VAR is selected as the White Balance Mode setting the white balance can be finely adjusted after a...

Page 51: ... distorted images This effect is not recommended in shooting locations where significant vibration may occur When the HDR setting is changed the monitor images will go momentarily black and the audio will be muted Furthermore IP video may stop for about 30 seconds When Low or High is selected it will take longer for the brightness of the image to converge When Low or High is selected brightness ca...

Page 52: ...amma Level Low Mid High This item is used to adjust the gamma compensation level This is enabled when Gamma Type is set to Normal When Low is set the images appear sedate and composed The resulting gamma curve has a gentle gradient in the low brightness areas and the contrast is sharper Conversely when High is set the tonal range in the dark area is expanded so that the images take on a lighter to...

Page 53: ... Normal EBU NTSC User The preset color matrix data is loaded and the saturation and phase are compensated accordingly When User is selected the saturation and phase can be finely adjusted using the 16 axis color matrix B to Cy_B_B 90 180 270 0 22 5 45 67 5 112 5 135 157 5 202 5 225 247 5 292 5 315 337 5 B B_B_Mg B_Mg_Mg Mg Mg_R R R_R_Yl R_Yl_Yl Yl Yl_Yl_G Yl_G_G G G_Cy Cy Cy_Cy_B Cy_B_B Mg 61 R 10...

Page 54: ...phase alignment when multiple cameras are to be used or when the unit is to be used in combination with other devices Genlock Horizontal Phase 0 Horizontal Phase Step 1 Return Horizontal Phase 206 to 49 This is used to adjust the horizontal phase during genlock Horizontal Phase Step 1 to 10 This is selected to set the amount by which the Horizontal Phase setting is to be adjusted Return Use this t...

Page 55: ...s of the same video format are output from the HDMI and SDI OUT connectors The setting values in the menu will also change to match the format configured later When HDMI is set to Auto the unit automatically determines the output video resolution based on information from the connected device This will result in the SDI setting changing to match the video format of HDMI Frequency 59 94Hz 50Hz This...

Page 56: ... personal computer NDI HX Transmits video to NewTek NDI compatible software applications and hardware devices over a network The function supports H 264 IP transmission using NDI HX When the priority mode is changed the operation of the mode before the change is forcefully stopped The IP and SD card mode require various settings to be configured from a personal computer connected via the network N...

Page 57: ...nfirm the format is set to the post change format and the display returns to the Output screen If you move the cursor to No and confirm the format is set to the pre change format and the display returns to the Output screen Similarly the display will return to the Output screen if an operation is not performed within 30 seconds Changing the frequency When the currently selected frequency is change...

Page 58: ...regenerated Mode A Pan Tilt Zoom including digital zoom Focus Iris Gain White BAL Mode B Pan Tilt Zoom including digital zoom Focus Iris Mode C Pan Tilt Zoom including digital zoom Focus Freeze During Preset Off On Turn the function for freezing images during preset playback Off On When this is set to On preset playback is performed with a still of the image immediately preceding the start of pres...

Page 59: ...focus and such D Extender Magnification 1 4 2 0 4 0 6 0 8 0 Set the magnification for the digital extender function OIS Off Mode1 Mode2 Set the optical image stabilization function Off Image stabilization function not used Mode1 Image stabilization function used optical 2 axis compensation Mode2 Image stabilization function used optical electronic 4 axis compensation Mode2 cannot be selected when ...

Page 60: ... AC adaptor cable and LAN cable and plug them back in 3 Perform the operation for turning on the unit s power from the wireless remote control 4 After changing this item turn off the unit s power and turn it back on Notes IR ID CAM1 CAM2 CAM3 CAM4 Configure the unit s remote control ID The settings for this item correspond to the CAM1 to CAM4 buttons on the wireless remote control Return Use this ...

Page 61: ...put with the volume set to high Line Middle Use the line input with the volume set to medium Line Low Use the line input with the volume set to low Plugin Power Off On Turn the plugin power for the audio Off On ALC Off On Turn automatic level adjustment for the audio Off On Equalizer Off Low Cut Speech Enhancement Set the equalizer function Off Do not use the equalizer function Low Cut Cut low fre...

Page 62: ...which the user can check the IP Address Subnet Mask and Default Gateway settings which have been established in the unit Initialize This is selected to display the Initialize screen on which the user can initialize the camera settings For details on operation refer to Concerning initialization on page 63 Return Use this to return to the previous menu Firmware Version screen Firmware Version Ver 1 ...

Page 63: ...e Initialize screen appears Initialize screen Initialize Do you want to initialize Menu settings CANCEL O K Return When the cursor is moved to O K on the Initialize screen and the setting is entered the Menu settings initialized screen is displayed for 5 seconds and the camera settings are restored to the settings which were established when the camera was purchased Camera menu item table pages 64...

Page 64: ...trast 2 2 Gain Auto Auto 0dB to 48dB 3dB increments AGC Max Gain 24dB 6dB to 48dB 6dB increments ND Filter Through Through Through 1 4 1 16 1 64 Day Night Day Day Day Night Auto Night Day Level Mid Mid Low Mid High Picture Picture 1 3 Chroma Level 2 3 to 3 White Balance Mode Manual1 ATW Manual2 AWB A Manual3 AWB B ATW AWB A AWB B 3200K 5600K VAR Color Temperature 3200K 2400K to 9900K approx 100K i...

Page 65: ...p 50Hz Auto Auto 1080 50p 1080 50i 1080 25PsF 1080 25p 720 50p Format SDI 59 94Hz 1080 59 94i 1080 59 94p 1080 59 94i 1080 29 97PsF 1080 29 97p 720 59 94p 50Hz 1080 50i 1080 50p 1080 50i 1080 25PsF 1080 25p 720 50p Frequency AW HE42WP AW HE42KP 59 94Hz AW HE42WE AW HE42KE 50Hz 59 94Hz 50Hz Priority Mode IP IP SD card USB NDI HX Others Others 1 4 Install Position Desktop Desktop Hanging Preset Spee...

Page 66: ... Low Plugin Power Off Off On ALC On Off On Equalizer Off Off Low Cut Speech Enhancement Protocol Model Select SEVIHD1 SEVIHD1 SBRC300 SBRCZ330 Reserved1 Reserved2 Reserved3 Reserved4 Reserved5 Reserved6 Reserved7 Maintenance Firmware Version Version shipped IP Network IP Address 192 168 0 10 Subnet Mask 255 255 255 0 Default Gateway 192 168 0 1 Initialize CANCEL CANCEL OK Camera menu item table co...

Page 67: ...mera View 4S plug in viewer software must have already been installed in order to display the unit s IP videos using a personal computer which is running Windows This is not required for a personal computer which is running OS X Mac For further details refer to Installing the plug in viewer software page 26 Notes Displaying the web screen using a personal computer The procedure is explained here u...

Page 68: ...strictions imposed by the graphics processing GDI of the operating system installed may give rise to a phenomenon called screen tearing where parts of the picture are not displayed in synchronization although this will depend on the personal computer used On a personal computer running Windows if H 264 transmission page 81 is set to On H 264 images and JPEG images can be displayed When it is set t...

Page 69: ...creen Live Single display mode You can display images from the camera on a personal computer and perform camera operations such as pan tilt zoom and focus control The items displayed on the screen will differ depending on whether the H 264 or JPEG button is selected under Compression When H 264 is selected 3 2 4 7 1 10 8 9 20 13 11 12 14 16 15 18 23 22 21 19 17 6 7 1 Stream menu Other menu 5 When ...

Page 70: ...g from another screen When the screen is updated Note 4 Stream buttons Stream When H 264 is selected These buttons appear only when H 264 images are displayed 1 When selected the text on the button turns green and the images in the main area appear according to the settings configured for H 264 1 page 81 2 When selected the text on the button turns green and the images in the main area appear acco...

Page 71: ...ashing and the new setting to be entered If OSD menu display is set to On by Web screen operation the OSD menu is also displayed for the monitor video Note 7 Power ON button Power ON Standby button Standby Power ON Turn the unit on Standby Set the unit to Standby mode In the Standby mode all the buttons on the live screen Live except for the Multi screen list box Power ON button Standby button and...

Page 72: ...omatic adjustments 12 Control pad and its buttons To adjust the image in the horizontal or vertical direction panning or tilting left click the pad and the buttons The more the outside of the pad is clicked the faster the camera operates Adjustment is also possible by dragging the mouse Right click the pad to initiate zooming and focusing When the top half of the pad is clicked in the up or down d...

Page 73: ...e is displayed in full screen mode The aspect ratio of the displayed image will be adjusted according to the monitor size 18 Snapshot button Capture a snapshot single still image and display it in a separate window A menu appears when you right click the image and you can select Save to save the image to the personal computer You can also click Print to output from a printer The following settings...

Page 74: ...ub screens Multi screen consisting of 16 sub screens 1 1 Multi Screen list box Multi screen The live screen Live display method is selected here Single The IP videos of the connected camera are displayed 4Split 1 4 Group You can view multiple IP videos on a single screen by configuring the cameras for multi screen display beforehand in the Multi screen setup screen Multi screen page 100 Multi disp...

Page 75: ...45 4 Click the OK button Click OK again when the following screen appears While the initial settings remain used for the user name and password a message prompting the user to change the user name and password is displayed after authorization In order to ensure security the password for the user name of admin must be changed without fail It is also recommended that the password be changed at regul...

Page 76: ...splayed in the main area Multi screen setup screen Multi screen page 100 4 User mng button User mng When the User mng button is pressed the User mng screen is displayed in the main area User management screen User mng page 101 5 Network button Network When the Network button is pressed the Network setup screen is displayed in the main area Network setup screen Network page 103 6 Maintenance button...

Page 77: ... the priority mode is changed the operation of the mode before the change is forcefully stopped The IP and SD card mode require various settings to be configured from a personal computer connected via the network Notes Clock settings tab Date Time Configure the settings for the clock Set the clock using any of the three methods PC synchronization NTP and Manual z zsetup Display Set the display of ...

Page 78: ...08 Notes Live page tab Live page Configure the setting for the camera title Camera title Input the name of the camera here When the Set button is clicked the input name appears in the camera title display area The factory default setting is the model number of the unit You can enter between 0 to 20 half size characters The following characters can be displayed Half size numeric characters 01234567...

Page 79: ...20 1080 25p 6Mbps 1280 720 50p 15Mbps 1280 720 25p 8Mbps 1280 720 25p 4Mbps 1280 720 25p 2Mbps 1280 720 25p 1Mbps Record tally Turn the function for the tally lamp to light when recording to an SD card On Off Factory settings Off z zSD memory card information Remaining capacity Remaining capacity Original capacity Displays the remaining capacity and total capacity of the SD card Capacity is indica...

Page 80: ...ted on this screen z zInitial display settings for Live page Stream Select the images to display when the Live screen Live is opened Setting value H 264 1 Display videos H 264 1 H 264 2 Display videos H 264 2 H 264 3 Display videos H 264 3 H 264 4 Display videos H 264 4 JPEG 1 Display still images JPEG 1 JPEG 2 Display still images JPEG 2 JPEG 3 Display still images JPEG 3 Factory settings H 264 1...

Page 81: ...ue Fine Normal Factory settings Fine z zH 264 1 H 264 2 H 264 3 H 264 4 Configure the settings for H 264 images When the Priority Mode page 56 page 77 selection is NDI HX H 264 3 and H 264 4 cannot be selected Note H 264 transmission Whether to transmit the H 264 images is set here Factory settings On Internet mode over HTTP This setting is selected when transmitting H 264 images over the Internet...

Page 82: ...idth Depending on how the bit rate is changed the Frame rate value is automatically determined as 5fps to 30fps or 5fps to 25fps page 83 Factory settings Frame rate When the Priority Mode page 56 page 77 selection is NDI HX this item is fixed to Frame rate Note Frame rate Set the frame rate for H 264 images Setting value For 59 94Hz 5fps 15fps 30fps 60fps For 50Hz 5fps 12 5fps 25fps 50fps Factory ...

Page 83: ... Factory settings H 264 1 1920 1080 25fps 14336kbps H 264 2 1280 720 25fps 8192kbps H 264 3 640 360 25fps 4096kbps H 264 4 640 360 25fps 4096kbps When the Priority Mode page 56 page 77 selection is NDI HX the following settings will be available When 59 94 Hz has been set as the unit s frequency Image capture size Frame rate H 264 bit rate 1920 1080 60fps 8192kbps to 24576kbps 1920 1080 5fps 15fps...

Page 84: ...st port Audio Usable port number range 1024 to 50000 Only even numbers can be specified The port number cannot be set to 10670 Factory settings H 264 1 33004 H 264 2 33014 H 264 3 33024 H 264 4 33034 The unicast port number must be configured when Transmission type is set to Unicast port MANUAL Note Multicast address Enter the multicast IP address Images and audio will be sent to the specified IP ...

Page 85: ... 5fps 1 Settable when HDR is Off 2 Settable when HDR is set to Off and the frame rate is other than 60fps or 50fps 3 Not settable when HDR is Off When Priority Mode is set to SD card or USB Settings H 264 1 H 264 2 H 264 3 H 264 4 JPEG 1 JPEG 2 5 JPEG 3 Resolution 640 360 320 180 4 Frame rate System frequency 59 94 Hz 30fps 15fps 5fps System frequency 50 Hz 25fps 12 5fps 5fps 4 Settable when HDR i...

Page 86: ... to 4 Approx 66 Mbps On JPEG Image capture size Refresh interval Bit rate System frequency 59 94 Hz System frequency 50 Hz 1920 1080 30fps 25fps Approx 59 Mbps 15fps 12 5fps Approx 30 Mbps 5fps 5fps Approx 10 Mbps 1280 720 30fps 25fps Approx 44 Mbps 15fps 12 5fps Approx 22 Mbps 5fps 5fps Approx 8 Mbps 640 360 30fps 25fps Approx 15 Mbps 15fps 12 5fps Approx 8 Mbps 5fps 5fps Approx 3 Mbps 320 180 30...

Page 87: ...dium Use this when audio is input to the camera via line input Line Low Set the volume to low Use this when audio is input to the camera via line input Factory settings Line Middle Plugin Power Turn plug in power Off On Factory settings Off ALC Turn automatic level adjustment for the audio Off On Factory settings On Equalizer Set the equalizer function Setting value Off Do not use the equalizer fu...

Page 88: ...hed When Full Auto has been selected the detailed setting and adjustment menus are not displayed Manual1 to 3 In these modes the detailed settings and adjustments are established manually to match the prevailing shooting conditions and the user s preferences When the Manual1 Manual2 or Manual3 mode has been selected the detailed setting and adjustment menu for the mode concerned is displayed Facto...

Page 89: ...When Synchro is selected as the Shutter Mode 1 100 1 250 1 500 1 1000 1 2000 1 4000 1 10000 59 94 Hz to max 660 09 Hz 255 steps Factory settings 1 100 When 50 Hz has been set as the unit s frequency When Step is selected as the Shutter Mode When Synchro is selected as the Shutter Mode 1 120 1 250 1 500 1 1000 1 2000 1 4000 1 10000 50 00 Hz to max 570 12 Hz 255 steps Factory settings 1 120 Frame Mi...

Page 90: ...or Through When Auto is selected ND filters are switched automatically When filters are switched there will be a momentary marked change in image brightness Depending on the surrounding environment and conditions of use filter switching may not occur as expected even when Auto is selected Notes Day Night This is used to select normal shooting or low light shooting by exposing the subjects to infra...

Page 91: ...us values are erased Use each of the memories for a different purpose in accordance with the shooting conditions R Gain and B Gain adjustments cannot be performed when White Balance Mode is set to ATW 3200K or 5600K Notes Detail The image detail image sharpness is adjusted here When Low or High is selected the detail is enhanced Setting value Off Low High Factory settings Low Detail Level H The im...

Page 92: ...RS function which provides just the right amount of compensation when images with significant light dark differences are displayed When Low or High is selected the effect is enhanced even more Depending on the shooting conditions however the picture quality may drop with increased noise Setting value Off Low High Factory settings Off E DRS Sets the E DRS function which provides a greater amount of...

Page 93: ...rdingly When User is selected the saturation and phase can be finely adjusted using the 16 axis color matrix B to Cy_B_B Setting value Normal EBU NTSC User Factory settings Normal 90 180 270 0 22 5 45 67 5 112 5 135 157 5 202 5 225 247 5 292 5 315 337 5 B B_B_Mg B_Mg_Mg Mg Mg_R R R_R_Yl R_Yl_Yl Yl Yl_Yl_G Yl_G_G G G_Cy Cy Cy_Cy_B Cy_B_B Mg 61 R 104 Yl 168 G 241 Cy 284 B 348 ColorMatrix Color Posit...

Page 94: ...he home position if Home has been selected on the pull down menu This is used to delete the preset position setting which is currently being selected It does not function if Home has been selected on the pull down menu z zPan Tilt Lens Control Zoom Use this to enable or disable the digital extender Use this to adjust the zoom magnification to 1 0 Use this to adjust the zoom magnification in the Wi...

Page 95: ... settings Off When Off is set adjust the focus as required after zooming or set the focus to the auto mode This item can be selected only when Manual has been selected as the Focus Mode setting z zPreset Setting Preset Speed Table Set the preset speed table Slow Fast During preset playback preset actions are performed at Preset Speed 1 to 30 values that are based on the table set here Setting valu...

Page 96: ...e selected in the pull down menu The file name selected in the pull down menu is deleted The still image is recorded to the PRIVATE 100CDPFQ folder on the microSD card If the specified number is already used for a recorded still image the image is replaced A maximum of 99 images can be recorded The buttons are disabled if a memory card has not been inserted or if a still image with the specified n...

Page 97: ...0 50p z zOthers This item s setting is reflected when the Set button is pressed Install Position Desktop or Hanging is selected here as the method used to install the unit Setting value Desktop Stand alone installation Hanging Suspended installation Factory settings Desktop When Hanging has been selected the top bottom left and right of the images will be reversed and up down left right control fo...

Page 98: ...l image stabilization function Setting value Off Image stabilization function not used Mode1 Image stabilization function used optical 2 axis compensation Mode2 Image stabilization function used optical electronic 4 axis compensation Factory settings Off Mode2 cannot be selected when HDR is Low or High When Mode2 is selected the view angle changes to set aside image pixels for use during compensat...

Page 99: ... remote control 4 After changing this item turn off the unit s power and turn it back on Notes IR ID Configure the unit s remote control ID The settings for this item correspond to the CAM1 to CAM4 buttons on the wireless remote control Setting value CAM1 CAM2 CAM3 CAM4 Factory settings CAM1 CAM BAR Switch between color bar display and camera image display on the monitor and the web setup screen S...

Page 100: ... 168 0 10 Maximum number of characters 1 to 128 half size characters Factory settings Cam 1 to Cam 16 blank When connecting via HTTPS install the security certificate for the camera to be displayed page 117 When configuring a host name the DNS settings of the personal computer that will display the multi screen must be configured For details on the personal computer s DNS settings consult your net...

Page 101: ...ame 1 to 32 half size characters The user name is input here Enter the setting using the Set button The following characters can be displayed Half size numeric characters 0123456789 Half size alphabetical characters upper and lower cases ABCDEFGHIJKLMNOPQRSTUVWXYZ abcdefghijklmnopqrstuvwxyz Symbols _ Password Retype password 4 to 32 half size characters The password is input here Enter the setting...

Page 102: ... unit The unit cannot be set Factory settings 2 Camera control Host check You can view registered host IP addresses by clicking for Host check A host is indicated in the form of Registered IP address Access level Example 192 168 0 21 1 You can delete selected hosts IP addresses by clicking the Delete button at the right Priority stream settings tab Priority stream Click the Priority stream tab of ...

Page 103: ...ersonal computer that does not use the DHCP function and other network cameras For details on server settings consult your network administrator Factory settings Off IP address IPv4 Input the unit s IP address here when the DHCP function is not going to be used Input an address that will not duplicate an existing IP address which has been set for a personal computer or another network camera Facto...

Page 104: ...pecified IP address through a router use an IPv6 compatible router and enable the automatic configuration function for the IPv6 address Be sure to configure an IPv6 address that includes the prefix information provided by the IPv6 compatible router For details refer to the operating instructions for the router Note Default gateway When Manual is set to On for IPv6 network enter the default gateway...

Page 105: ...e MSS transmitted by a camera when viewing camera images using HTTP Setting value Unlimited 1460byte Unlimited 1460 byte Limited 1280byte Limited 1280 byte Limited 1024byte Limited 1024 byte Factory settings Unlimited 1460byte Normally it is recommended that the default setting be used Select Limited 1024byte Limited 1280byte when the maximum segment size MSS of the used communication line is limi...

Page 106: ...ver HTTP On Image capture size 1280 720 Image capture size 640 360 Max bit rate per client Max 8192 kbps Min 2048 kbps Max bit rate per client Max 4096 kbps Min 1024 kbps Transmission priority Best effort Transmission priority Best effort H 264 2 Internet mode over HTTP On H 264 transmission Off Image capture size 640 360 Max bit rate per client Max 4096 kbps Min 1024 kbps Transmission priority Be...

Page 107: ...ge 104 Note Directory name Enter the name of the directory to save the video data to be sent Maximum number of characters 0 to 256 half size characters Characters that can be entered Half size alphanumeric characters half size symbols However the following characters cannot be entered Factory settings blank User name Enter the user name login name for accessing the FTP server Maximum number of cha...

Page 108: ... IPv4 network on the Network tab of the network setup screen Network to On Note NTP server address When Manual is selected in the NTP server address setting input the IP address or host name of the NTP server Maximum number of characters 0 to 128 half size characters Characters that can be entered Half size alphanumeric characters half size symbols _ Factory settings blank To input the NTP server ...

Page 109: ...not displayed refer to No access is possible from the web browser in the Troubleshooting page 141 Notes z zHTTPS Using the HTTPS function enables access to the camera to be encrypted and communication safety to be improved See page 111 for more details on the HTTPS setup method This item s setting is reflected when the Set button is pressed CRT key generate A CRT key SSL encryption key is generate...

Page 110: ... security certificate To delete an enabled server certificate security certificate confirm that there is a backup to the said certificate in your personal computer or recording media A server certificate security certificate will be needed to reinstall it Note Connection This sets the method to connect to the unit Setting value HTTP Only HTTP connection is possible HTTPS Only HTTPS connection is p...

Page 111: ...icate Signing Request CSR page 114 4 Installing a Server Certificate page 115 Request to Certificate Authority CA Generate Server Certificate When using self signed certificates When using server certificates When using a server certificate the process from applying to the Certificate Authority CA to issuing a server certificate must be performed between customers and the Certificate Authority CA ...

Page 112: ...te the RSA key size must be in accordance with the demands of the Certificate Authority CA which will be applied to Note 3 Click the Execute button CRT key generation starts When CRT key generation is complete the size of the CRT key generated by the Current CRT key and the date and time generation concluded will be displayed Perform procedures 1 to 3 to change update the generated CRT key Because...

Page 113: ...lowing half size symbols _ When connecting the camera to the Internet set the address or host name to be accessed from the Internet in Common Name In this case when accessing the camera locally a security warning screen is displayed every time the camera is accessed even when a security certificate is installed When inputting the IPv6 address in Common Name surround the address with e g 2001 db8 1...

Page 114: ... name of the state 128 half size characters Locality Inputs the name of the city 128 half size characters Organization Inputs the name of the organization 64 half size characters Organizational Unit Inputs the name of the organizational unit 64 half size characters CRT key Displays the size of the current CRT key and the date and time generation was completed When using a server certificate the in...

Page 115: ...ive period of the server certificate has expired When the Confirm button is clicked the content of the installed server certificate security certificate is displayed in the CA Certificate Confirm dialog An asterisk is displayed in the Organizational Unit field only Click the Delete button to delete the installed server certificate security certificate When HTTPS is selected in Connection the serve...

Page 116: ...es to acquire and install root certificates and intermediate certificates When accessing the camera by HTTPS the image display speed and frame rate of the moving image may reduce When accessing the camera by HTTPS it may take some time for the images to be displayed When accessing the camera by HTTPS images may be disturbed and sound may be interrupted The maximum number of cameras that can be con...

Page 117: ...rnet in Common Name In this case when accessing the camera locally a security warning screen is displayed every time the camera is accessed even when a security certificate is installed When the security certificate is correctly installed an icon of the key will be displayed in the address bar of the web browser accessing the camera in the case of Internet Explorer 8 0 and 9 0 The screen will diff...

Page 118: ... 6 Select Place all certificates in the following store and click Browse 7 Select Trusted Root Certification Authorities and click OK 8 Click Next 9 Click Finish 10 Click Yes When importing is finished the The import was successful screen is displayed 11 Click OK Closing the web browser after importing the certificate and reconnecting to it will stop the Certificate error screen being displayed ...

Page 119: ...ogs Setting value Event log Displays the event logs Error log Displays the error logs Event log No Displays the log sequence numbers 1 indicates the latest information and up to 100 logs can be saved Date Time Displays the dates and times when the events occurred The dates and times when the events occurred are indicated in 24 hour format according to the clock of the unit Event code Displays the ...

Page 120: ... of characters to be used for the name of the directory in which the software will be stored and for the name of the software which has been downloaded to less than 250 characters Note 2 Click the Browse button and specify the downloaded software 3 Click the Execute button The software upgrade check screen is displayed After upgrading the software version be absolutely sure to delete the temporary...

Page 121: ... default Except the network settings When the Execute button is clicked the unit s settings are returned to their defaults The following settings are not initialized All the settings under Setup Basic Date Time The Horizontal Phase Format and Frequency settings under Setup Image Audio System All the settings under Setup Multi screen All the settings under Setup User mng All the settings under Setu...

Page 122: ...n dialog box to appear is about 10 seconds for a camera settings file and about 20 seconds for a network settings file The unit may restart after download of settings files Depending on the state of the unit whether recording to the SD card is in progress settings file downloading may not be possible The unit will also restart automatically in such cases Notes Upload The unit s setting files which...

Page 123: ...Activate You can perform activation register an unlock key code to add available functions For details refer to Activation page 137 Download Obtain the serial number and other information for the remote camera Upload Upload an activation file to the unit ...

Page 124: ...P4 format 1 1920 1080 59 94p Frequency 59 94 Hz 2 1920 1080 29 97p Frequency 59 94 Hz 3 1280 720 59 94p Frequency 59 94 Hz 4 1280 720 29 97p Frequency 59 94 Hz 5 1920 1080 50p Frequency 50 Hz 6 1920 1080 25p Frequency 50 Hz 7 1280 720 50p Frequency 50 Hz 8 1280 720 25p Frequency 50 Hz The folder names and file numbers are initialized each time an SD card is formatted initialized Note Inserting and...

Page 125: ... is approximately 89100 Also the maximum number of folders is approximately 900 Setting the format for the video to be recorded Set the size frame rate and bit rate of the video to be recorded to an SD card 1 Select the size frame rate and bit rate from the pull down list in the Recording format item SD card tab SD memory card page 79 Guide to recording modes and recording durations Recording form...

Page 126: ...ecorded content Play List screen Select content individually Acquires the latest information Deletes the selected content Close the Play List screen Displays the recording duration of the content Displays the recording start date and time of the content Displays the remaining capacity and total capacity of the SD card Select all content Switches to top page Returns to the previous page Goes to the...

Page 127: ...e playback screen to download the file currently playing back to the connected personal computer Specify the save destination on the personal computer If downloading does not start and no operation is performed for a while downloading may not be possible If the file could not be downloaded click again to start downloading Start the saving of the file soon after clicking Downloaded MP4 files are de...

Page 128: ...roma Level of the camera menus and Web settings Setting range 0 to 6 Equivalent to 3 to 3 of Chroma Level If the shooting mode scene is set to Full Auto even if this setting is changed the change will not be reflected on the unit Sharpness Sharpness This is not supported by this unit Gamma Gamma This is not supported by this unit White balance White Balance This allows you to set a function equiva...

Page 129: ...ure Iris Aperture Iris The lens iris can be adjusted manually Setting range 1 minimum to 2731 open If this item is set to auto mode the lens iris is set to automatic adjustment and Contrast Mode of the camera menus and Web settings is set to Auto If auto mode is canceled the lens iris is set to manual adjustment and Contrast Mode of the camera menus and Web settings is set to Manual This cannot be...

Page 130: ...0 Mic High 1279 to 1024 Mic Middle 1023 to 768 Mic Low 767 to 512 Line High 511 to 256 Line Middle 255 to 0 Line Low The volume may be adjusted automatically depending on the communication software used Audio may not be stable depending on the combination of the unit and communication software Video and audio may not be stable depending on the performance of your personal computer or other device ...

Page 131: ... name and password The default settings for the user name and password are as follows User name admin Password 12345 If the mobile terminal does not support the character code UTF 8 the characters cannot be displayed properly Notes 1 Input http IP address mobile using the mobile terminal and press the enter button The unit s images will now be displayed Pan Tilt When this button is pressed the but...

Page 132: ...solution switching When this button is pressed the buttons for selecting the resolution are displayed on the screen The characters are displayed in green for the resolution button which is currently selected The resolution configured with JPEG 1 JPEG 2 and JPEG 3 in the Video over IP tab is displayed The images are displayed with a resolution of 1920 1080 pixels The images are displayed with a res...

Page 133: ...us When this button is pressed the buttons for performing the focusing operations are displayed on the screen Use this to switch between auto and manual focusing At the auto setting focusing is performed the focal point is adjusted automatically At the auto setting the button label turns green When this is pressed while the focus is being adjusted manually the focus will be temporarily adjusted au...

Page 134: ...t s port number When the authentication dialog box appears enter the user name and password of an administrator or general user Depending on the mobile terminal password entry may be required when transitioning between each screen Audio cannot be received on mobile terminals If the User auth page 101 setting has been changed to On from a personal computer while the mobile terminal screen is displa...

Page 135: ...troller or web setting screen Whatever was set or released last takes precedence For the controller operations refer to the Operating Instructions of the controller The settings of the limiters using the wireless remote control will be described here Basic limiter operations 1 Press the MENU button Tap the button rather than pressing it When it is pressed for 2 seconds the camera menu will appear ...

Page 136: ...it Next perform the steps in Basic limiter operations Press the MENU button quickly and then press the button for 2 seconds while holding down the PRESET button Releasing the limiters The limiter positions that are set can be released by following the steps below When the position is released the tally lamp blinks twice 1 Press one of the CAM1 to CAM4 buttons to select the unit 2 Release the limit...

Page 137: ...code can be obtained by accessing the activation code generation site and then having the serial number information of the unit and key code included with Feature Upgrade authenticated 1 Click Setup Maintenance Activate from the Web screen 2 Click the Execute button of the Download item 3 Click the OK button SERIAL LST serial number information file of the unit is downloaded to the personal comput...

Page 138: ...oad item 3 Click the OK button After uploading completes the unit restarts automatically 4 Click the OK button The web screen appears 5 Close the Web browser once Checking that activation is complete 1 Click Setup Maintenance Product info from the Web screen 2 Check the value of the Activation counter item Check that the value has been incremented in accordance with the activation file ...

Page 139: ...e PoE terminals Refer to the operating instructions for the PoE power supply device The status display lamp flashes red continuously The PoE power supply conditions do not meet the specifications Check the power supply device P 14 The status display lamp flashes red several times An error such as an attempt to perform a recording operation while an SD card is not inserted has occurred Check the ev...

Page 140: ...e using the controller Is the unit connected to the controller properly Refer to the Operating Instructions of the controller Installation Instructions Connections Connecting a controller AW RP50 IP connection example to System example 5 infrared output connection Are all the cameras in the daisy chain connection turned on Installation Instructions Connections System example 1 connection with comm...

Page 141: ...s below When using Windows Using the Windows command prompt execute ping IP address which has been set in the camera A reply returned from the unit signifies that there are no problems in operation If a reply is not received try following operation Reboot the unit and within 20 minutes change the IP address using the Easy IP Setup Software When using Mac Using the OS X terminal execute ping c 10 I...

Page 142: ...rver has been set using the proxy setting of the web browser it is recommended that a Don t use proxy address be selected as the unit s IP address setting Has the wrong default gateway been set for the unit When the unit and personal computer are connected to different subnets Check out the default gateway that has been set for the unit and then consult with the network administrator P 63 P 103 Th...

Page 143: ...e one or more of the symptoms described below but these are not malfunctions The resolution of the characters in the camera menu displays changes as the background image changes Depending on the edge enhancement setting established for the monitor white lines appear in front of the black shadows of the camera menus Depending on the edge enhancement setting established for the monitor the backgroun...

Page 144: ...d adjust the iris manually P 36 Set Auto Shutter Limit to Off P 47 P 89 The images are in black and white Is Night mode established In Night mode the images are output in black and white P 46 P 49 P 90 The auto white balance adjustment AWB does not work Is Night mode established The auto white balance adjustment AWB cannot be used in Night mode P 39 to 41 P 46 P 49 P 90 Is the scene mode set to Fu...

Page 145: ...ged systematically on each image sensor It is noticeable when the spatial frequency of a subject and the pixel pitch are brought into proximity so change the camera angle or take other such action When the high dynamic range function HDR is enabled flickering may be noticeable depending on the subject This is not a malfunction If necessary disable the HDR function Noise occurs in the audio input A...

Page 146: ...iority Mode selection is anything other than IP Only JPEG images can be displayed on the Live screen P 30 P 56 P 77 The images are not refreshed The images may not be refreshed or other trouble may occur with some web browsers or their version which is being used Image display may be suspended if the network is congested or the unit is being accessed excessively When the IP video settings of the u...

Page 147: ... pages in the Temporary Internet Files settings the web setting screen may not be displayed properly Follow the steps below A In Internet Explorer select Tools Internet Options B Click the General tab and click the Settings button in Browsing history C In the Temporary Internet Files and History Settings dialog box under Check for newer versions of stored pages set the radio button to ON for Every...

Page 148: ...occur and the refresh speed of the IP videos may drop Is the H 264 image format set to 1920 1080 60fps or 50fps Depending on the performance of the personal computer the screen display images will be displayed later than the actual images if the H 264 image format is set to 1920 1080 60fps or 50fps Also the motion of the screen display images may not be smooth immediately after opening the web scr...

Page 149: ...to None at the far left and click OK An unnecessary status bar or scroll bar is displayed on the pop up window Open the security settings screen for Internet Explorer and select Internet Click the Custom level button set Allow script initiated windows without size or position constraints to Enable under Miscellaneous and click the OK button When the warning window appears click the Yes button The ...

Page 150: ...e wants to run the following add on Web from Panasonic System Networks Co Ltd Select Allow For Internet Explorer 8 0 The following message appears in the information bar Pop up blocked To see this pop up or additional options click here Click the information bar and select Always Allow Pop ups from This Site When the Allow pop ups from this site dialog box appears click the Yes button For Internet...

Page 151: ...V IN PoE IEEE802 3at compliant Mic line input Stereo mini jack ø3 5 mm Input impedance Approx 2 kΩ unbalanced Mic input Supported microphones Stereo mic plug in power on off switching via menu Supplied voltage 2 5 V 0 5 V Mic input level 60 dBV 3 dBV 0 dB 1 V Pa 1 kHz Line input Input level 10 dBV 3 dBV G L IN BBS Black Burst Sync signal and tri level sync supported BNC 1 OUTPUT Video output HDMI ...

Page 152: ...p During Auto 6 dB to 48 dB 6 dB step are available for AGC Max Gain setting Frame mix Auto Off 6 dB 12 dB 18 dB 24 dB During Auto 0 dB 6 dB 12 dB and 18 dB are available for Auto F Mix Max Gain setting ND filter Auto Through 1 4 1 16 1 64 Auto can be selected when Scene is set to Full Auto Electronic shutter speed During Full Auto 59 94 Hz 1 60 to 1 2000 Auto Slow Shutter Off 1 30 to 1 2000 Auto ...

Page 153: ...re safety the unit must be secured using the mount bracket supplied Camera pan tilt head control IP connecting cable When connecting through a hub LAN cable 2 category 5 or above max 100 m 328 ft When using a PoE hub LAN cable 2 category 5e or above max 100 m 328 ft When a hub is not used LAN cable 2 category 5 or above max 100 m 328 ft AW protocol connecting cable LAN cable 2 category 5 or above ...

Page 154: ...the lowest number Maximum number of recordable items 99 Network Transfer modes Image Resolution Frame rate 1 System frequency 59 94 Hz System frequency 50 Hz JPEG 1920 1080 30fps 15fps 5fps 25fps 12 5fps 5fps 1280 720 640 360 320 180 H 264 1920 1080 60fps 2 30fps 15fps 5fps 50fps 2 25fps 12 5fps 5fps 1280 720 640 360 320 180 1 The frame rate may be lower than the setting depending on the operating...

Page 155: ...C 12 V 3 0 A 36 W indicates safety information Mass Approx 220 g 0 485 lb Dimensions W H D 115 mm 37 mm 57 mm 4 17 32 inches 1 59 128 inches 2 31 128 inches Inrush current measured according to European standard EN55103 1 on initial switch on 4 5 A after a supply interruption of 5 s 16 A ...

Page 156: ... format 57 Changing the frequency 57 Chroma amount variability 152 Chroma Level 50 90 Color Enable 128 Color Matrix 93 Color Temperature 50 91 Common 105 Compression 70 Concerning initialization 63 Config data type 122 Connected device indication 73 Connection 110 116 Contrast 47 88 128 Contrast 1 2 screen 47 Contrast 2 2 screen 48 Contrast Level 46 47 88 Contrast Mode 47 88 Controller 151 Control...

Page 157: ...Network screen 63 IPv4 network 103 IPv6 network 104 IR Control 60 99 IR ID 60 99 Iris 133 J JPEG 81 86 JPEG 1 JPEG 2 JPEG 3 81 JPEG transmission 81 L LAN cable 20 Limitation Setting 95 Live 68 69 74 Live page 78 Live screen 68 69 74 Low Light Compensation 129 M MAC address 120 Main area 72 76 Maintenance 45 119 Maintenance screen 62 Main unit mounting screw 15 Manual 104 Manual adjustment R gain a...

Page 158: ...tion 132 Retype password 101 R Gain 50 91 Roll 129 Router global address 121 S Saturation 128 Scene 46 73 88 Scene file 152 SD access lamp 73 SD Card Operation 71 SDI 55 SD memory card 79 SD memory card information 79 Secondary DNS server address 104 Secondary server address 104 Security certificate 117 Self signed Certificate Generate 109 113 Information 109 Serial no 120 setup 77 Setup 44 68 75 ...

Page 159: ...159 Index continued White balance 152 White Balance 128 White Balance Mode 50 91 Wireless remote controller 15 18 22 24 WV Q105A 15 Z Zoom 72 94 129 131 Zoom Mode 59 98 ...

Page 160: ...Web Site http www panasonic com Panasonic Corporation 2019 ...

Reviews: