7
Rack Mounting
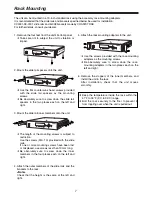
The unit can be mounted in a 19-inch standard rack using the accessory rack-mounting adapters.
It is recommended that the slide rails and brackets specified below be used for installation.
CC3001-99-0191 slide rails and B-308 brackets made by CHASIS TRAK.
For further details, consult your dealer.
1. Remove the four feet from the unit’s bottom panel.
O
Take care not to subject the unit to vibration or
impact.
3. Mount the slide rail inner members onto the unit.
4. Attach the outer members of the slide rails and the
brackets to the rack.
<Note>
Check that the height is the same at the left and
right.
6. Remove the stoppers of the inner members, and
install the unit in the rack.
After installation, check that the unit moves
smoothly.
O
Keep the temperature inside the rack within the
41°F to 95°F (5°C to 35°C) range.
O
Bolt the rack securely to the floor to prevent it
from toppling over when the unit is pulled out.
O
Use the screws provided with the rack-mounting
adapters as the mounting screws.
O
Be absolutely sure to screw down the rack-
mounting adapters in the two places each on the
left and right.
O
The length of the mounting screws is subject to
restriction.
Use the screws (M4
a
10) provided with the slide
rails.
If one or more mounting screws have been lost
or misplaced, use screws less than 10 mm long.
O
Be absolutely sure to screw down the inner
members in the four places each on the left and
right.
2. Mount the slide rail spacers onto the unit.
O
Use the flat countersunk head screws provided
with the slide rail spacers as the mounting
screws.
O
Be absolutely sure to screw down the slide rail
spacers in the two places each on the left and
right.
5. Attach the rack-mounting adapters to the unit.

