background image

7

Be

fo

re

 U

s

e

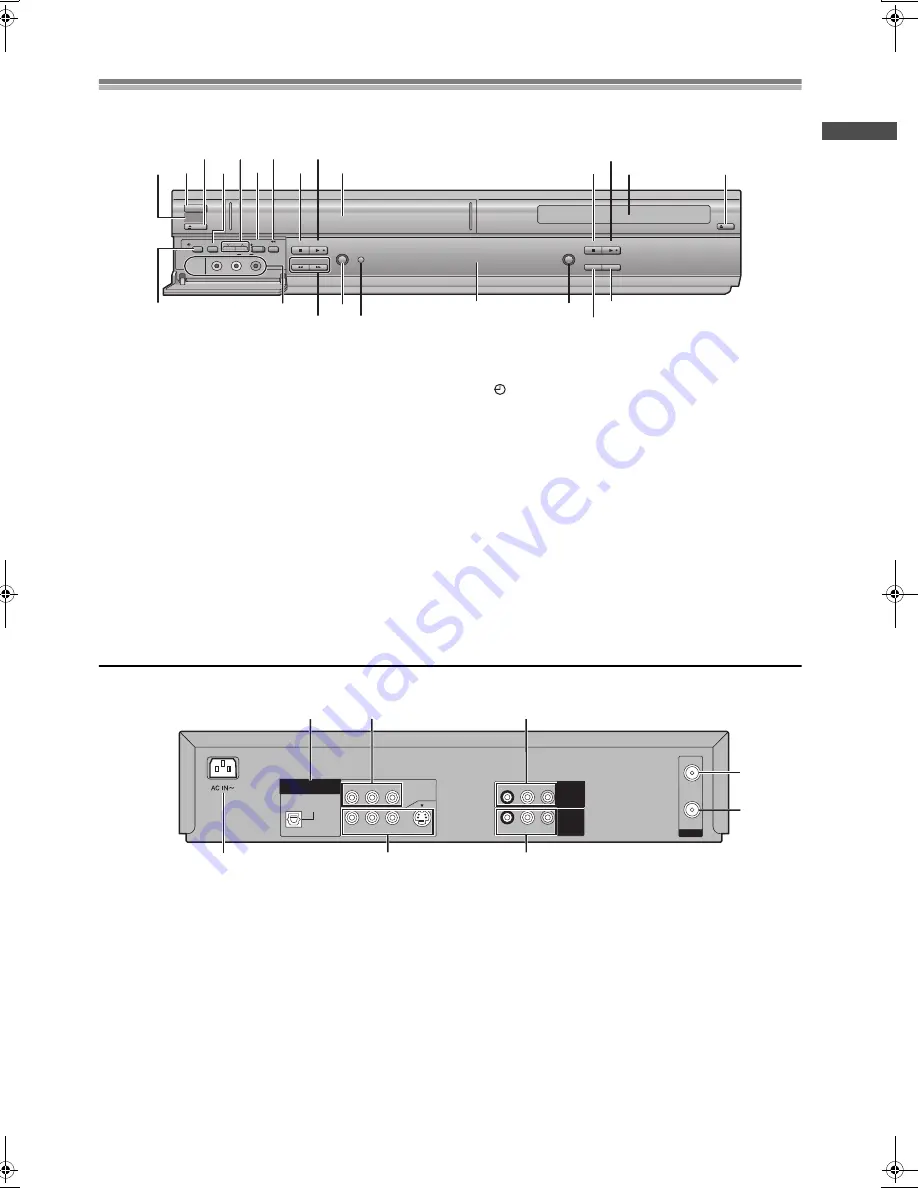
Control reference guide

This section describes in detail the function of each button, switch and connection socket.

FRONT 

REAR

POWER

Í

/I

TIMER REC

TAPE 

REFRESH

AV2 IN

REC/OTR

CH

TIMER 

CHECK

PICTURE 

MODE

EJECT

VCR

STOP

PLAY

STOP

PLAY

FF/

5

6

/REW

JET REW

PROGRESSIVE OUT

REC CHECK

MUSIC 

WITH PICTURE

OPEN/CLOSE

DVD

VIDEO

AUDIO

L

R

(2)

(4)

(6)

(8)

(1)

(3)

(4)

(9)

(10)

(11)

(12)

(13)

[C]

(5)

(14)

[D]

[A] [B]

(7)

(5)

(3)

(1)

(2)

ª

Common section

[A]

Infra-red remote control receiver window

[B]

POWER

Í

/I button

Press 

[POWER

Í

/I]

 to switch this unit from on to standby mode 

or vice versa. In standby mode, the unit is still connected to the 
main AC power.

[C]

Display

[D]

MUSIC WITH PICTURE button .............. (

l

page 53)

ª

VCR section

(1)

Tape eject button (

<

VCR EJECT) ........ (

l

page 17)

(2)

TAPE REFRESH button ......................... (

l

page 27)

(3)

Channel up/down buttons 
(CH

IJ

) ............................................. (

l

page 19,20)

(4)

Recording/One-Touch Recording button 
(

¥

REC/OTR)....................................... (

l

page 20,21)

(5)

Jet Rewind button (

6

JET REW) ........ (

l

page 17)

(6)

Stop

 button .......................................... (

l

page 17)

(7)

Play

1

 button .......................................... (

l

page 17)

(8)

Cassette compartment

(9)

Timer recording button 
(

TIMER REC) ....................................... (

l

page 22)

(10)

AV2 IN (AUDIO/VIDEO) sockets ............ (

l

page 52)

(11)

Fast-forward/rewind buttons 
(

6

/REW, FF/

5  

6

5

) ................... (

l

page 17)

(12)

PICTURE MODE button.......................... (

l

page 19)

(13)

Timer program check button 
(TIMER CHECK) ...................................... (

l

page 23)

(14)

Record check button (REC CHECK) ..... (

l

page 21)

ª

DVD section

(1)

Stop

 button .......................................... (

l

page 33)

(2)

Play

1

 button .......................................... (

l

page 32)

(3)

Disc tray

(4)

Disc tray open/close button 
(

<

DVD OPEN/CLOSE) ........................... (

l

page 32)

(5)

PROGRESSIVE OUT button................... (

l

page 33)

R-AUDIO-L

VIDEO

OPTICAL

RF

DIGITAL 
AUDIO OUT 

(PCM/BITSTREAM)

R-AUDIO-L

VIDEO

S-VIDEO

IN

OUT

COMPONENT

VIDEO OUT

(480P/480I)

Y

P

B

P

R

OUT2 

(DVD ONLY)

R-AUDIO-L

VIDEO

IN 

(AV1)

OUT1 

(VCR/DVD)

(2)

(3)

[A]

(1)

[B]

(2)

(3)

(1)

ª

Common section

[A]

AC Input socket

[B]

OUT1 (VCR/DVD) terminal

ª

VCR section

(1)

AUDIO IN/VIDEO IN (AV1) sockets ....... (

l

page 52)

(2)

RF IN socket

(3)

RF OUT socket

ª

DVD section

(1)

OUT2 (DVD ONLY) terminal/DIGITAL AUDIO OUT 
(OPTICAL, PCM/BIT STREAM) .............. (

l

page 47)

(2)

OUT2 (DVD ONLY) terminal/
COMPONENT VIDEO OUT (

480P/480I

) .... (

l

page 13)

(3)

OUT2 (DVD ONLY) terminal/
AUDIO/VIDEO/S-VIDEO OUT ................. (

l

page 13)

VP300P.book  Page 7  Thursday, March 20, 2003  10:21 AM

Summary of Contents for AGVP300 - VCR/DVD COMBO

Page 1: ...DE TIMER CHECK PROGRESSIVE OUT STOP REC CHECK MUSIC WITH PICTURE PLAY PLAY DVD VQT0C73 1 DVD Player Video Cassette Recorder Before attempting to connect operate or adjust this product please read these instructions completely Operating Instructions Model No AG P ...

Page 2: ...Settings Using the On Screen Display 28 Common procedure 28 To Select the Desired Language 28 Setting the Clock of your unit 28 Channel Set 29 Option 30 Onscreen display 31 Changing audio 31 Playing discs 32 Basic play 32 Starting play from where you stopped it 33 To immediately access a specific scene or track 34 Other methods of play 35 Playing the programs or play lists on DVD RAM 37 Selecting ...

Page 3: ...claims of certain U S patents and other intellectual property rights owned by Macrovision Corporation and other rights owners Use of this copyright protection technology must be authorized by Macrovision Corporation and is intended for home and other limited viewing uses only unless otherwise authorized by Macrovision Corporation Reverse engineering or disassembly is prohibited Manufactured under ...

Page 4: ... ÅBNING UNDGÅ UDSÆTTELSE FOR STRÅLING ADVARSEL AVATTAESSA OLET ALTTIINA NÄKYVÄÄ JA NÄKYMÄTÖN LASERSÄTEILYLLE ÄLÄ KATSO SÄTEESEEN VARO SYNLIG OCH OSYNLIG LASERSTRÅLNING NÄR DENNA DEL ÄR ÖPPNAD BETRAKTA EJ STRÅLEN VARNING SYNLIG OG USYNLIG LASERSTRÅLING NÅR DEKSEL ÅPNES UNNGÅ EKSPONERING FOR STRÅLEN ADVARSEL SICHTBARE UND UNSICHTBARE LASERSTRAHLUNG WENN ABDECKUNG GEÖFFNET NICHT DEM STRAHL AUSSETZEN ...

Page 5: ... to a place which is hot and humid Note Do not operate the unit for at least 1 hour if any of the above conditions occur This unit does not incorporate a dew sensor Surge Absorber For added protection for this product these models are equipped with new surge absorbing circuits which prevents damage due to power surges caused by induced lightning This function may not be effective for surges by dir...

Page 6: ...s of the disc for example where one program ends and another begins may not play smoothly ªDVD R discs Panasonic DVD R discs recorded and finalized a process that allows play on compatible equipment on a Panasonic DVD video recorder or DVD video camera are played as DVD Video on this unit ªCD R and CD RW discs This unit can play CD R RW audio recording disc recorded with if CD DA video CD MP3 or W...

Page 7: ...6JET REW lpage 17 6 Stop button lpage 17 7 Play1 button lpage 17 8 Cassette compartment 9 Timer recording button TIMER REC lpage 22 10 AV2 IN AUDIO VIDEO sockets lpage 52 11 Fast forward rewind buttons 6 REW FF 5 6 5 lpage 17 12 PICTURE MODE button lpage 19 13 Timer program check button TIMER CHECK lpage 23 14 Record check button REC CHECK lpage 21 ªDVD section 1 Stop button lpage 33 2 Play1 butto...

Page 8: ...ng or playing in the five time Long play mode 4 Tape operation status lpage 17 20 The operation status of this unit such as playback fast forward or fast rewind 5 Recording indicator REC red lpage 20 On while recording or while a timer recording is being performed 6 Channel display lpage 20 1 2 3 125 A1 A2 Indicates the channel while in the TV reception mode or the channel set for timer recording ...

Page 9: ...smitter 14 VCR TV DVD switch VCR TV DVD 15 Recording button REC lpage 20 16 This button does not work 17 Tracking V Lock and Channel up down buttons TRACKING V LOCK CHIJ lpage 19 20 18 Fast forward rewind buttons 6 5 lpage 17 19 Play button 1 lpage 17 20 MENU button lpage 28 21 Jet Rewind button JET REW6 lpage 17 22 CANCEL RESET button lpage 23 31 23 MUSIC WITH PICTURE button MUSIC w PICTURE lpage...

Page 10: ...CR TV DVD switch VCR TV DVD 11 Slow search buttons 6 5 SLOW SEARCH lpage 35 12 Play button 1 lpage 32 13 PLAY LIST button lpage 37 14 RETURN button lpage 37 38 40 43 48 15 QUICK REPLAY button lpage 35 16 SUBTITLE button lpage 40 17 Advanced surround button A SRD lpage 41 18 MUSIC WITH PICTURE button MUSIC w PICTURE lpage 53 19 PLAY MODE button lpage 36 20 REPEAT button lpage 35 21 AUDIO button lpa...

Page 11: ... 100 4 5 6 SLOW SEARCH NAVI TOP MENU MENU RETURN PROG CHECK QUICKREPLAY DISPLAY JET REW TIMER ENTER PLAY LIST INDEX SKIP Í Í OUTPUT TRACKING V LOCK AV D DIRECT NAVIGATOR 1 2 3 4 5 6 The remote control Installing the Batteries Insert the batteries with the polarity and correctly aligned Power Source for the Remote Controller The remote controller is powered by 2 AA UM 3 or R6 size batteries The lif...

Page 12: ...und through other audio equipment You can output digital signals from this unit s OPTICAL DIGITAL AUDIO OUT terminal enabling you to enjoy the powerful surround effects found on discs recorded with Dolby Digital or DTS Connect an amplifier with built in decoders See page 47 for connection examples R AUDIO L VIDEO OPTICAL RF DIGITAL AUDIO OUT PCM BITSTREAM R AUDIO L VIDEO S VIDEO IN OUT COMPONENT V...

Page 13: ... that you used for the connection through this unit s OUT1 VCR DVD terminal Picture from this unit s VCR will not appear when you use the same group input terminal connections because the S video terminal input takes precedence The following connections are for the DVD section only Carry out the Basic Connections described on the left page to view video from the VCR section You may need to change ...

Page 14: ...ill continue to operate with the exception of charging channels automatically CATV Channel selection will have to be performed with the cable converter Timer controlled recording from CATV Channels is therefore limited to one channel at any given time R AUDIO L VIDEO OPTICAL RF DIGITAL AUDIO OUT PCM BITSTREAM R AUDIO L VIDEO S VIDEO IN OUT COMPONENT VIDEO OUT 480P 480I Y PB PR OUT2 DVD ONLY R AUDI...

Page 15: ...tions regarding tuning During Auto Tuning the TV program screen does not appear and the Auto Tuning screen appears instead The unit starts Auto Clock Setting when the Auto Tuning is completed When Auto Tuning and Auto Clock Setting are completed the on screen display disappears and the lowest channel position at which a broadcast can be tuned in is received and the time is displayed on the unit s ...

Page 16: ...he RF output channel a few channels up and down from the current setting The procedure is described below 1 Hold down MENU for 5 seconds or more The unit s display changes as shown below and the VCR picture on the TV displays this pattern 2 Enter the desired channel number 3 or 4 by CH IJ 3 4 3 Press MENU to finish the setting mode 4 Retune your TV to the new RF channel for this unit Note Even if ...

Page 17: ...ton is pressed and operation returns to normal playback when the button is released 4 View a still picture by pressing D To continue normal playback press 1 PLAY or D 5 View a slow motion picture Keep D pressed for 2 seconds or more To continue normal playback press 1 PLAY To stop viewing the picture Press To Eject the Video Cassette Using the Remote Controller You can eject the video cassette wit...

Page 18: ...conds 2 Press PLAY1 on this unit repeatedly to select the desired playback duration on the unit s display Repeatedly pressing this button changes the indication in the following order Counter display normal playback mode 30 min 60 min 90 min 120 min 180 min 240 min Counter display normal playback mode This unit will automatically switch off when Play Off Timer is completed To turn the unit on agai...

Page 19: ...ing play Press TRACKING V LOCK I or J Repeat until the noise disappears To return tracking control to the unit Press both TRACKING V LOCK I and J at the same time To remove the noise from a paused picture Start slow play then adjust the tracking Note This may not be effective on some tapes You can also adjust the tracking with CH IJ on the unit ªFor vertical locking adjustment Adjust the vertical ...

Page 20: ...during recording Press it again to continue recording Note Even if the tape you use is labeled S VHS it is not possible to record in the S VHS system with this unit It records in normal VHS system You cannot play VP recordings on other equipment You cannot change channels while recording You can change channels while in the pause mode Recording pause stops after 5 minutes and returns to the stop m...

Page 21: ...eo source which is to be recorded and start recording 2 Press REC OTR on this unit repeatedly to select the desired recording duration The duration indicated on the unit s display changes by pressing REC OTR as follows Counter display normal recording mode 30 min 60 min 90 min 120 min 180 min 240 min Current time normal recording mode This unit will automatically switch off when OTR is completed T...

Page 22: ... 3421 and confirm with MENU You can also set and change the category in the navigator list lpage 25 Repeat steps 1 to 8 to make further timer programs 9 Press TIMER to put the unit on timer recording standby Check that is lit on the unit s display If it is flashing check the timer recording details again lpage 23 To release the unit from timer recording standby Press TIMER To stop recording Press ...

Page 23: ...mode Confirm that the TV is on and this unit viewing channel is selected While the timer programming screen is on the television labove 1 Press PROG CHECK repeatedly to highlight the program you want to correct and press ENTER 2 Select the item with Cursor 21 and correct it with Cursor 34 3 Press ENTER To exit the On Screen Display Press MENU Note If timer recording is not completed due to insuffi...

Page 24: ...playback will start automatically Every time you press NAVI the program shifts above If after playback has started you want to search for the beginning of the same or another program press NAVI Playback stops and the Jet Navigator list appears To cancel the Jet Navigator list Press MENU ªTo delete the Jet Navigator data of a single video cassette tape Keep CANCEL RESET pressed for more than 5 seco...

Page 25: ...g or manual recording is finished the program data is deleted starting from the oldest data If a new program is attempted to be recorded when data for 20 cassettes are already stored in memory REMAINING CASSETTE 0 FOR JET NAVIGATOR DELETE JET NAVIGATOR DATA is displayed Programs recorded without deleting data as instructed are not registered in the list When Recording Over the Same Location on a T...

Page 26: ...ice This operation is performed while the unit is in the stop mode or normal playback mode After finding the specific recorded segment playback starts automatically To cancel the Index Search or to stop playback Press Notes If you press 9 too many times simply press to correct it In this way you can reduce the displayed figure down to 1 Up to 20 index signals can be searched for in both directions...

Page 27: ... Cassette s Contents Tape Refresh Function You can delete all of a cassette s contents the picture the sound and the Jet Navigator data all at once Operations 1 When you want to delete all contents of a cassette that is recorded while setting JET NAVIGATOR in the VCR MENU OPTION to ON Be sure to set JET NAVIGATOR to ON lpage 30 When you want to delete all contents of a cassette that is recorded wh...

Page 28: ...MANUAL CLOCK SET 2 Select MANUAL CLOCK SET by pressing Cursor 34 and then press ENTER 3 Press Cursor 2 1 to select the item you want to change and press Cursor 34 to change the setting D S T means Daylight Saving Time If you set to YES Daylight Saving Time will be activated automatically 4 Press MENU to start the clock and exit the setting screen Note The clock operates for at least 5 years on its...

Page 29: ...channel position at which a broadcast can be tuned in is received If you have not set the clock the unit will carry out Auto Clock Setting The time is displayed on the unit s display when finished If the unit is not correctly tuned by Auto Tuning follow the procedure on the right column ªManual Tuning 2 Select MANUAL by pressing Cursor 34 and then press ENTER 3 Press Cursor 34 to select CH and Cur...

Page 30: ...e TV screen during rewind Jet Rewind and fast forward OFF Messages do not appear TAPE SELECT Set the length of tape you are using so the unit can show the correct remaining time T120 T30 T60 T90 T120 tapes T160 T140 T160 tapes T180 T180 tapes BLUE BACK ON The screen shows a blue background when you play unrecorded portions OFF The blue background function is deactivated JET NAVIGATOR lpage 24 ON J...

Page 31: ...assette which has been recorded by a video recorder equipped with Panasonic s Auto Bilingual Choice function The function will not work with a cassette which has been recorded using the external equipment 1 Channel display CH is displayed when using a television channel and C is displayed when using a cable television channel 2 STEREO SAP indication Indicates when a program is broadcast in stereo ...

Page 32: ... a disc Press DVD OPEN CLOSE The disc tray comes out You can eject a disc even if the power is turned off Notes When the unit is first turned on and there is a disk loaded it may start playing automatically If Prohibit indication appears on the television the operation is prohibited by the unit or disc In this case either of the following marks is displayed If a disc cannot be played and U11 appea...

Page 33: ...played Operations 1 Press while playing to stop playing When 1 in the unit s display flashes the Resume function lbelow is active When the whole disc has finished playing the unit automatically stops Some discs present a menu screen ªResume function To play from where you stopped it 2 While stopped when 1 in the unit s display flashes Press 1 PLAY once ªChapter Preview DVD V After viewing the dige...

Page 34: ... on the disc or the portion played e g Video CDs This may not work on some discs How to specify a position to be accessed DVD V VCD CD MP3 WMA Press once and the header of the current chapter track is accessed However if you press when the header of a chapter track is being played the previous chapter track is accessed RAM The header of the program can be accessed or if the marker is memorized the...

Page 35: ...e 5 slow motion speeds Each press increases the slow motion speed To cancel still picture frame by frame slow motion for normal play Press 1 PLAY To play repeatedly Repeat play DVD V RAM VCD CD MP3 WMA When the elapsed play time is displayed Press REPEAT during play Each press DVD V Chapter l Title l Off RAM Program l All whole disc l Off While playing a play list Scene l Playlist l Off VCD CD Tra...

Page 36: ...errupt Program play 1 Press twice during Program play 2 Press PLAY MODE twice The program is retained Press PLAY MODE again and the current program entry state appears To change a program 1 Select the program number to be changed with Cursor 34and press ENTER 2 Carry out step 3 and change an item Press 6 or 5 and the screen page is changed to allow the program number to be displayed more quickly T...

Page 37: ...e played back Preparations Turn on the TV and select the video input for this unit Switch VCR TV DVD to DVD Insert the DVD RAM disc on which play lists were created 1 Press PLAY LIST The play list screen appears 2 Press Cursor 34 to select the play list You can also select play lists by entering a 2 digit number with the numeric buttons Example 03 3 10 S10 l 1 l 0 3 Press ENTER The selected play l...

Page 38: ...py protected To create an MP3 WMA disc that can be played back on this unit on a personal computer Formats that can be used are IS09660 level1 and level 2 except extended format MP3 files must have the extension MP3 or mp3 WMA files must have the extension WMA or wma If you wish to play the tracks in your favorite order add a number at the beginning of each file name corresponding to the desired p...

Page 39: ...ter O V and E If you select a wrong character press Cursor 2 and the previous character appears 4 Select Find with Cursor 1 and press ENTER The result of the search is displayed If there are no tracks found as a result of the search a message is displayed 5 Select the track to be played with Cursor 34 and press ENTER To get back to the previous screen Press RETURN Notes Only alpha numeric characte...

Page 40: ... multiple angles During play Press ANGLE The angle number changes each time you press the button To erase the on screen display for subtitles audio or angle view Press RETURN About subtitle soundtrack and angle view numbers j or j j is displayed instead of the language number in circumstances such as when no language is recorded on the disc You may also select one using numeric buttons or Cursor 3...

Page 41: ...specific to cathode ray tube TVs and provides soft and smooth pictures Even during dark and unclear scenes this function regenerates the contours on dark backgrounds for easy identification of persons Press CINEMA Then each press of Cursor 34 switches Cinema1 l Cinema2 l User l Normal The User mode allows the picture quality to be adjusted to your liking by selecting Picture Menu l Picture mode on...

Page 42: ...s displayed Press Cursor 34 The ratio changes in 0 01 units between 1 00 and 1 60 and in 0 02 units between 1 60 and 2 00 Notes The ratio returns to 1 00 when you open the disc tray change the source or switch the unit to standby The ratio may return to 1 00 when a menu is displayed Screen size Movies are made using a variety of screen sizes VCR DVD TV VCR DVD REC CHECK REC CH VOLUME TV TV VCR DVD...

Page 43: ...item with Cursor 34 Some items require pressing numeric buttons or ENTER for selection To cancel the menus Press DISPLAY several times Or press RETURN ªTo change the position of the icons If a DVD disc is played back with the Automatic Picture Zoom function activated on the TV the icons may not be displayed in whole or in part In this case move the icons 1 Press Cursor 21 to select the rightmost i...

Page 44: ...z MP3 WMA l Audio mode RAM VCD lpage 40 LR L R Cursor 34 m Menu play VCD with playback control only Display only n Karaoke vocal on off DVD V Karaoke DVD only If a DVD title is a duet select V1 or V2 to duet with the unit Cursor 34 ENG English FRA French DEU German ITA Italian ESP Spanish NLD Dutch SVE Swedish NOR Norwegian DAN Danish POR Portuguese RUS Russian JPN Japanese CHI Chinese KOR Korean ...

Page 45: ...NTER b Repeat mode lpage 35 DVD V RAM VCD CD MP3 WMA Cursor 34 c Play mode lpage 36 DVD V VCD CD MP3 WMA Normal play PGM Program play RND Random play Display only d Marker lbelow DVD V RAM VCD CD MP3 WMA b a c d e g DVD V 1 10 1 2 3 4 5 6 7 8 9 10 a Advanced surround lpage 41 DVD V RAM VCD V S S mode SP HP SP HP level 1 2 OFF Cursor 34 b Dialogue Enhancer on off lpage 41 DVD V ON OFF a 4 3 Aspect ...

Page 46: ...ype of material being played Auto 1 normal For viewing film material Auto 2 For viewing film material the same as Auto 1 but able to convert 30 frame per second progressive video Video For video material U 1 d 3D NR 0 to i4 Dot NR On Reduces overall noise Reduces the dot noise that occurs at the borders between colors When the contours on the video get blurred reduce the level e Block NR 0 to i3 S...

Page 47: ...und effects A center speaker and surround speakers optional are also necessary In this case turn the ADVANCED SURROUND function OFF If 1 or 2 is selected lpage 41 the surround effect does not work properly OPTICAL DIGITAL AUDIO OUT PCM BITSTREAM R AUDIO L VIDEO S VIDEO COMPONENT VIDEO OUT 480P 480I Y PB PR OUT2 DVD ONLY OPTICAL IN Speaker Not supplied Example Six speakers are connected Optical dig...

Page 48: ... list Abkhazian 6566 Afar 6565 Afrikaans 6570 Albanian 8381 Ameharic 6577 Arabic 6582 Armenian 7289 Assamese 6583 Aymara 6588 Azerbaijani 6590 Bashkir 6665 Basque 6985 Bengali Bangla 6678 Bhutani 6890 Bihari 6672 Breton 6682 Bulgarian 6671 Burmese 7789 Byelorussian 6669 Cambodian 7577 Catalan 6765 Chinese 9072 Corsican 6779 Croatian 7282 Czech 6783 Danish 6865 Dutch 7876 English 6978 Esperanto 697...

Page 49: ... Player Change Password Change Level Temporary Unlock Video DVD V RAM VCD TV Aspect lpage 50 Choose the setting to suit your television and preference 4 3 Pan Scan 4 3 Letterbox 16 9 Progressive Out Component lpage 33 Choose Enable to enable progressive output Disable For TVs not supporting progressive output Enable Still Mode Specify the type of picture shown when paused Automatic Field Less blur...

Page 50: ...less prohibited by the producer of the disc The images are clipped on both the right and left edges 4 3 Letterbox Widescreen software is shown in the letterbox style on a 4 3 aspect television The whole images are reproduced with black bands appearing both on the top and bottom of the screen 16 9 Used to view video on a wide screen TV having an aspect ratio of 16 9 If you have a wide screen TV 16 ...

Page 51: ...ersion Dolby Digital and DTS Digital Surround ªPCM Down Conversion Select how to output audio with a sampling frequency of 96 kHz Select Yes if the equipment you connect cannot process signals with a sampling frequency of 96 kHz No Initial setting Output as 96 kHz Yes Converted to 48 kHz Note Signals are converted to either 48 kHz despite the above settings if the signals have a sampling frequency...

Page 52: ...t 5 Start the new recording by pressing D again To stop Press Note The new sound will be recorded on both the normal and Hi Fi sound tracks only monaural sound recording is possible on the normal sound tracks VCR DVD TV VCR DVD REC CHECK REC CH VOLUME TV TV VCR DVD 1 2 3 7 8 9 0 100 4 5 6 SLOW SEARCH NAVI TOP MENU MENU RETURN PROG CHECK QUICKREPLAY DISPLAY JET REW TIMER ENTER PLAY LIST INDEX SKIP ...

Page 53: ...on this unit To stop playing the disc Press To cancel MUSIC WITH PICTURE mode Press MUSIC w PICTURE Notes While in the MUSIC WITH PICTURE mode pressing VCR DVD OUTPUT does not switch the output ªRecording onto a video cassette You can start recording onto a video cassette at the same time of disc playback Only the discs the audio on which is not copy protected can be used 4 Switch VCR TV DVD to VC...

Page 54: ...ctures The progressive out is set to Disable Go to Video in the SET UP menus and select Enable in Progressive Out Component 49 H F stands for a number An error has occurred The number following H or F depends on the status of the unit Reset procedure Press POWERÍ I to switch the unit to the standby mode and then back to ON Alternatively press POWERÍ I to switch the unit to the standby mode disconn...

Page 55: ...udio visual suppliers Consult your dealer if reception does not improve Cannot eject cassette The unit is in timer recording standby or actually recording If you need to eject the tape press TIMER first so goes out 22 No on screen display Go to OPTION in the VCR MENU and select ON for OSD Go to Display in the SETUP menus and select On for On Screen Messages 30 49 The menu is displayed in a differe...

Page 56: ... recorded with other systems e g PAL 19 15 5 Picture is distorted when stilled or during slow motion Some distortion is normal with tapes recorded using VP mode The blue back appears during play You are playing a blank or poor quality part of the tape You can damage the unit if you play dirty or damaged tapes and this can cause the blue back to appear Consult your dealer The picture jiggles Adjust...

Page 57: ...s I added are different when I call them up RAM The unit numbers markers by time so they change when you add and delete them 45 Cannot select random or program play You cannot select random or program play with some DVD Video Folders deeper than the eighth layer on a data CD are not displayed correctly Folders deeper than the eighth layer are displayed as the eighth layer You have forgotten your r...

Page 58: ...gether to make a moving picture A frame is made up of 2 fields A frame still is made up of two alternating fields so the picture may appear blurred but overall quality is high A field still is not blurred but it has only half the information of a frame still so picture quality is lower ID3 tag An MP3 file has an area in which the character based information referred to as ID3 tag is stored The inf...

Page 59: ... aspect ratio of 4 3 Two styles of picture Pan Scan and Letter box deal with this problem Pan Scan The sides are cut off so the picture fills the screen Letterbox A black belt appears on top and bottom of the screen to present 16 9 aspect ratio video on the 4 3 aspect ratio screen Playback control PBC If a Video CD has playback control you can select scenes and information with menus In this manua...

Page 60: ...UDIO lpage 31 Is it possible to record only the left channel audio or right channel audio for stereophonic broadcasting only the main audio channel or sub audio channel for bilingual broadcasting No It is not possible Select the desired channel with AUDIO when playing back Timer recording Is it possible to view programs on another cassette when the timer recording is set Or is it possible to repla...

Page 61: ...12 cm 5q DVD Video DVD RAM DVD VR compatible DVD R DVD Video compatible CD audio CD DA Video CD CD R RW CD DA Video CD MP3 WMA formatted discs MP3 WMA Maximum number of tracks and groups recognizable 999 tracks and 99 groups Compatible compression rate between 32 kbps and 320 kbps MP3 between 48 kbps and 192 kbps WMA VIDEO Signal System NTSC Output Level Composite video 1 0 Vp p 75 ohm S VIDEO OUT...

Page 62: ...62 ...

Page 63: ...age 28 44 48 49 M Manual Tuning 29 Marker 45 Mosquito NR 46 MPEG DNR 46 MP3 32 38 MUSIC WITH PICTURE 53 O Onscreen display 28 31 On Screen Menu Icon 43 Option 30 OTR 21 P PCM Down Conversion 51 Picture 19 46 Play list 37 Playback Off Timer 18 Plug in Auto Tuning 15 Position Memory function 33 Program play 36 Progressive 13 33 49 Q Quick Replay 35 Quick Setup 50 R Random play 36 Ratings 51 Record c...

Page 64: ...NE 3330 Cahuenga Blvd W Los Angeles CA 90068 323 436 3500 Government Marketing Department 52 West Gude Drive Rockville MD 20850 301 738 3840 Broadcast PARTS INFORMATION ORDERING 9 00 a m 5 00 p m EST 800 334 4881 24 Hr Fax 800 334 4880 Emergency after hour parts orders 800 334 4881 TECHNICAL SUPPORT Emergency 24 Hour Service 800 222 0741 Panasonic de Mexico S A de C V Av angel Urraza Num 1209 Col ...

Reviews: