


14
3
2
2
1
1
1, 2
2
1
3
LCD/EVF SET
PUSH MENU TO RETURN
LCD BRIGHTNESS
LOW ||||---- HIGH
LOW ||||---- HIGH
LCD COLOR
LOW ||||---- HIGH
EVF BRIGHTNESS
2:51:32PM
OCT 1 2001
2:51:32PM
2:51:32PM
OCT 1 2001
VOL/JOG
PUSH
MODE
ON
OFF
POWER
1, 2, 3
CAMERA
CARD P.B.
VCR
MODE
ON
OFF
1
Turning on/off the Camera/Recorder and
selecting Modes
Turn on the power first and then select Modes.
ª
How to Turn on the Power
1
Set the [OFF/ON/MODE] Switch to [ON] while pressing the
center Button
1
.
≥
The [CAMERA] Lamp lights up.
ª
How to Switch Modes
2
Slide the [OFF/ON/MODE] Switch.
≥
With each slide of the Switch, the Mode switches in the order of Camera
Mode, VCR Mode, and Card Playback Mode.
≥
The appropriate Mode Lamp lights up.
ª
How to Turn off the Power
3
Set the [OFF/ON/MODE] Switch to [OFF] while pressing the
center Button
1
.
~~~~~~~~~~~~~~~~~~~~~~~~~~~~~~~~
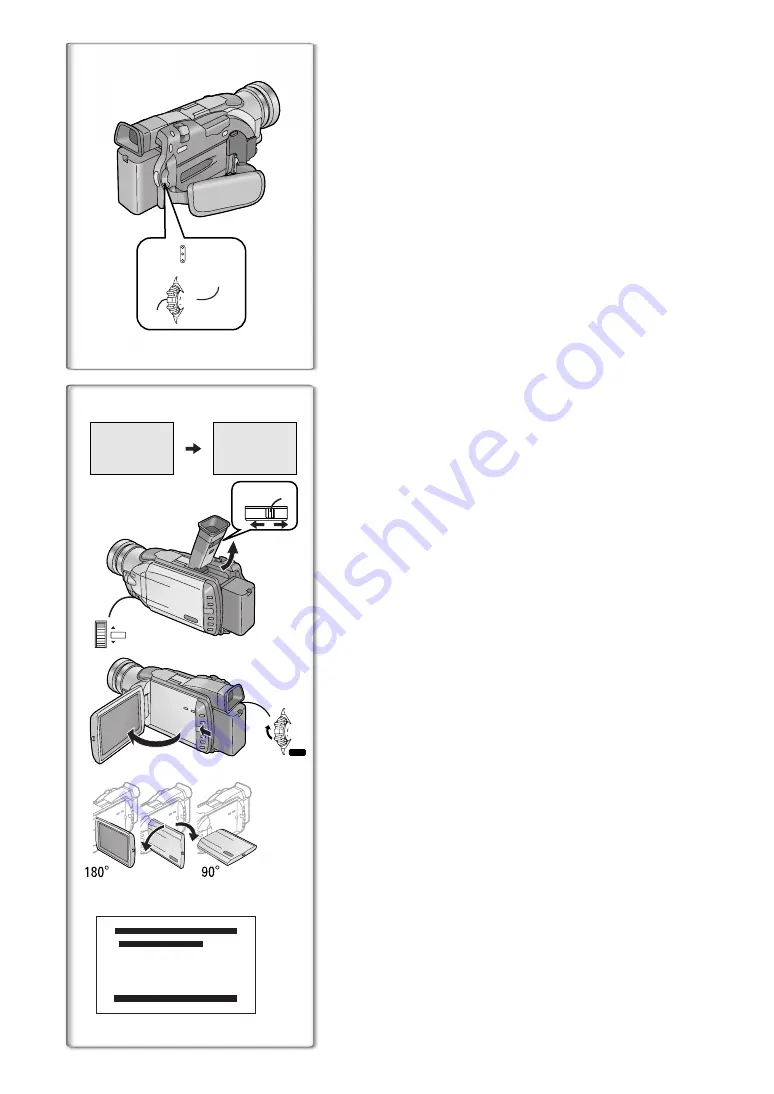
Using the Viewfinder
Before using the Viewfinder, adjust the field of view so that the displays inside
the Viewfinder become clear and easy to read.
1
Slide the Viewfinder backward and then tilt it upward.
≥
The Viewfinder angle is adjusted upward.
2
Adjust by sliding the Eyepiece Corrector Knob
1
.
Using the LCD Monitor
With the LCD Monitor open, you can also record the picture while watching it.
1
Turn the [OFF/ON/MODE] Switch to [ON].
2
Slide the [PUSH OPEN] Lever and, at the same time, bring
out the LCD Monitor about 90
x
in the direction of the arrow.
≥
The Viewfinder goes off.
3
Adjust the LCD Monitor angle according to the desired
recording angle.
≥
The LCD Monitor can rotate a maximum of 180
x
2
from the vertical
position to the upward direction and a maximum of 90
x
3
to the
downward direction. Forcefully rotating the LCD monitor beyond these
ranges will damage the Camera/Recorder.
Closing the LCD monitor
Push the LCD Monitor until the [PUSH OPEN] Lever is securely locked.
ª
Adjusting Brightness and Color Level
When [LCD/EVF SET] on the [DISPLAY SETUP] Sub-menu is set to [YES],
the following items are displayed.
(
l
LCD Brightness [LCD BRIGHTNESS]
Adjusts the brightness of the image on the LCD screen.
LCD Color Level [LCD COLOR]
Adjusts the color saturation of the image on the LCD screen.
Brightness of the Viewfinder [EVF BRIGHTNESS]
Adjust the brightness of the image in the Viewfinder.
1
Press the [PUSH] Dial and select the item you want to adjust.
2
Rotate the [PUSH] Dial and increase or decrease the number
of the vertical bars on the Bar Indication.
≥
The Bar Indication has 8 steps. A larger number of vertical bars
indicates stronger brightness or color saturation.
Increasing the Brightness of the Entire LCD Monitor
Set the [LCD MODE] on the [DISPLAY SETUP] Sub-Menu to [BRIGHT].
≥
These adjustments do not affect the recorded images.


