background image

11

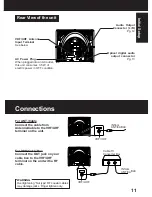
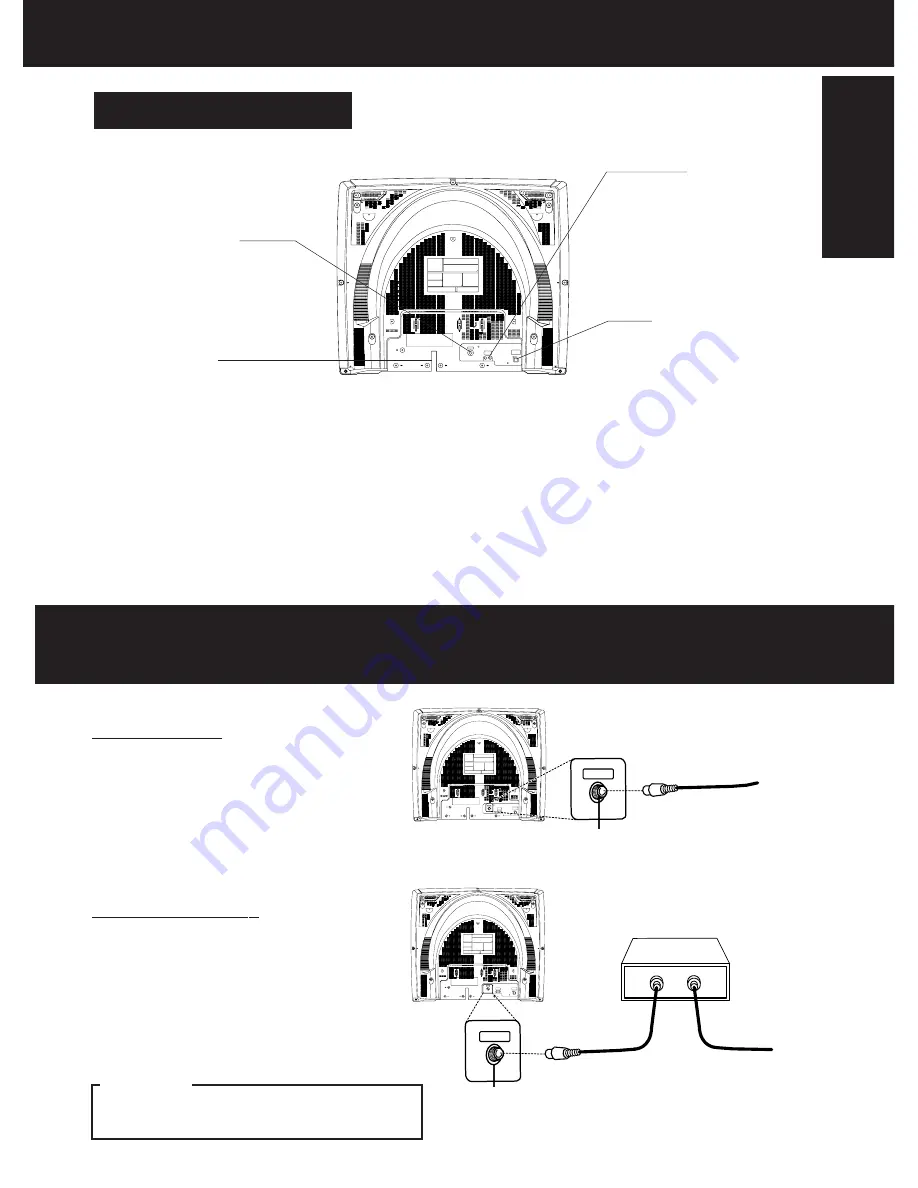
Rear View of the unit

Initial Setup

Connections

For ANT./Cable
Connect the cable from
Antenna/Cable to the VHF/UHF
terminal on the unit.

For DSS/Cable Box
Connect the OUT jack on your
cable box to the VHF/UHF
terminal on the unit with a RF
cable.

WARNING
Overtightening “Nut type” RF coaxial cables
may damage jacks. Finger tighten only.

VHF/UHF

AUDIO  OUT

R           L

DIGITAL  AUDIO  OUT

(PCM/BITSTREAM)

OPTICAL

AC Power Plug
When plugged into an AC outlet,
this unit consumes 3.5 W of
electric power in OFF condition.

VHF/UHF Antenna
Input Terminal
See below.

Audio Output

Connector (L/R)

Pg. 12

Optical digital audio

output connector

Pg. 13

VHF/UHF

AUDIO  OUT

R           L

DIGITAL  AUDIO  OUT
(PCM/BITSTREAM)

OPTICAL

VHF/UHF

IN from

ANT./CABLE

VHF/UHF

VHF/UHF

AUDIO  OUT

R           L

DIGITAL  AUDIO  OUT
(PCM/BITSTREAM)

OPTICAL

IN from

ANT./CABLE

Cable TV
Converter Box  

VHF/UHF

VHF/UHF

Summary of Contents for AG527DVDE - DVD/VCR/MONITOR

Page 1: ...imer Operation For Your Information Advanced Operation As an ENERGY STAR Partner Matsushita Electric Corporation of America has determined that this product or product model meets the ENERGY STAR guidelines for energy efficiency Please read these instructions carefully before attempting to connect operate or adjust this product Please save this manual Professional Industrial Video ...

Page 2: ...technician before use 3 ELECTRICAL STORMS During a lightning storm or before leaving unit unused for extended periods of time disconnect all equipment from the power source as well as the antenna and cable system 4 WHEN UNIT IS PLUGGED IN DO NOT OPERATE IF liquid has spilled into unit unit was dropped or otherwise damaged unit emits smoke odours or noises Immediately unplug unit and have it inspec...

Page 3: ... this unit is 1 1 This product utilizes both a Cathode Ray Tube CRT and other components that contain lead Disposal of these materials may be regulated in your community due to environmental considerations For disposal or recycling information please contact your local authorities or the Electronics Industries Alliance http www eiae org Safety Precautions Mesures de sécurité Warning To prevent fir...

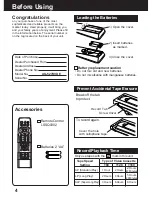
Page 4: ... Batteries 2 AA Accessories Batteryreplacementcaution Do not mix old and new batteries Do not mix alkaline with manganese batteries 1 Open the cover 3 Close the cover 2 Insert batteries as marked Break off the tab to protect Record Tab Screw driver Cover the hole with cellophane tape To record again Prevent Accidental Tape Erasure Loading the Batteries Record Playback Time Only use tapes with the ...

Page 5: ... a Tape 18 Record On a Tape 18 Copy Your Tapes Dubbing 19 TV VCR Basic DVD Operation 20 21 DVD For Your Information Before Requesting Service 62 63 Warning and Instruction Displays 64 65 Index 66 67 Settings for DVD Operation 58 60 Language Code List 61 Advanced Operation Cable Box Universal Remote Control Feature 32 33 Tape Operation 34 37 Special VCR Features 38 39 V Chip Control Feature 40 43 A...

Page 6: ... digital output Optical connector Pickup Wavelength 655 nm DVD 790 nm Video CD CD Laser power CLASS II Note Designs and specifications are subject to change without notice Specifications Head Cleaning Unit auto adjusts clock for DST Daylight Saving Time DST Daylight Saving Time Spring First Sunday in April DST ON Sets clock ahead one hour Autumn Last Sunday in October DST ON Turns clock back one h...

Page 7: ... on the disc Wipe away moisture with a soft dry lint free cloth before using disc See above Improper disc storage Discs could be damaged if stored or left in areas exposed to direct sunlight that are humid or dusty near heat i e heater radiator etc Disc Handling Disc tray Disc Disc formats supported by this unit The unit can play back discs bearing any of the following marks Discswhichcannotbeplay...

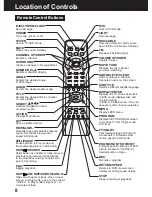
Page 8: ...RESET Enlarges specific portions of DVD picture Resets to 0 00 00 at desired portion of tape REC Records a program STOP Stops recording or playback RETURN SPEED Returns to DVD menu screen Selects recording speed of tape EJECT OPEN CLOSE See next page POWER Turns the unit on or off TV VCR Sets to TV VCR mode MUTE Mutes the sound instantly CHANNEL UP DOWN Selects a channel SURROUND Creates a deeper ...

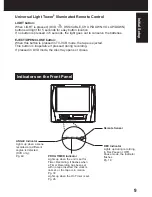
Page 9: ...ive if pressed during recording If pressed in DVD mode the disc tray opens or closes Indicators on the Front Panel Initial Setup Remote Sensor PROG TIMER Indicator Lights up when the unit is set for Timer Recording It flashes when a Timer Recording has been set with no tape inserted the clock is not set or the tape is in motion Pg 30 Lights up when the On Timer is set Pg 26 REC Indicator Lights up...

Page 10: ... DOWN See page 8 TRACKING UP DOWN See page 8 VOLUME UP DOWN See page 8 REC See page 8 PLAY REPEAT See page 8 STOP EJECT See page 8 FAST FORWARD SEARCH See page 8 Disc Tray Cassette Compartment If the disc cannot be removed First unplug unit Then prepare a rigid wire e g an extended paper clip and applying moderate force insert it straight into the hole at the base of the tray The tray will eject a...

Page 11: ...nger tighten only VHF UHF AUDIO OUT R L DIGITAL AUDIO OUT PCM BITSTREAM OPTICAL AC Power Plug When plugged into an AC outlet this unit consumes 3 5 W of electric power in OFF condition VHF UHF Antenna Input Terminal See below Audio Output Connector L R Pg 12 Optical digital audio output connector Pg 13 VHF UHF AUDIO OUT R L DIGITAL AUDIO OUT PCM BITSTREAM OPTICAL VHF UHF INfrom ANT CABLE VHF UHF V...

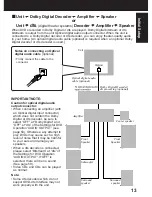
Page 12: ...de full 5 1 channel Dolby Digital soundtracks as well as from titles with the Dolby Surround mark For information on Panasonic or Technics Dolby Pro Logic Surround Sound Decoders please contact your local dealer Ready Checklist Turn down the volume then turn this unit as well as other equipment to be connected off before proceeding with connection Do not block ventilation holes of any of the equip...

Page 13: ...t connector When connecting an amplifier with an Optical digital input connector which does not contain the Dolby Digital or dts decoder be sure to select OFF at Dolby Digital and OFF at dts of the Settings for DVD Operation AUDIO OUTPUT see page 59 Otherwise any attempt to play DVDs may cause such a high level of noise that it may be harmful to your ears and damage your speakers When a dts decode...

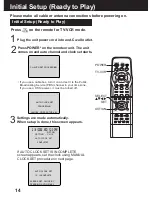
Page 14: ...Please make all cable or antenna connections before powering on Press POWER on the remote or unit The unit comes on and auto channel and clock set starts CH AUTO SET PROCEEDING Settings are made automatically When setup is done this screen appears PROCEEDING AUTO CLOCK SET CANCEL PRESS STOP KEY If AUTO CLOCK SET IS INCOMPLETE screen appears set the clock using MANUAL CLOCK SET procedure on next pa...

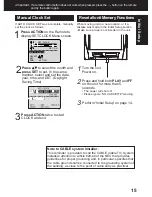
Page 15: ...nd exit 3 Reset all unit Memory Functions When moving unit to a new location or if a mistake was made in the Initial Setup section Make sure a tape is not inserted in the unit Note to CABLE system installer This reminder is provided to call the CABLE Cable TV System Installers attention to Article 820 40 of the NEC that provides guidelines for proper grounding and in particular specifies that the ...

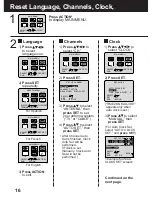
Page 16: ... ON 2 6 2002 WED 12 00PM SELECT HOUR SELECT 1 2 For English For Spanish For French MAIN MENU DVD LOCK CH CLOCK TV LANGUAGE END ACT I ON SELECT SET SET 5 3 1 MENU PRINCIPAL DVD BLOQUEO CANAL RELOJ TV IDIOMA TERMINAR ACT I ON ELEGIR FIJAR SET 5 3 1 HOLA MAIN MENU DVD LOCK CH CLOCK TV LANGUAGE END ACT I ON SELECT SET SET 5 3 1 HELLO MAIN MENU DVD LOCK CH CLOCK TV LANGUAGE END ACT I ON SELECT SET SET ...

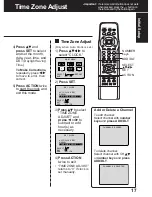
Page 17: ...elete a Channel Time Zone Adjust 1 Press to select CLOCK 2 Press SET AUTO CLOCK SET MANUAL T I ME ZONE ADJUST 0 SELECT SET END ACT I ON SET CLOCK AUTO CLOCK SET MANUAL T I ME ZONE ADJUST 1 SELECT SET END ACT I ON SET CLOCK CHANNEL 08 ADDED To add channel Select channel with number keys and press ADD DLT Important If a remote control button does not work when pressed press the button on the remote ...

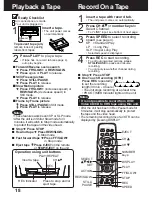
Page 18: ...r number keys to Select Channel For LINE input see bottom of next page 2 3 4 Press SPEED to select recording speed see page 4 SP Standard Play LP Long Play SLP Super Long Play Selected speed is displayed Press REC to start recording To edit out unwanted portions press STILL PAUSE to pause and resume recording You cannot view another channel during recording After the unit has been in Rec Pause mod...

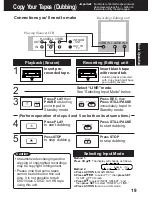
Page 19: ... Input Mode below Press REC then Press STILL PAUSE immediately to put in Standby mode Press STILL PAUSE to start dubbing Press STOP to stop dubbing Selecting Input Mode Method 1 Press CH The display will change as follows Method 2 a Press ACTION for MAIN MENU b Press to select TV then press SET for SET UP TV screen c Press to select INPUT SELECT and then press SET to select TUNER or LINE d Press A...

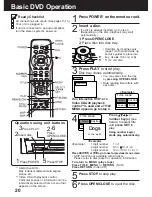
Page 20: ... by its edges only page 7 with printed side up and use guides to place into tray Use 3 8 cm or 5 12 cm disc 1 Interactive DVD May include multiple camera angles stories etc 2 Video CD with playback control Particular scenes or information can be interactively selected from a menu that appears on the screen Operation using unit buttons Example 1 digit number 1 1 2 digit number 12 10 1 2 3 digit num...

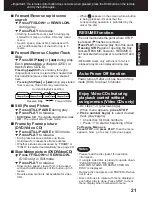
Page 21: ...ce Whether pictures are advanced by FRAME or FIELD is selected automatically see page 60 Slow Motion picture DVD Video CD Press FF SLOW or REW SLOW DVD only in Still mode Press PLAY to release Slow motion speed slow at first is increased with each additional press of the button up to 5 levels Reverse slow motion is not available for video CDs When appears on the screen while a button is being pres...

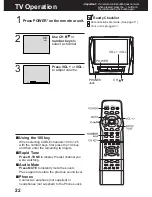
Page 22: ... MUTE to instantly mute the sound Press again to restore the previous sound level Phones Connect an earphone not supplied or headphones not supplied to the Phones Jack Ready Checklist All connections are made See page 11 Your unit is plugged in Important If a remote control button does not work when pressed press the button on the remote and try the button again Use CH or number keys to select a c...

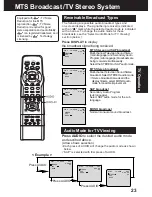
Page 23: ... possible improvement SAP broadcast Secondary Audio Program sub language Select SAP audio mode for the sub language Audio Mode for TV Viewing Press AUDIO to select the desired audio mode as described above Arrow shows selection Each press of AUDIO will change the audio mode as shown below SAP is selected with first press of AUDIO MTS Broadcast TV Stereo System MONO broadcast Normal monaural sound ...

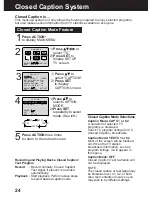
Page 24: ...T SET 5 3 1 SELECT END ACT I ON SET UP TV SET SET CAPTION I NPUT SELECT TUNER SET UP VIDEO AUD I O FM ANTENNA INT REMOTE WARNING ON DVD VOL ADJUST 2 ClosedCaptionModeSelections Caption Mode CAP C1 or C2 A narration of selected TV programs is displayed Check TV program listings for CC Closed Caption broadcasts Caption Mode TEXT C1 or C2 Most of the screen will be blocked out When the TV station bro...

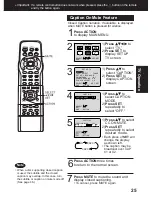
Page 25: ...3 1 Press to select CAPTION 2 Press SET to display CAPTION screen MAIN MENU DVD LOCK CH CLOCK TV LANGUAGE END ACT I ON SELECT SET SET 5 3 1 SELECT END ACT I ON SET UP TV SET SET CAPTION I NPUT SELECT TUNER SET UP VIDEO AUD I O FM ANTENNA INT REMOTE WARNING ON DVD VOL ADJUST 2 4 1 Press to select CAPTION MODE 2 Press SET repeatedly to select OFF NO CAP C1 CAP C2 5 1 Press to select CC ON MUTE 2 Pre...

Page 26: ...s inserted if Playback mode is selected Make sure a disc is inserted if DVD DVD Video CD CD mode is selected See FM Radio on pages 28 and 29 for instructions on how to preset FM stations FM1 VCR CH01 CH125 FM8 FM9 CH02 CH03 DVD ON T IMER SELECT HOUR SET SET SELECT END PROG ALARM ON 4 Press to select ALARM ON or OFF When ON is selected an alarm will gradually increase in volume for one minute or un...

Page 27: ...n the selected channel has no broadcast signal with the Weak Signal Display Feature set to OFF see page 39 the screen will turn solid blue Important If a remote control button does not work when pressed press the button on the remote and try the button again REC 12 00PM 0 25 ABC 0 12 34 SP STEREO SAP MONO TV VCR Status Clock Display Press DISPLAY to display or remove the overlay Function Status Cu...

Page 28: ...search mode 3 FM Radio Setup FM 1 87 5MHz 12 00PM FM 1 87 7MHz MEMORY PRESS ADD DLT KEY 12 00PM FM 1 87 7MHz MEMORIZED 12 00PM Press FM on the remote to display FM radio mode FM Radio is This unit has an FM radio with built in antenna 9 station preset and a band range of 87 5 108 1 MHz You can even set the On Timer page 26 to wake up to your favorite radio station FM Antenna Setup 1 2 Make sure FM...

Page 29: ...MENU is displayed Once stations are set the selected station and current time are displayed when FM Radio mode is entered To remove time press DISPLAY If DISPLAY is pressed again the unit status screen appears Important If a remote control button does not work when pressed press the FM button on the remote and try the button again SELECT END ACT I ON SET UP TV SET SET CAPTION I NPUT SELECT TUNER S...

Page 30: ... PROG to display SET PROGRAM screen 1 Press to select TIMER PROGRAMMING 2 Press SET to display screen If a program is already in memory press and SET to select an unused program number Press to select and SET or to set the recording DATE 1 31 One time DAILY MON FRI WEEKLY SUN SAT Same time once a week Repeat step 3 to set Start time stop time Channel or LINE for outside source Speed SP LP SLP Toda...

Page 31: ...cord tab is loaded and the unit is in Stop mode If the start times of two programs overlap the lower numbered program will have priority If the start time for a Timer Recording comes up during a normal recording or One Touch Recording page 18 the Timer Recording will not be performed If there is a power interruption of more than one minute the recording may not be performed or continued If INCOMPL...

Page 32: ... code entry Press POWER to turn selected unit ON or OFF See below for controllable functions in each mode Please repeat the Universal Remote Control Setup after replacing remote control batteries The remote control will not operate all DSS receivers or Cable Boxes made by the manufacturers listed If you get no results your particular brand cannot be controlled Notes 2Setup remote Hold down DSS CAB...

Page 33: ...02 04 55 65 66 67 68 120 106 121 122 115 117 118 124 Gerrard 44 51 75 59 GC Electronics 44 42 63 29 30 52 04 124 126 Hamlin 41 14 15 28 102 104 103 130 Hitachi 31 Jerrold 01 84 83 34 03 02 04 55 65 66 67 68 120 106 121 122 115 117 118 124 Jasco 30 04 124 Macom 31 Magnavox 26 112 Matsushita 17 16 08 87 109 Movietime 32 39 42 44 126 38 40 Maestro 74 35 NEC 40 19 38 32 NSC 40 19 38 32 Novavision 08 0...

Page 34: ...y within 5 minutes or the Index Search mode will be canceled If Index Search is started very close to an index mark that index mark may not be counted in the search 2 Play begins at search end To search forward or back 1 index press FF or REW while screen left is displayed 10 seconds NOTE indicates start points of each recording 6 1 5 7 2 3 4 To calculate the Index Number Example 1 To go to rec 2 ...

Page 35: ... BLANK INDEX Program 2 BLANK INDEX BLANK Program 1 Program 2 BLANK Program 1 INDEX Press SEARCH button Press SEARCH button FF FF Press SEARCH button FF End Point 2 End Point Upon locating end point The unit searches slightly past end point reverse searches and plays the last few seconds of the program then stops Press SEARCH button If Program End Search is started very close to an index mark that ...

Page 36: ...ing playback to display the Counter Press CM ZERO in stop mode to start ZERO SEARCH 0 00 00 SLP PLAY 12 00 PM PLAY REPEAT ON To turn ON press PLAY REPEAT on the unit repeatedly in Play mode to select REPEAT ON To turn OFF repeat above to select REPEAT OFF Playback repeats when tape end is reached or unrecorded portion over 30 seconds is detected ForrepeatplayinDVDmode seepage55 Note Unit goes into...

Page 37: ...inutes Power turns off This feature is canceled if any button is pressed during above conditions Auto Playback Insert a tape in Power off mode Power turns on Playback begins if tape has no record tab Auto Rewind except for Recording Tape reaches its end Rewind Stop Playback Auto Eject Repeat Play is OFF Tape with no record tab reaches its end Rewind Stop Eject Auto Operation Functions Important If...

Page 38: ...ect a station 2 Press SET or to move cursor to the right 3 Press to select channel number 4 Press SET or to set preset captions Repeat step 4 until the Caption List is complete PBS CNN ESPN HBO ABC CBS FOX NBC CLEAR ADD DLT SELECT SET END ACT I ON SET CHANNEL CAPT I ON To Make Corrections Press then SET or to select channel number Press to change or ADD DLT to delete Channel Caption is Station nam...

Page 39: ...t Useful for families with small children VCR LOCK ACT IVATED VCR LOCK OFF 4 Press ACTION to display MAIN MENU 1 Press to select CH 2 Press SET to display SET UP CHANNEL screen Press ACTION twice to return to the normal screen 1 Press to select WEAK SIGNAL DISPLAY 2 Press SET to set ON or OFF Notes In Stop mode hold down REC on the unit without a cassette inserted for 7 seconds to turn ON Please i...

Page 40: ...gs menu see pages 41 42 Or Press ACTION twice to exit 4 LOCK RECOGNIZED CHANGE CODE ADD DLT CONTINUE SET END ACT I ON CONFIRM 4 DIGIT CODE 1 Press number keys to enter your secret code 2 Enter same code again for confirmation 3 BACK SPACE ENTER 0 9 END ACT I ON LOCK ENTER 4 D I G I T CODE Step 2 not necessary when changing rating or secret code Take care that you are not observed entering the secr...

Page 41: ...ed press the button on the remote and try the button again US MOVIES OFF CHANGE SETT I NGS US TV PROGRAMS OFF CHANGE SETT I NGS DVD LOCK OFF CHANGE SETT I NGS SELECT SET SET END ACT I ON LOCK NEXT PAGE 2 1 Press to select CHANGE SETTINGS 2 Press SET to display screen SELECT SET SET END ACT I ON LOCK NEXT PAGE US MOVIES OFF CHANGE SETT I NGS US TV PROGRAMS OFF CHANGE SETT I NGS DVD LOCK OFF CHANGE ...

Page 42: ... You may select from standard TV ratings chart 1 or customize to a specific content rating chart 2 4 1 Press to select and SET to set ratings to be blocked See ratings charts on this page V I EW NR PROGRAMS YES FOR ALL CH I LDREN SELECT SET SET END ACT I ON TV Y TV Y7 TV G TV PG TV 14 TV MA FV V S L D V S L D V S L UNLOCKED 5Press ACTION four times to exit this mode Note NEXT PAGE displays CANADIA...

Page 43: ...V Chip Control is activated To View a Blocked Program Movie Temporarily Deactivate V Chip Control Enter your secret code ACCESS CODE in the Blocking Message screen V Chip Control is reactivated when power is turned off or power failure occurs Deactivate V Chip Control Enter your secret code steps 1 4 page 40 Then set US MOVIES and or US TV PROGRAMS to OFF using and SET Ratings set on pages 41 and ...

Page 44: ...rded in Hi Fi stereo will playback with true stereo sound Standard stereo tapes will playback with monaural sound To listen to Hi Fi stereo playback the unit AUDIO L R jacks must be connected to a stereo amp and speakers There may be a difference in audio level between Hi Fi and normal audio playback Notes 2 This screen appears when you press AUDIO during playback Press AUDIO repeatedly each press...

Page 45: ... UP TV screen MAIN MENU DVD LOCK CH CLOCK TV LANGUAGE END ACT I ON SELECT SET SET 5 3 1 3 1 Press to select DVD VOL ADJUST 2 Press SET to set the level 0 1 or 2 SELECT END ACT I ON SET UP TV SET SET CAPTION I NPUT SELECT TUNER SET UP VIDEO AUD I O FM ANTENNA INT REMOTE WARNING ON DVD VOL ADJUST 2 4Press ACTION twice to return to normal screen You can hear a deeper 3 D sound effect using just the u...

Page 46: ...IO ADJUST 5Press ACTION three times to end setup 1 Press to select TV 2 Press SET to display SET UP TV screen 2 MAIN MENU DVD LOCK CH CLOCK TV LANGUAGE END ACT I ON SELECT SET SET 5 3 1 1 Press to select SET UP VIDEO AUDIO 2 Press SET to display SELECT END ACT I ON SET UP TV SET SET CAPTION I NPUT SELECT TUNER SET UP VIDEO AUD I O FM ANTENNA INT REMOTE WARNING ON DVD VOL ADJUST 2 3 Audio Menu NORM...

Page 47: ...ure intensity by adjusting both contrast and color level in the proper balance SHARPNESS Control Adjust picture sharpness f Press ACTION four times to end setup d e BASS TREBLE BALANCE STANDARD ADJUST SELECT END ACT I ON AUDIO ADJUST AUDIO Adjustment BASS Control To adjust the intensity of low frequency sound TREBLE Control To adjust the intensity of high frequency sound BALANCE Control To adjust ...

Page 48: ...edish Norwegian Danish Portuguese Russian Japanese CHI KOR MAL VIE THA Chinese Korean Malay Vietnamese Thai Other Subtitle language No Audio soundtrack language No Change the No by pressing and press SET Ready Checklist Please read Basic DVD Operation on page 20 You can change the audio soundtrack language selected at the Settings for DVD Operation to a different language if available See page 58 ...

Page 49: ...low 2 Press or to set DVD only Number of angle being played back You can enlarge specific portions of a picture and select the zoom ratio using the ZOOM button on the remote during DVD playback Set Zoom size Press ZOOM repeatedly to change display as follows Picture Zoom DVD only You can enlarge the center portion of the image to one of 2 magnifications Closed captioning will not be displayed whil...

Page 50: ...ow basic steps for using the menu a b Press MENU in Play mode to display DVD menu 1 Press or number key s to select an item 2 Press SET or PLAY to access DVD menu DVD only Pressing MENU again resumes play from the scene when MENU was first pressed 2 1 Press or number Key s to select a title 2 Press SET or PLAY to start play Disc Operation continued Step 2 not necessary when using number key s Exam...

Page 51: ...Press DISPLAY again to display Unit Information screen f Press SET to set mode DISC REPEAT stops flashing To cancel select REPEAT OFF in step e then press SET SELECT SET SET END DISPLAY PLAY DISC REPEAT PROGRAM PLAY SET SET END DISPLAY SET SET NEXT DISPLAY TRACK 1 VIDEO CD PBC OFF 1 35 12 Notes Important If a remote control button does not work when pressed press the DVD button on the remote and t...

Page 52: ...K TV LANGUAGE END ACT I ON SELECT SET SET 5 3 1 1 Press to select PLAY MODE 2 Press SET to display screen 3 DVD MAIN MENU SELECT SET SET END ACTION 1 Press to select RANDOM PLAY 2 Press SET to begin random play To cancel press STOP during play then press CLEAR 4 PLAY MODE SELECT SET SET END ACTION Important If a remote control button does not work when pressed press the button on the remote and tr...

Page 53: ...sing SET When numbers are displayed e g title number the NUMBER keys are also available To return to the normal screen press CLEAR or DISPLAY repeatedly Example of DVD SELECT SET SET NEXT DISPLAY T I TLE 12 DVD CHAPTER 11 0 12 34 SELECT SET SET NEXT DISPLAY T I TLE 12 DVD CHAPTER 24 0 12 34 21 Press or to select an item 2 Press SET to set Example of Video CD SET SET NEXT DISPLAY TRACK 12 VIDEO CD ...

Page 54: ... for DVD Track No and elapsed playing time are not displayed during play started from menu of Video CDs with playback control When appears on the screen while a button is being pressed it means that the corresponding operation is prohibited by the unit or the disc Disc information screen for Video CD CD A Track No Change the No by pressing or the NUMBER keys and press SET B Playback control ON OFF...

Page 55: ... information screen Change the desired mode during play by pressing and press SET Video CD CD TRACK REPEAT DISC REPEAT REPEAT OFF DVD CHAPTER REPEAT TITLE REPEAT REPEAT OFF Important If a remote control button does not work when pressed press the DVD button on the remote and try the button again For repeat play in VCR mode see page 36 b Play mode Video CD CD only See page 51 or 52 PROGRAM PLAY pro...

Page 56: ...kip Press SKIP or SKIP during play Each press skips a track If pressed within first 3 seconds of playback skips to the previous track If over 3 seconds returns to first track SKIP only Only the SKIP or SKIP button can be used for track skip selection during playback Put unit in Stop mode before performing folder file selection see above right Press STOP to stop playing 5 Press OPEN CLOSE to eject ...

Page 57: ...ted in Green will be blocked those not highlighted white letters will not be blocked Perform DVD Lock setting in TV mode Enter your secret code to display LOCK menu Perform Enter Secret Code steps on page 40 US MOVIES OFF CHANGE SETT I NGS US TV PROGRAMS OFF CHANGE SETT I NGS DVD LOCK OFF CHANGE SETT I NGS SELECT SET SET END ACT I ON LOCK NEXT PAGE SELECT SET SET END DISPLAY YOUR SELECTION EXCEEDS...

Page 58: ... the disc can be set If a language not offered is set the original disc language will be selected AUDIO OUTPUT See page 59 You can set the audio output that comes from the digital audio output terminal STILL MODE See page 60 To select FIELD or FRAME to prevent jitter or to make small text or fine patterns clearly visible in a still picture When AUTO is set FIELD or FRAME is selected automatically ...

Page 59: ...l bitstream 1ch 5 1ch is output Factory preset OFF No output dts selections Bitstream dts bitstream is output Factory preset OFF No output DRC Dynamic Range Compression selections OFF Normal audio range is selected Factory preset ON For dynamic sound even at low volume this is useful for late night listening Dolby Digital DVDs only SURROUND selections Surround Sound creates the effect of sound com...

Page 60: ... right of screen is trimmed Video data not formatted in Pan Scan will play in letterbox style Letterbox Widescreen video data is played in Letterbox style top and bottom of screen has black margin Set the screen display style for widescreen video material playback Pan Scan Factory preset Letterbox Set to reduce jitter in a displayed still picture or a motion picture DVD MAIN MENU SELECT SET SET EN...

Page 61: ...Tatar 8487 Twi 8575 Ukrainian 8582 Urdu 8590 Uzbek 8673 Vietnamese 8679 Volapük 8779 Wolof 8872 Xhosa 8979 Yoruba 9072 Chinese 9085 Zulu Code Language 7079 Faroese 7082 French 7089 Frisian 7165 Irish 7168 Scots Gaelic 7176 Galician 7178 Guarani 7185 Gujarati 7265 Hausa 7273 Hindi 7282 Croatian 7285 Hungarian 7289 Armenian 7365 Interlingua 7378 Indonesian 7383 Icelandic 7384 Italian 7387 Hebrew 746...

Page 62: ...ntrol P 22 Adjust SHARPNESS and PICTURE controls in the SET UP Video Adjustment P 47 Adjust TINT and COLOR controls in the SET UP Video Adjustment P 47 Install a directional antenna Make sure the selected channel is in unit s memory P 16 Only the channel begin recorded can be viewed on this unit Correction Completely insert Power Plug into an AC outlet Set POWER button to ON Auto power off shut of...

Page 63: ...t contain more than one language For some discs alternative language cannot be selected with the AUDIO or SUB TITLE button Try selecting it from the DVD menu if available This function is dependent on software availability Even if disc has multiple angles they may be recorded for specific scenes only ANGLE Indicator on unit lights up P 49 Correction Insert the cassette window side up record tab fa...

Page 64: ... Timer Recording or set the On Timer and the Clock is not set If you press REC and a cassette is inserted with no record tab If you press STOP during a Timer Recording If you press PLAY FF REW or REC without a cassette inserted If the unit is not in Stop mode or a cassette with record tab is not inserted two minutes before a Timer Recording is about to begin Page 16 17 4 18 31 18 30 31 Check the f...

Page 65: ...T IS PROHIBITED TO COPY DVD VIDEO CD CD TO VHS Caution If head cleaning becomes necessary while playing back a tape If you press a function button other than STOP EJECT or POWER while the unit is in VCR Lock mode If you press PLAY or the unit reads data from a stained or scratched disc in DVD mode Also if the type of disc is other than DVD Video CD or CD If you press REC in DVD mode Page 6 39 7 18...

Page 66: ...ECT button 8 9 Eject tape 18 F Fast Forward 18 FF SLOW button 8 18 FM button 8 28 29 FM Radio 28 29 Forward Search 18 Frame by Frame Advance 18 Front Panel Indicators 9 Function Display 27 TV VCR H Head Cleaning 6 I Important Safeguards and Precautions 2 Information Unit Cassette Disc 6 7 Initial Setup 14 Index Search 34 Indicators on the Front Panel 9 Input Mode 19 L Language 14 16 LIGHT button 8...

Page 67: ...0 Playback control Video CDs 21 PLAY button 8 20 Program Play Video CD CD 51 Program Repeat Play Video CD CD 51 R Random Play Video CD CD 52 Region number 3 Repeat Play 55 RESUME function 21 RETURN button 8 20 REW button 8 20 S Settings for DVD Operation 58 SKIP button 8 20 21 Slow Motion DVD Video CD 21 SLOW button 8 21 STILL MODE 60 Still Pause Picture 21 STILL PAUSE button 8 21 Subtitle languag...

Page 68: ...ngeles CA 90068 323 436 3500 Government Marketing Department 52 West Gude Drive Rockville MD 20850 301 738 3840 Matsushita Electric Corporation of America Corporate Sales Group Hawaii Region 99 859 Iwaiwa ST Alea Hl 96701 3267 808 488 7779 Panasonic Canada Inc 5770 Ambler Drive Mississauga Ontario L4W 2T3 905 624 5010 Panasonic Sales Company Division of Matsushita Electric of Puerto Rico Inc Ave 6...

Reviews: