background image

18

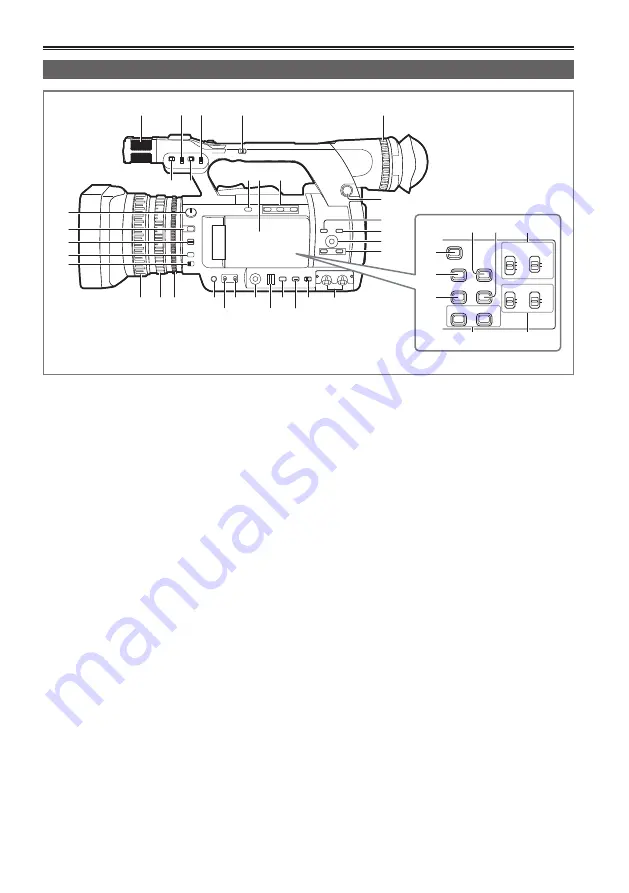
Left side

BARS

EVF DTL

LCD

COUNTER-RESET/TC SET

ZEBRA

CH1 SELECT

AUDIO

INT(L)

INT(R)

INPUT1

INPUT2

INPUT2

CH2 SELECT

WFM

AUTO

MANU

CH2

AUTO

MANU

CH1

1

4

8 9 10

5

16

3

6 7

21

24

25

26 27

28

29

30

31

32

22 23

2

17

18

19

20

11
12

13

14

15

35

39

40

38

33 34

36

37

Description of parts

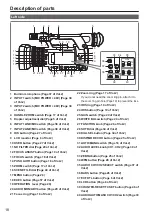
1  Built-in microphone (Page 37 of Vol.2)
2  INPUT1 switch (MIC POWER + 48V) (Page 38 

of Vol.2)

3  INPUT2 switch (MIC POWER + 48V) (Page 38 

of Vol.2)

4  HANDLE ZOOM switch (Page 17 of Vol.2)
5  Diopter adjustment dial (Page 5 of Vol.2)
6  INPUT1 LINE/MIC switch (Page 38 of Vol.2)
7  INPUT2 LINE/MIC switch (Page 38 of Vol.2)
8  OIS button (Page 27 of Vol.2)
9  LCD monitor (Page 6 of Vol.2)
10 USER button (Page 27 of Vol.2)
11  ND FILTER dial (Page 20 of Vol.2)
12 FOCUS ASSIST button (Page 19 of Vol.2)
13 FOCUS switch (Page 18 of Vol.2)
14 PUSH AUTO button (Page 18 of Vol.2)
15 ZOOM switch (Page 17 of Vol.2)
16 SCENE FILE dial (Page 40 of Vol.2)
17 MENU button (Page 28)
18 EXEC button (Page 57 of Vol.2)
19 OPERATION  lever (Page 28)
20 AUDIO MON/ADV button (Page 29 of Vol.2)
21 Focus ring (Page 18 of Vol.2)

22 Zoom ring (Page 17 of Vol.2)

If you do not need the zoom ring pin, attach it to 
the zoom ring pin hole (Page 19) to prevent the loss.

23 IRIS ring (Page 19 of Vol.2)
24 IRIS button (Page 19 of Vol.2)
25 GAIN switch (Page 20 of Vol.2)
26 WHITE BAL switch (Page 20 of Vol.2)
27 FUNCTION knob (Page 26 of Vol.2)
28 SHTR dial (Page 34 of Vol.2)
29 DIAL SEL button (Page 34 of Vol.2)
30 DISP/MODE CHK button (Page 25 of Vol.2)
31 AUTO/MANU switch (Page 18 of Vol.2)
32 AUDIO LEVEL knob (CH1, CH2) (Page 39 of 

Vol.2)

33 ZEBRA button (Page 25 of Vol.2)
34 WFM button (Page 28 of Vol.2)
35 AUDIO CH1/CH2 SELECT switch (Page 37 of 

Vol.2)

36 BARS button (Page 28 of Vol.2)
37 EVF DTL button (Page 6 of Vol.2)
38 LCD button (Page 8 of Vol.2)
39 COUNTER-RESET/TC SET button (Page 46 of 

Vol.2)

40 AUDIO AUTO/MANU CH1/CH2 switch (Page 39 

of Vol.2)

Description of parts

Summary of Contents for AG-AC130A Series

Page 1: ...vanced operations of the Memory Card Camera Recorder refer to Operating Instructions Vol 2 pdf file contained in the supplied CD ROM Page 10 This product is eligible for the AVCCAM 3 Year Warranty Repair Program For details see page 6 Operating Instructions Memory Card Camera Recorder Before operating this product please read the instructions carefully and save this manual for future use Volume 1 ...

Page 2: ...order to maintain adequate ventilation do not install or place this unit in a bookcase built in cabinet or any other confined space To prevent risk of electric shock or fire hazard due to overheating ensure that curtains and any other materials do not obstruct the ventilation CAUTION Do not lift the unit by its handle while the tripod is attached When the tripod is attached its weight will also af...

Page 3: ...is equipment generates uses and can radiate radio frequency energy and if not installed and used in accordance with the instructions may cause harmful interference to radio communications However there is no guarantee that interference will not occur in a particular installation If this equipment does cause harmful interference to radio or television reception which can be determined by turning th...

Page 4: ...ies specified by the manufacturer 12 Use only with the cart stand tripod bracket or table specified by the manufacturer or sold with the apparatus When a cart is used use caution when moving the cart apparatus combination to avoid injury from tip over 13 Unplug this apparatus during lightning storms or when unused for long periods of time 14 Refer all servicing to qualified service personnel Servi...

Page 5: ...ntre partes metálicas pode causar vazamentos gerar calor romper a blindagem e produzir fogo Não desmonte não remova o invólucro nem amasse a bateria O gás liberado pela bateria pode irritar a garganta danificar o lacre do invólucro ou o vazamento provocar calor ruptura da blindagem e produzir fogo devido ao curto circuito dos terminais Não incinere nem aqueça as baterias elas não podem ficar expos...

Page 6: ...y coverage 3 The basic warranty period may vary depending on the country region 4 Not all repair work is covered by this extended warranty Purchase AVCCAM product Register online within 1 month Registration Notice e mail sent Details about user registration and the extended warranty http panasonic biz sav pass_e Free 3 years of Warranty Repairs Customers who register as users on the website will r...

Page 7: ...either registered trademarks or trademarks of Microsoft Corporation in the United States and or other countries Screenshots are used in accordance with Microsoft Corporation guidelines IBM and PC AT are registered trademarks of International Business Machines Corporation Intel is a registered trademark or a trademark of Intel Corporation in the United States and or other countries Apple Macintosh ...

Page 8: ... as DV mode LOCK AG AC130A DV tape equipment memory card camera recorder computer etc Computer Video equipment television monitor Data can be transferred for backup dubbing editing IEEE1394 DV cable can only be used in DV mode Audio pin cable Video pin cable HDMI cable can only be used in AVCHD mode Memory card AVCHD mode Speed class 4 or higher can be used when in PH HA mode DV mode Speed class 6...

Page 9: ... 21 Recharging 21 Power sources 23 Using the battery 23 Using the AC adaptor 24 Adjusting the hand strap 24 Attaching the shoulder strap 25 Attaching removing the lens hood 25 Attaching removing the lens cap 25 Fitting the eye cup 26 The remote control 26 Inserting the battery 26 Remote control usable range 26 Turning the camera ON OFF 27 Switching to AVCHD mode DV mode 27 Setup menu basic operati...

Page 10: ... Thumbnail operations Useful playback functions Editing Connecting external devices Nonlinear editing How to handle data recorded on the memory card Dubbing Displays Screen displays Menu Setup menu list Reference Before calling for service Updating the firmware incorporated into the unit Cleaning Storage precautions Recording format list Index How to open the operating instruction manual PDF files...

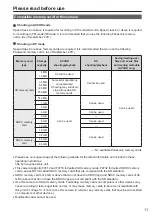
Page 11: ... SDHC memory card 4 GB Can be used 6 GB 8 GB Can be used 12 GB 16 GB Can be used 32 GB SDXC memory card 48 GB 64 GB No available Panasonic memory cards Please see our support page at the following website for the latest information not included in these operating instructions http pro av panasonic net This camera supports FAT12 and FAT16 formatted SD memory cards FAT32 formatted SDHC memory cards ...

Page 12: ...card is recommended for SD compatible products this indicates that stable recording operation can be achieved by using memory cards of class 6 and above UHS I compatibility UHS I Ultra High Speed I is speed standard for SD memory card You can use a UHS I memory card which performs as an SD speed class 10 memory card on this camera Reminders for handling Do not allow dirt water or other substances ...

Page 13: ...harger and battery If the CHARGE lamp continues to flash even when the battery temperature is normal the battery or AC adaptor battery charger might be damaged Contact your dealer The battery takes longer to charge when it is warm Using the AC adaptor battery charger near radios may distort their sound Keep the AC adaptor battery charger 1 meter or more away from radios The AC adaptor battery char...

Page 14: ...y cards Liquid crystal displays Images or characters can linger on the screen of the LCD or viewfinder if they are left displayed for a long time but you can fix this by leaving the camera off for several hours The LCD monitor is managed with high precision to ensure that 99 99 of the pixels are effective leaving only 0 01 of pixels that are either dead or remain on all the time This is normal and...

Page 15: ...o compensation can be provided Copyrights Copyright laws forbid the use of video and audio material that you recorded for any purpose other than your own personal enjoyment Caution regarding laser beams The lens may suffer damage if struck by a laser beam Make sure that laser beams do not strike the lens when shooting in an environment where laser devices are used Media that can be used with this ...

Page 16: ...de Recorded video cannot be used with non AVCHD compatible equipment Playback may not always be possible on all AVCHD compatible equipment In such instances play your video using this camera Compatibility of video recorded in DV mode When playing back memory cards recorded using the DV mode of the camera in Panasonic AG HMC80 series is displayed on the clip on the thumbnail screen The playback wil...

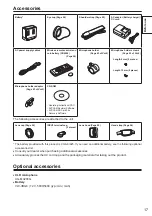
Page 17: ...m 2 pieces Microphone holder adaptor Page 63 of Vol 2 CD ROM Operating Instructions PDF AVCCAM Restorer Software AVCCAM SD Card File Recovery Software The following accessories are attached to the unit Lens cap Page 25 INPUT terminal cap 2 pieces Lens hood Page 25 Hand strap Page 24 The battery provided with this product is CGA E 625 If you need an additional battery see the following optional acc...

Page 18: ...switch Page 17 of Vol 2 16 SCENE FILE dial Page 40 of Vol 2 17 MENU button Page 28 18 EXEC button Page 57 of Vol 2 19 OPERATION lever Page 28 20 AUDIO MON ADV button Page 29 of Vol 2 21 Focus ring Page 18 of Vol 2 22 Zoom ring Page 17 of Vol 2 If you do not need the zoom ring pin attach it to the zoom ring pin hole Page 19 to prevent the loss 23 IRIS ring Page 19 of Vol 2 24 IRIS button Page 19 of...

Page 19: ... 6 START STOP button Page 11 of Vol 2 7 Protective caps Keep protective caps fitted over connecting terminals that are not being used 8 Shoulder strap mounting location Page 25 9 Zoom lever handle side Page 17 of Vol 2 10 REC CHECK button Page 12 of Vol 2 11 Zoom lever Page 17 of Vol 2 12 AUDIO INPUT1 2 terminal XLR 3 pin Page 38 of Vol 2 13 Zoom ring pin hole 14 HOLD switch Page 24 of Vol 2 15 ST...

Page 20: ...OT SEL button Page 12 of Vol 2 16 Protective caps Keep protective caps fitted over connecting terminals that are not being used 17 USB2 0 terminal Page 64 of Vol 2 18 Headphone jack 3 5 mm stereo mini jack Page 63 of Vol 2 19 INDEX REMOTE jack 2 5 mm super mini jack 20 CAM REMOTE jack FOCUS IRIS 3 5 mm mini jack You can connect a remote control unit optional to control the FOCUS and IRIS operation...

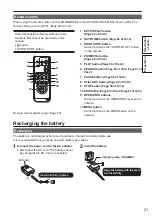
Page 21: ...ra 4 ZOOM VOL button Page 62 of Vol 2 5 PLAY button Page 50 of Vol 2 6 SEARCH button Page 50 of Vol 2 Page 61 of Vol 2 7 PAUSE button Page 50 of Vol 2 8 STILL ADV button Page 62 of Vol 2 9 STOP button Page 50 of Vol 2 10 SKIP button Page 50 of Vol 2 Page 61 of Vol 2 11 OPERATION buttons Same function as the OPERATION lever on the camera 12 MENU button Same function as the MENU button on the camera...

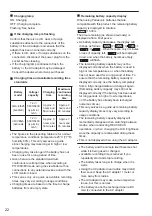
Page 22: ...n using Panasonic batteries that are compatible with this product the remaining battery capacity is displayed in minutes 1h30m The time remaining as shown previously is displayed after a brief pause As battery capacity decreases the display will change as follows When there are only 3 minutes or less of capacity left will be displayed in red and when the battery becomes empty will flash The remain...

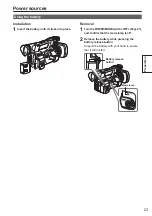
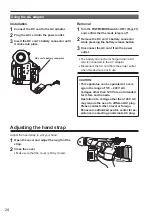
Page 23: ...ry until it clicks into place Removal 1 Turn the POWER MODE switch OFF Page 27 and confirm that the mode lamp is off 2 Remove the battery while pressing the battery release button Support the battery with your hand to ensure that it will not fall Battery release button Mode lamp ...

Page 24: ...ged when a DC cord is connected to the AC adaptor Disconnect the AC cord from the power outlet when this device is not in use CAUTION This apparatus can be operated at a volt age in the range of 110 240 V AC Voltages other than 120 V are not intended for U S A and Canada Operation at a voltage other than 120 V AC may require the use of a different AC plug Please contact either a local or foreign P...

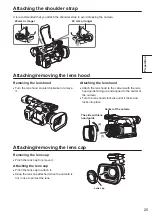
Page 25: ...g the lens hood Attach the lens hood to the camera with the lens hood guide facing up and aligned to the center of the camera Turn the lens hood clockwise until it clicks and locks into place 1 2 Center of the camera The side with lens hood guide Attaching removing the lens cap Removing the lens cap Pinch the lens cap to remove it Attaching the lens cap Pinch the lens cap to attach it Keep the len...

Page 26: ...cy of usage but is approximated at about one year If the remote control unit fails to work even when it is operated near the camera s remote control sensor it means that the battery has run out Keep the battery out of the reach of children Remote control usable range For the remote control sensor Distance Approx within 5 m Angle Approx 10 upward 15 downward and 15 sideways using the accessory batt...

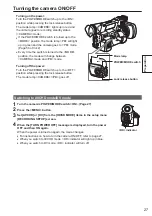
Page 27: ...g off the power Turn the POWER MODE switch up to the OFF position while pressing the lock release button The mode lamp CAMERA PB goes off Lock release button POWER MODE switch Mode lamp Switching to AVCHD mode DV mode 1 Turn the camera s POWER MODE switch ON Page 27 2 Press the MENU button 3 Set AVCHD or DV from the HD SD MODE items in the setup menu RECORDING SETUP screen 4 When the TURN POWER OF...

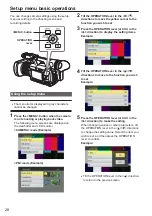
Page 28: ... in the directions to move the yellow cursor to the function you wish to set 3 Press the OPERATION lever or tilt it in the direction to display the setting items Example 4 Tilt the OPERATION lever in the directions to move to the function you wish to set Example 5 Press the OPERATION lever or tilt it in the direction to make the setting When changing values or other parameters tilt the OPERATION l...

Page 29: ... user files all items other than scene files By selecting INIT in the LOAD SAVE INIT item of the USER FILE screen you can restore the current user file menu setting to its factory setting To initialize scene files Among the six scene files select the file you wish to initialize using the SCENE FILE dial Then by selecting INIT in the LOAD SAVE INIT item of the SCENE FILE screen you can restore the ...

Page 30: ...ol Page 21 3 Select the TIME ZONE item on the setup menu OTHER FUNCTIONS screen and press the OPERATION lever or tilt it to the direction 4 Since pressing the OPERATION lever will display the settings screen tilt the OPERATION lever in the directions to set the time difference from Greenwich Mean Time then press the OPERATION lever again Factory default setting is 0 00 5 Tilt the OPERATION lever i...

Page 31: ...ill appear on the display Time is displayed in the 24 hour format 9 When settings are complete press the OPERATION lever The time can be inaccurate so confirm that the time is correct before shooting When using the camera overseas do not set the CLOCK SET to the local time but instead enter the time difference from Greenwich Mean Time according to the TIME ZONE Page 94 of Vol 2 ...

Page 32: ...ER1 DRS USER2 DRS EFFECT USER3 GAMMA WFM KNEE LCD MATRIX FACE FRAMING SKIN TONE DTL CARD READ CARD WRITE NAME EDIT AUTO SW A IRIS Page 84 of Vol 2 AGC ATW AF RECORDING SETUP HD SD MODE Page 85 of Vol 2 REC FORMAT ASPECT CONV 1 TC UB SETUP TC MODE PREREC MODE Page 87 of Vol 2 TCG SIMUL REC TC PRESET RELAY REC UB MODE 1 INTERVAL REC 2 UB PRESET TIME STAMP EXT TC LINK AUDIO LIMITER CH1 AUDIO LIMITER ...

Page 33: ...T META DATA 2 CARD READ EVF SET Page 93 of Vol 2 RECORD LCD BACKLIGHT USER CLIP NAME SELF SHOOT META DATA PROP EVF MODE CLIP COUNTER RST EVF COLOR META INIT SET OTHER FUNCTIONS IR REMOTE Page 93 of Vol 2 DV CONTROL 1 DV CMD SEL 1 TALLY LAMP OPTION MENU 1 4 1394 STATUS CLOCK SET Page 95 of Vol 2 1394 CONFIG TIME ZONE LANGUAGE SYSTEM INFO MENU INIT OPERATION TIME 1 Only in DV mode 2 Only in AVCHD mo...

Page 34: ...OUT SETUP HDMI OUT SEL 2 Page 88 of Vol 2 DOWNCON MODE 2 VIDEO SETUP AUDIO OUT VIDEO OUT OSD DATE TIME DATE FORMAT LEVEL METER CARD BATTERY OTHER DISPLAY LCD SET DISPLAY SETUP EVF SET Page 89 of Vol 2 LCD BACKLIGHT EVF MODE EVF COLOR CARD FUNCTIONS CARD FORMAT Page 92 of Vol 2 CARD STATUS CLIP PROPERTY USER FILE CARD READ Page 92 of Vol 2 CARD WRITE LOAD SAVE INIT OTHER FUNCTIONS IR REMOTE Page 93...

Page 35: ...1 m Gain settings 0 3 6 9 12 15 18 24 30 dB 24 dB and 30 dB are assigned to the USER button S GAIN Color temperature settings ATW ATW LOCK preset 3200 K preset 5600 K preset VAR Ach Bch Digital zoom 2X 5X 10X Assigned to the USER button ratio is changed every time the button is pressed Minimum subject illumination 0 4 lx F1 6 gain 30 dB shutter speed 1 30 seconds Lens hood Wide field large lens ho...

Page 36: ...ion rate PH mode Approx 21 Mbps VBR PM mode Approx 8 Mbps VBR HA mode Approx 17 Mbps VBR HE mode Approx 6 Mbps VBR Interval recording OFF 1 s 10 s 30 s 1 min 2 min For the recording mode PH 1080 24P fixed and shooting time has a maximum of 168 hours 1 week DV mode Recording format DV standard compliant File format AVI Type2 Recording media SD memory card 512 MB 1 GB 2 GB FAT12 FAT16 formats suppor...

Page 37: ...und 20 mm diameter Other terminals Camera remote terminal 2 5 mm diameter super mini jack x 1 ZOOM S S 3 5 mm diameter mini jack x 1 FOCUS IRIS INDEX remote terminal 2 5 mm diameter super mini jack x 1 TC PRESET IN OUT terminal VIDEO OUT terminal dual purpose IN 1 0 V 4 0 V p p 10 kΩ OUT 2 0 V 0 5 V p p low impedance USB2 0 terminal Memory card reader writer function without copyright protection T...

Page 38: ...the European Union EU These symbols are only valid in the European Union If you wish to discard these items please contact your local authorities or dealer and ask for the correct method of disposal Web Site http panasonic net Panasonic Corporation 2012 ...

Reviews: