background image

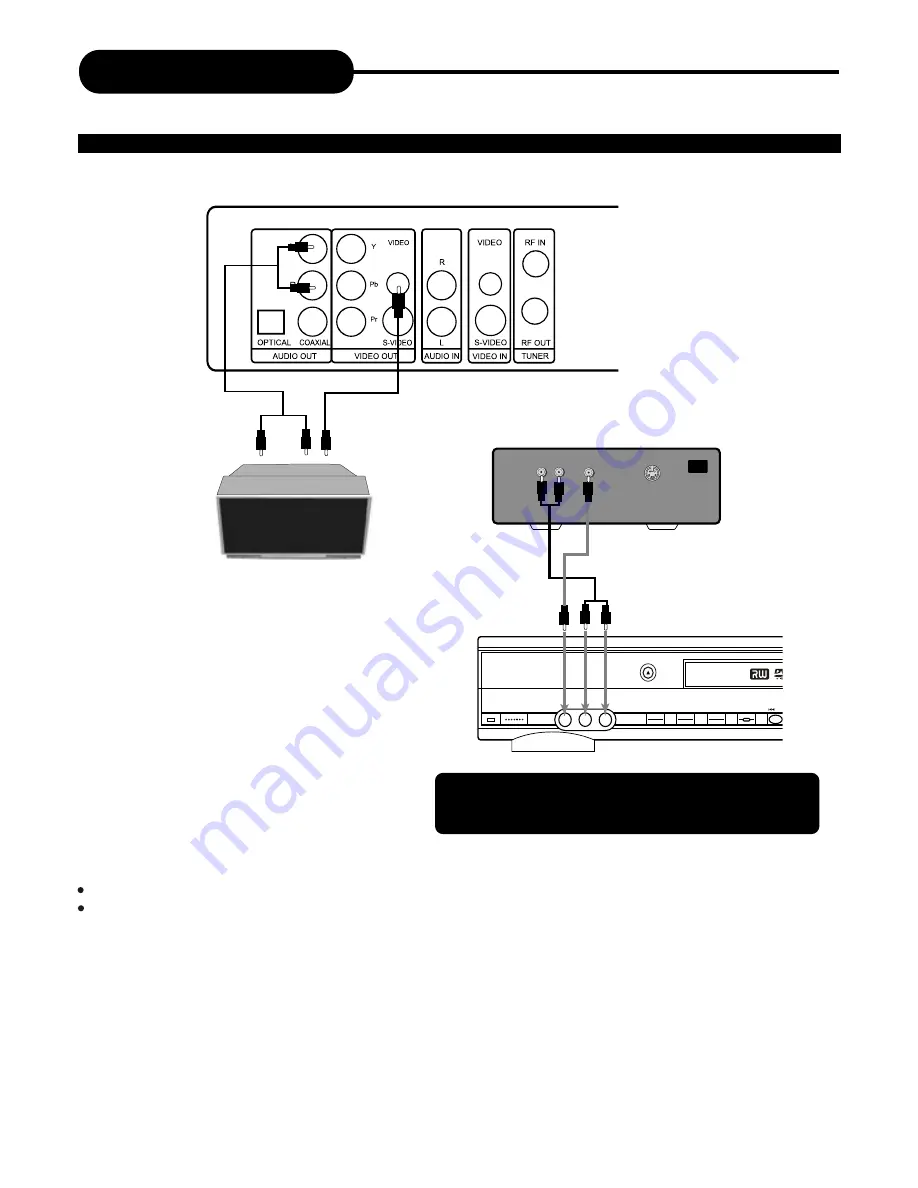
CONNECTION FOR AV SIGNAL (A/V FRONT INPUT)

Connection

11

Connection

NOTE

Refer to the manual of the connected system.
Turn off the power and unplug both units before setting up any connections.

Connect your recorder with the S-Video cable, if the Signal
Source has an S-Video input. Do not connect the yellow
video cable if using the S-Video cable.

RECORDER FRONT

RECORDER REAR

Video Out

Audio Out

EXTERNAL SIGNAL AV

Audio In

Video In

S-VIDEO

VIDEO

AUDIO

POWER

NEXT

PREV

RECORD

INPUT

CH+

CH-

OPEN/CLOSE

VIDEO

R  ----  AUDIO  ----  L

DVD PLAYER & RECORDER

Summary of Contents for DVDR111

Page 1: ...tructions PALSONIC CORPORATION PTY LTD 1 JOYNTON AVENUE WATERLOO NSW 2017 AUSTRALIA TEL 02 9313 7111 FAX 02 9313 7555 www palsonic com au PALSONIC CUSTOMER SERVICE TELEPHONE AUSTRALIA 1300 657 888 DVD...

Page 2: ...manual carefully and retain for future reference Should the unit require maintenance contact an authorised service location or contact us Only qualified service personnel should remove the cover Chan...

Page 3: ...ure See Instruction Manual for replacement or resetting of protective device If replacement of the plug is required be sure the service technician has used a replacement plug specified by the manufact...

Page 4: ...ound the player for proper ventilation TO OBTAIN A CLEAR PICTURE This player is a high tech precision device If the optical pick up lens and disc drive parts are dirty or worn down the picture quality...

Page 5: ...om Order Selecting Camera Angles Language Audio Settings Playing in a Favourite Order Selecting Subtitles 1 2 3 4 5 7 12 13 13 14 16 18 20 21 22 23 24 KODAK Picture CD JPEG MP3 Playback Using the On s...

Page 6: ...T S VIDEO OUTPUT S VIDEO INPUT REAR RF SIGNAL OUTPUT RF SIGNAL INPUT AUDIO OUTPUT COMPONENT VIDEO OUTPUT COMPOSITE VIDEO OUTPUT AUDIO INPUT REAR LEFT RIGHT COMPOSITE VIDEO INPUT REAR DIGITAL AUDIO OPT...

Page 7: ...RWARD 20 SLOW 21 SETUP 22 OPEN CLOSE 23 NUMBERS 24 TITLE 25 GOTO 26 RETURN 27 PLAY 28 STOP 29 CHANNEL 30 VOLUME 31 MENU 32 SUBTITLE 33 PAUSE STEP 34 DISPLAY 35 NAVIGATION 1 STANDBY 2 MUTE 3 I P INTERL...

Page 8: ...m right and left front speakers a centre speaker and one or two rear speakers CONNECTION FOR AUDIO OUTPUT Enjoying Digital Stereo Sound BETTER Enjoy the dynamic sound of Digital Stereo by connecting a...

Page 9: ...Video Input During stop status press I P button on remote control unit to switch between Progressive Scan or Interlace Scan or switch these two modes in General Setup from the Setup Menu CONNECTION F...

Page 10: ...ions RF out is signal pass thru ONLY Use A V S Video or Component outputs for playback For TV without A V inputs an RF Modulator Accessory RF 150 will be required Signal Input YOUR RECORDER Connection...

Page 11: ...R DVD PLAYER ETC NOTE Refer to the manual of the connected system Turn off the power and unplug both units before setting up any connections Connect your recorder with the S Video cable if the Signal...

Page 12: ...tting up any connections Connect your recorder with the S Video cable if the Signal Source has an S Video input Do not connect the yellow video cable if using the S Video cable RECORDER FRONT RECORDER...

Page 13: ...by Macrovision Corporation and other rights owners Use of this copyright protection technology must be authorised by Macrovision Corporation and is intended for home and other limited viewing uses onl...

Page 14: ...ection keys or the number buttons to select the title 4 Press the SELECT or PLAY button The DVD video player will start playback from the title selected 5 To remove the disc press the OPEN CLOSE butto...

Page 15: ...rder 2 Insert a DVD RW or DVD R disc The index pictures will appear on the screen as above PREV NEXT 1 TITLE 01 01 00 12 14PM SP 00 00 20 2 TITLE 01 01 00 12 14PM HQ 00 00 20 3 TITLE 01 01 00 12 14PM...

Page 16: ...ss PREV again the Index Picture Screen can only be updated When NEXT is highlighted press SELECT the next index pictures will display on the screen When it reaches the last one if press NEXT again the...

Page 17: ...AVIGATION again to cancel the control bar Playback mode Set your preferable playback mode such as PROGRAM RANDOM and various repeat mode Playback control Control playback by various setting such as FA...

Page 18: ...ayback Press PAUSE STEP during normal playback to pause playback and Press PLAY to resume normal playback 4 Frame advance Press PAUSE STEP during normal playback One frame is advanced each time you pr...

Page 19: ...INTO TRACKS YOU CAN CONVENIENTLY LOCATE ANY SPECIFIC TITLE CHAPTER OR TRACK WITH THIS DVD PLAYER Audio CD You can locate a specific title using the title menu function if a DVD video disc contains a...

Page 20: ...the screen then press SELECT to confirm it e g To select title 2 SELECT 3 To select your desired chapter press GOTO to highlight the icon and input the number of a available chapter then press SELECT...

Page 21: ...SELECT 3 Use UP DOWN to select A B and press SELECT at the beginning of the segment in which you want to repeat playback point A 2 Press SELECT again at the end of the segment point B The player will...

Page 22: ...ck press the RANDOM button The player will start random playback now 2 Press RANDOM again to resume normal playback RANDOM The player will go to another chapter or track and start playback if you pres...

Page 23: ...e camera angle When you resume to normal playback the camera angle changes to the new settings The angle icon indicator will illuminate while playing back a title that contains at least one scene reco...

Page 24: ...in your favourite order 4 In the left volume use UP DOWN to select one title and press ADD CLEAR to add it to the right volume You can also select one chapter by pressing SELECT after highlighting the...

Page 25: ...e nature of some DVD s you may not be able to turn off the subtitles as they will appear on screen automatically As you press the SUB T button the subtitles may not appear immediately during some scen...

Page 26: ...uld first highlight press SELECT then use UP or DOWN to select one There are 17 modes available such as From top to down From down to top From left to right From right to left Extend from centre V Ext...

Page 27: ...ge an audio channel press AUDIO on the remote each time you press it it cycles among LEFT RIGHT and STEREO You can also switch the channel by the menu Highlight by press LEFT or RIGHT press SELECT the...

Page 28: ...e Current chapter Time elapsed Time remain Press DISPLAY button during DVD playback THIS PLAYER ALLOWS YOU TO VIEW STATUS AND DISC INFORMATION ON YOUR TV SCREEN DISPLAY CURRENT TITLE TOTAL TITLE CURRE...

Page 29: ...e menu appears on the TV screen 4 Use UP DOWN to select Rating Level press SELECT button 5 Input your password by numbers highlight OK and press SELECT 6 Press SELECT the sub menu of Set Rating Level...

Page 30: ...AY REC LANG TUNER CLOCK Record Setup 1 Press SETUP during stop status 2 Press direction keys UP DOWN RIGHT LEFT to select category highlight then press SELECT 3 Press SETUP to exit the setup menu DISP...

Page 31: ...ter the sub menu as the right figure To browse the the channels scanned Use CH CH to switch to the channel or input the assigned number of the channel directly To rename the channel you have scanned U...

Page 32: ...ghlight the Sort channel order to enter the sub menu as the right figure To sort the channels a Use the UP DOWN to highlight each channel press RIGHT to select the channel you want to adjust the seque...

Page 33: ...gned number of the channel to select your desired one directly 5 Press SELECT to confirm your selection 6 Press RIGHT LEFT to highlight the icon and press SELECT and UP DOWN to select the record quali...

Page 34: ...ing is suspended you can press PLAY to switch to normal playback mode 1 During stop status press SETUP to access the Setup Menu 2 Use RIGHT LEFT to highlight the CLOCK icon as the right figure 3 Use U...

Page 35: ...rd the scheduled it appears a Record Prompt dialog affirm press OK abolish press CANCEL and if without operation for a moment it will record the scheduled automatically Note In standby mode your recor...

Page 36: ...PREV NEXT to view the previous next page of titles 3 Press EDIT the title edit bar appears on the screen while playing back Press RIGHT LEFT to highlight one icon and enter it press UP DOWN to select...

Page 37: ...d to the current point When is selected by pressing SELECT the marker of the current chapter will be deleted When is selected by pressing SELECT all of the chapter markers in the current title will be...

Page 38: ...rename the current title by selecting press SELECT with T NAME displayed On the screen there appears a keyboard Press the direction keys UP DOWN RIGHT LEFT to highlight the one which you want to inpu...

Page 39: ...4 With each icon highlighted by pressing RIGHT LEFT the corresponding description of each operation will display on the screen such as Disc Finalisation Delete title Erase disc Disc protection etc 5...

Page 40: ...ayer you should go on FINALISE operation T DEL DVD RW only When this icon is selected it will delete the last title ERASE DVD RW only Press SELECT to begin erasing the disc LOCK DVD RW only When the i...

Page 41: ...60 Hz 30W 4 14 Kg 430 x 65 x 302 mm W H D PAL NTSC Semiconductor laser wavelength 650 nm Design and specifications are subject to change without notice Audio cable red and white 1 pair Remote control...

Page 42: ...some discs manufactured between 1997 1998 Scratched disc Connect the DVD player directly through the TV and not through any other source What you re viewing is the effect of the copy protection circu...

Page 43: ...OPTODISC PRODICS MKM RICOHJPN 001 W01 W01 OP1 W01 W11 ProDISC Ritek Ricoh HP Total Not Recommend MITSUBISHI RICOH TDK Total Recommend 2 4x 2 4x 2 4x 3 2 4x 2 4x 2 4x 2 4x 4 PRODISC RITEK RICOHJPN RIC...

Page 44: ...d Portugal Russia Singapore South Africa Spain Sweden Switzerland Taiwan United Arab Emirates Great Britain USA Yugoslavia Zaire PAL CN PAL BG PAL BG NTSC NA NTSC NA PAL BH PAL BM NTSC NA PAL D NTSC N...

Page 45: ...PALSONIC CORPORATION PTY LTD 1 JOYNTON AVENUE WATERLOO NSW 2017 AUSTRALIA TEL 02 9313 7111 FAX 02 9313 7555 www palsonic com au PALSONIC CUSTOMER SERVICE TELEPHONE AUSTRALIA 1300 657 888...

Reviews: