background image

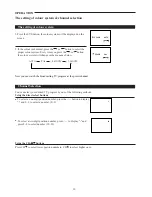
Channel selection......................................11

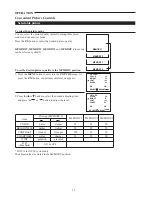
Convenient Picture Controls...................12

Convenient Sound Controls.....................13

Other functions.........................................14

Remote controller...................................5

Back view.................................................4

Front view................................................4

Battery installation..................................3

Antenna connection.................................3

Cautions for safety...................................2

Features ...................................................1

Congratulations on your purchase of this Palsonic colour television receiver.

We recommend that you thoroughly read this manual before use to fully enjoy the many functions
and excellent effects of this receiver
Retain this manual in an easily accessible location for future reference.
* Screen displays and illustrations in this manual may differ from the actual ones for better
   visibility.

Contents

INTRODUCTION 

OPERATION 

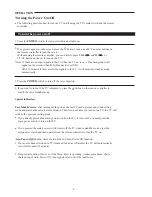
Turning the Power On/Off.................6
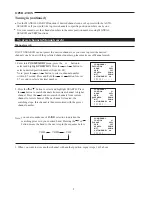
Tuning in..............................................7

NOTES FOR OPERATION 

INSTALLATION 

To preset channels (Auto search)..........7
To preset channels (Manual search)......8
To skip unnecessary position numbers..9
MFT (Manual Fine Tuning)...................9
The setting of colour system................10

APPEARANCE 

Sleep timer and to select the
language for OSD.................................14

CONNECTING OTHER EQUIPMENT

External Equipment Connections........15

To  connect AV input terminals...........15

To connect TV output terminals...........15

OTHERS

Troubleshooting.......................................16

Specifications............................................16

Summary of Contents for 5179

Page 1: ...RALIA TEL 02 9313 7111 FAX 02 9313 7555 www palsonic com au PALSONIC CUSTOMER SERVICE TELEPHONE AUSTRALIA 1300 657 888 51CM CORDLESS REMOTE COLOUR TELEVISION MODEL 5179 OWNER S MANUAL Type Tested Elec...

Page 2: ...an easily accessible location for future reference Screen displays and illustrations in this manual may differ from the actual ones for better visibility Contents INTRODUCTION OPERATION Turning the Po...

Page 3: ...s setting AUDIO VIDEO input output terminals S VHS Terminal 2 1 Advanced digital picture improvement circuit 1 Built in digital comb filter NTSC system To attain the complete separation of brightness...

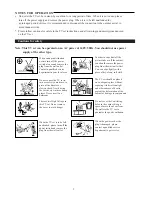
Page 4: ...excessive moisture to prevent tire disaster or electric shock Avoid using the set in very warm or damp places Never use it in a bathroom There exists High Voltage in this TV set Do not remove the cove...

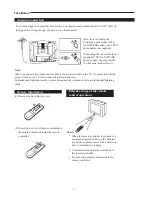
Page 5: ...t directly Note When you connect the outdoor aerial cable to the aerial terminal on the TV set please turn off the power switch on the TV while connecting the antenna lead In thunder and lightning wea...

Page 6: ...provided to the remote controller S VHS is S VIDEO 4 CHANNEL UP CHANNEL DOWN VOLUME UP POWER INDICATOR POWER SWITCH POWER INDICATOR REMOTE SENSOR PUSH TO OPEN MENU TV AV VOLUME DOWN 2 AV2 IN S VIDEO V...

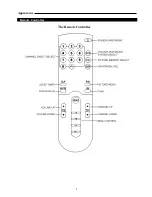
Page 7: ...Remote Controller Appearance 5 The Remote Controller...

Page 8: ...Therefore next time you turn on the TV the TV will work in the previous setting mode If you directly pressed the main power switch on the TV to turn it off you must press the main power switch to tur...

Page 9: ...r or CH button on the TV set the or button refers to the or button on the remote controller or the VOL button on the TV set AUTO SEARCH 1 Press the or button to select and highlight AUTO MEMORY Press...

Page 10: ...ss and hold the or button for over 0 7 second to select a decimal number Press the or button to select and highlight SEARCH Press the button to search channels from current channel to higher channel P...

Page 11: ...of a channel is poor for example one or two CATV channel s sound and picture are not standard you can correct them by making use of Manual Fine Tuning 1 Enter into POS MEMORY menu select the channel y...

Page 12: ...press the or button the colour system will change in the sequence below AUTO Now you can watch the broadcasting TV program at the preset channel 10 The setting of colour system PAL 4 43NTSC 3 58NTSC C...

Page 13: ...t can be selected cyclically paler deeper 50 50 50 darker lighter 50 50 50 MEMORY 2 To set the desired picture quality to the MEMORY position 1 Press the MENU button to enter into the PICTURE menu Or...

Page 14: ...s the VOL button to decrease the sound Press the VOL button to increase the sound To mute the sound The muting function is convenient when you need to pay attention to surrounding sounds answer a phon...

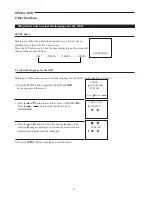
Page 15: ...To select the language for the OSD Making use of this function can switch the language for the OSD to either English or Chinese ENGLISH menu appears on the screen ENGLISH Press the or button to move...

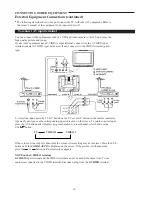
Page 16: ...V AV button on the TV set or AV button on the remote controller repeatedly until you see the corresponding input indication on the screen To return to aerial input press the AV button until it display...

Page 17: ...quipment Refer to the owner s manual of the equipment to be connected as well You can connect an audio system to the TV output terminals on the set to enjoy a high quality TV sound The TV output termi...

Page 18: ...Possible interferences of automobiles motorcycle trolley bus neon lamps etc Possible interference of electronic interference from another TV set a computer an electronics game machine a broadcast stat...

Page 19: ...PALSONIC CORPORATION PTY LTD 1 JOYNTON AVENUE WATERLOO NSW 2017 AUSTRALIA TEL 02 9313 7111 FAX 02 9313 7555 www palsonic com au PALSONIC CUSTOMER SERVICE TELEPHONE AUSTRALIA 1300 657 888 604 21A53 06...

Reviews: