background image

9

SAFETY

Caution: for extra protection it is recommended that you install a residual current device (rcd) with a 30 mA 

current limiter. In case of doubt, consult an electrician.

Caution: this appliance should not be used near washbasins or other receptacles that contain water. Unplug 

the hair straightener when not in use.

IMPORTANT INFORMATION

-  Due to the risk of extreme heat a lot of care must be taken when using the appliance. Before using 

the hair straightener, dry your hair lightly with a towel and comb it through to remove any tangles. The 

appliance can also be used with dry hair.

-  This hair straightener has a temperature control. Choose a low temperature for hair that is fragile, split, 

damp or damaged. Choose a high temperature for thick hair or hair that is difficult to straighten.

-  The red indicator light is illuminated when the hair straightener is plugged in. When it is ready for use the red 

indicator light turns green.

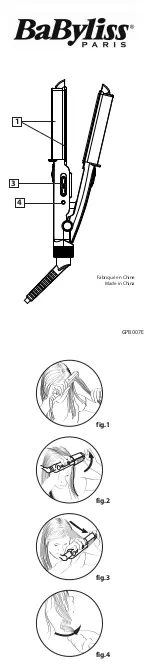
-  It is very important that the ventilation holes are directed away from the face or hair as water released 

from the hair can enter the holes and be converted into very hot steam. Always hang the hair straightener 

from its hanging loop. Avoid touching the ends of the appliance. Always hold the hair straightener by the 

heat protected area.

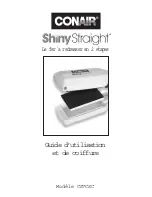
-  For short hair, place a plastic comb between the scalp and straighten the hair, taking care not to touch 

the scalp. Do not use the hair straightener too near your scalp, face, eyes, neck or skin.

-  To use the appliance, place the lock of hair selected between the plates and slide the hair straightener 

through the hair for a few seconds, maintaining slight tension as you do so. Do not repeat the process 

more than twice on the same lock of hair to avoid damaging your hair.

-  Always move the hair straightener downwards through your hair.

-  Do not keep the hair straightener switched on for more than 30 minutes.

-  When you have finished using the appliance, switch it off, unplug it and let it cool down completely 

before putting it away. Do not use abrasive cleaners to clean the plates as these can damage them. 

Make sure that the hair straightener is switched off and unplugged. Use a soft, damp cloth to clean the 

plates.

DOUBLE PROTECTION FOR YOUR HAIR

This hair straightener doubly protects your hair:

A.  You do not have to dry your hair.

B.  The cuticle that is smoothed when the hair is wet remains closed while it is being straightened and so 

the heat does not penetrate it.

C.  A pleasant and smooth straightening of the hair is guaranteed.

PERFECT RESULTS

The results obtained with this TITANIUM-PRO hair straightener are better than those of a normal hair 

straightener because the cuticle does not break down. It gently smoothes as it dries, leaving the hair shiny, 

smooth and protected.

ADVICE

-  Ensure that the ventilation holes do not come into direct contact with the face, head or hair.

-  Dry your hands before using the hair straightener and do not put your hands over the ventilation 

holes.

-  It is completely safe to use on dry hair.

-  If using the hair straightener on damp hair, dry it with a towel first.

-  If you wish, you may use a spray or oil to protect your hair against the heat. 

Summary of Contents for TITANIUM-PRO

Page 1: ...tter Piastra per capelli Steiltang Hajkisim t eszk z Sa d zle tirici MODO DE EMPLEO OPERATING INSTRUCTIONS MODE D EMPLOI MODO DE EMPR GO GEBRAUCHSANLEITUNG ISTRUZIONI GEBRUIKSAANWIJZING TROPOS CRHSHS...

Page 2: ...m 5 Orif cios de sa da de vapor 6 Suporte 1 I O Schalter an aus 2 Temperaturregler 3 Netzkabel 4 Titanium Platten 5 Dampfausg nge 6 Haken 1 Pulsante I O acceso spento 2 Pulsante di regolazione della t...

Page 3: ...ESPA OL 4 ENGLISH 8 FRAN AIS 12 PORTUGU S 16 DEUTSCH 20 ITALIANO 24 NEDERLANDS 28 ELLHNIKA 32 36 43 MAGYAR 44 T RK E 48 52 GB E F P D I NL GR RU AR HU TR BG 3 2 4 1 5 6...

Page 4: ...Nunca dejar caer ni introducir ning n objeto en las aberturas 14 No utilizarlo al aire libre o en lugares en los que se est n utilizando productos de aerosol spray o en los que se administre ox geno 1...

Page 5: ...ha demasiado cerca del cuero cabelludo la cara las orejas el cuello y la piel Cuando se est utilizando el producto coloque la parte de cabello seleccionada entre las placas y deslice la plancha por el...

Page 6: ...rese para planchar primero las partes inferiores del cabello Empezando por la base del cuello ponga una parte del cabello entre las planchas asegur ndose que la ventilaci n de la parte superior de la...

Page 7: ...asivo o use un l quido limpiador espec fico para ello utilice un trapo suave ALMACENAMIENTO 1 Desenchufar el aparato dejar que se enfr e y guardarlo en un lugar limpio y seco 2 Guardar el cable enroll...

Page 8: ...ou are drowsy or sleepy 13 Do not put anything into or let anything fall into the appliance 14 Do not use the appliance in the open air or in places where aerosol sprays are being used or oxygen is be...

Page 9: ...e appliance place the lock of hair selected between the plates and slide the hair straightener through the hair for a few seconds maintaining slight tension as you do so Do not repeat the process more...

Page 10: ...lower parts of the hair first Starting at the base of the neck put a section of hair between the plates making sure that the ventilation holes in the upper part of the hair straightener are not direct...

Page 11: ...non abrasive soap or use a liquid cleaner specifically designed for the purpose with a soft cloth STORAGE 1 Unplug the appliance let it cool down and store it in a cool dry place 2 Store the cable ro...

Page 12: ...pas enrouler le c ble autour de l appareil 12 N utilisez jamais cet appareil si vous tes somnolents ou endormi 13 Ne laissez pas tomber et n introduisez pas d objets dans les fentes 14 Ne pas utilise...

Page 13: ...ne prot g e contre la chaleur Pour les cheveux courts placez un peigne en plastique entre le cuir chevelu et le fer lisser en vitant de toucher le cuir chevelu N utilisez pas le fer lisser trop pr s d...

Page 14: ...pouvez choisir une temp rature interm diaire tape 3 Utilisation de cotre fer lisser Divisez les cheveux en parts gales en utilisant des pinces non fournies et pr parez vous lisser d abord les parties...

Page 15: ...ou utilisez un liquide nettoyant sp cifique et passez le l aide d un chiffon doux RANGEMENT 1 D branchez l appareil laissez le refroidir et rangez le dans un endroit propre et sec 2 Rangez le c ble en...

Page 16: ...cair nem introduza qualquer objecto nas aberturas 14 N o o utilize ao ar livre nem em locais onde estejam a ser utilizados produtos de aeross is spray ou onde se administre oxig nio 15 Esta unidade a...

Page 17: ...or demasiado perto do couro cabeludo da cara das orelhas do pesco o ou da pele Quando estiver a utilizar o produto coloque a parte de cabelo seleccionada entre as placas e deslize o modelador pelo cab...

Page 18: ...s e prepare se para modelar primeiro as partes inferiores do cabelo Come ando pela base do pesco o coloque uma parte de cabelo entre as placas certificando se de que a ventila o da parte superior do m...

Page 19: ...e n o abrasivo ou use um l quido de limpeza espec fico Para isso utilize um pano suave ARMAZENAMENTO 1 Desligue o aparelho deixe o arrefecer e guarde o num local limpo e seco 2 Guarde o cabo enrolado...

Page 20: ...esch digt oder ins Wasser oder andere Fl ssigkeiten gefallen ist Den Apparat zur Untersuchung oder Reparatur zum n chstgelegenen autorisierten Fachpersonal bringen 11 Das Kabel von Hitze oder hei en O...

Page 21: ...len Sie eine hohe Temperatur f r starkes Haar oder solches das sich nur schwer gl tten l sst Die rote Lichtanzeige wird angehen wenn der Haargl tter angeschlossen wird Wenn er bereit zu Benutzung ist...

Page 22: ...dass beim Einsatz mit feuchtem Haar dieses gepflegt und nicht gesch digt wird Schritt 1 Vorbereitung des Haars Waschen Sie das Haar und benutzen Sie Ihre gew hnlichen Haarpflegeprodukte Trocknen Sie...

Page 23: ...n Heben Sie den Kopf erneut an und gl tten Sie das Haar gut mit einer B rste aus Naturborsten REINIGUNG 1 Den Haargl tter aus der Steckdose ziehen und ihn abk hlen lassen Die Platten d rfen nur ges ub...

Page 24: ...oggetto nelle aperture 14 Non utilizzarlo all aperto o in luoghi in cui si stiano utilizzando prodotti aerosol spray o nei luoghi in cui si somministri ossigeno 15 Questa unit si scalda durante l util...

Page 25: ...locare la parte dei capelli che si desidera stirare tra le piastre e farle scorrere lungo i capelli per alcuni secondi esercitando una leggera pressione Non ripetere il procedimento pi di due volte su...

Page 26: ...dalla base del collo inserire una parte dei capelli tra le piastre assicurandosi che la ventilazione della parte superiore della piastra non sia diretta verso il viso o il cuoio capelluto Ricordare P...

Page 27: ...are un detergente liquido specifico applicandolo con un panno morbido IMMAGAZZINAMENTO 1 Scollegare l apparecchio lasciare che si raffreddi e conservarlo in un luogo pulito e asciutto 2 Conservare il...

Page 28: ...stbijzijnde erkende technische dienst voor onderzoek of reparatie 11 Houd de kabel uit de buurt van warmtebronnen of warme oppervlakken Rol de kabel niet rond het apparaat 12 Gebruik het apparaat nooi...

Page 29: ...echtkomen en een zeer hete stoom produceren Hang de tang altijd op aan het haakje Vermijd aanraking met de uiteinden van het apparaat Houd het apparaat altijd vast aan de hittebestendige zone Plaats e...

Page 30: ...elicaat haar en 220 voor sterk of moeilijk te strijken haar Voor normaal haar kunt u een gemiddelde temperatuur gebruiken Stap 3 Gebruik van de steiltang Deel het haar op in twee gelijke delen met haa...

Page 31: ...laten schoonmaken met een zachte zeep of een specifiek schoonmaakmiddel Gebruik hierbij een zachte doek BEWARING 1 Haal het apparaat uit het stopcontact laat het afkoelen en bewaar het op een schone e...

Page 32: ...32 GR TITANIUM PRO PALSON 1 2 3 4 5 6 7 8 9 10 11 12 13 14 15 16 17 18 19 1 2 3...

Page 33: ...33 4 5 rcd 30 mA 30...

Page 34: ...34 GR A B C TITANIUM PRO 1 2 30 140 220 3...

Page 35: ...35 4 1 2 3 1 2 3 4 5...

Page 36: ...36 RU TITANIUM PRO PALSON 1 2 3 4 5 6 7 8 9 10 11 12 13 14 15 16 17 18 19 1 2 3 4...

Page 37: ...37 5 rcd 30 A 30 A B C...

Page 38: ...38 RU TITANIUM PRO 1 2 30 140 220 3 4...

Page 39: ...39 1 2 3 1 2 3 4 5...

Page 40: ...40 AR...

Page 41: ...41...

Page 42: ...42 AR...

Page 43: ...43...

Page 44: ...illetve oxig nt haszn lnak 15 A k sz l k haszn lat k zben felmelegszik Ne hagyja hogy a forr fel letek a b r hez rjenek 16 Ne tegye le a k sz l ket sehova am g meleg illetve be van kapcsolva 17 Ne has...

Page 45: ...akor helyezze a hajat a lapok k z s p r m sodpercen kereszt l h zza v gig rajta enyh n megnyomva Ne ism telje meg t bbsz r mint k tszer ugyanott mert k rt tehet a hajban Folyamatosan mozgassa az eszk...

Page 46: ...ir nyul Ne felejtse el min l kevesebb hajat sim t ki egyszerre ann l szebb lesz az eredm ny Z rja ssze r gt n a lapokat s h zza meg az eszk zt lefel ir nyban finoman a haj t v t l kezdve eg szen a v g...

Page 47: ...kerje fel 3 Sose tekerje a k belt a k sz l k k r ez rt a k belnek s annak megt r s t okozhatja 4 Ne fesz tse meg a k belt a bemenet k rny k n mert ez is vezethet a k bel szakad s hoz 5 Sose fogja meg...

Page 48: ...en kullanmay n z 13 Hi bir zaman cihaz n aral klar n ba ka bir obje sokmay n z veya d rmeyiniz 14 Cihaz a k havada veya spray r nlerin kulland ortamlarda veya oksijen verilen ortamlarda kullanmay n z...

Page 49: ...orumal b lgesinden tutunuz K sa sa lar i in kafa derisine bir plastik tarak yerle tiriniz ve cihaz n kafa derisine de memesine dikkat ediniz Sa d zle tiricisini kafa derisine y z n ze kulaklara bo az...

Page 50: ...istedi iniz ekilde ayarlay n z ince hasarl veya k r lgan sa lar i in 140 g l sa lar veya d z hale getirilmesi zor sa lar i in ise 220 tavsiye edilir Normal sa lar i in ise orta dereceli bir s se ilebi...

Page 51: ...n bo luklar na girmesine m saade vermeyiniz 3 E er plakalar zerinde at klar olu uyorsa bunlar yumu ak bir sabun veya zel bir temizlik s v s ile temizleyiniz ve bunun i in bir yumu ak bez kullan n z DE...

Page 52: ...52 BG TITANIUM PRO PALSON 1 2 3 4 5 6 7 8 9 10 11 12 13 14 15 16 17 18 19 1 2 3 4...

Page 53: ...53 5 30 mA 30 B C TITANIUM PRO...

Page 54: ...54 BG 1 2 30 140 C 220 C 3 4...

Page 55: ...55 1 2 3 1 2 3 4 5...

Page 56: ...s Recyclen dieses Produktes kontaktieren Sie bitte Ihr lokales B rgerb ro lhren Hausm ll Abholservice oder das Gesch ft in dem Sie dieses Produkt gekauft haben Smaltimento dei rifiuti elettrici ed ele...

Reviews: