12
BENTO 42 CONCRETE FIRE PIT Match-lit | Installation & Owner's Manual
TROUBLESHOOTING
WARNING:
Turn off appliance and let cool before
servicing. Only a qualified service person
should service and repair this appliance.
IF YOU SMELL GAS:
Shut off gas supply.
Do not try to light any appliance.
Do not touch any electrical switch; do
not use any phone in the vicinity of the
appliance.
Immediately call your gas supplier
from a safe distance. Follow your gas
supplier’s instructions.
IMPORTANT: Operating unit where
impurities in air exist may create
odors. Cleaning supplies, paint, paint
remover, cigarette smoke, cements
and glues, new carpet or textiles,
etc., create fumes. These fumes may
mix with combustion air and create
odors. These odors will disappear
over time.
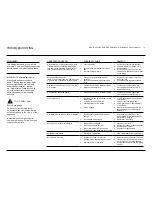
OBSERVED PROBLEM
POSSIBLE CAUSE
REMEDY
Unit is smoking / sooting excessively. (Note:
It is natural and unavoidable for appliance
sets to produce moderate levels of carbon
(soot) where flames contact the media.)
1. Poor fuel quality
2. Excessive flame impingement or block-
age
3. Improper fuel/air mixture
1. Contact local natural gas company
2. Separate the stones to allow more
flame passage
3. Remove any foreign items from the
flame pattern and/or check for proper
orifice sizing
Burner is excessively noisy
(Note: The movement and combustion of gas
will create low, unavoidable levels of noise.)
1. Passage of air/gas across irregular
surfaces
2. Excessive gas pressure on natural gas
units
1. Relieve any tight bends or kinks in
gas supply line
2. Check/reset gas regulator pressure
Gas odor even when manual valve is in the
OFF position
1. Gas leak. See Warning statement below.
2. Main gas valve defective.
1. Locate and correct all leaks (see
Checking Gas Connections, pg 5)
2. Replace gas valve
Unit produces unwanted odors
1. Gas leak. See Warning statement below.
1. Locate and correct all leaks (see
Checking Gas Connections, pg 5)
Pilot cannot be lit
1. Gas supply turned off or manual shutoff
valve closed
2. Air in gas lines when installed
3. Pilot adjustment screw closed
4. Pilot is clogged
1. Turn off gas supply or open manual
shutoff valve
2. Purge air from the supply line
3. Adjust pilot flame for approximately
1” blue flame
4. Clean pilot (see Cleaning and Main-
tenance, page 12) or replace pilot
assembly
Pilot does not stay lit after control is released 1. Flame sensor/thermocouple is not hot
enough
2. Thermocouple is damaged
1. Retry, holding control 0key for a
longer period of time (20 seconds or
more) before releasing
2. Replace thermocouple
Burner does not light after pilot is lit
1. Burner orifice is clogged
2. Inlet gas pressure is too low
3. Burner orifice diameter is too small
4. Flame sensor lead loose or disconnected
1. Clean burner orifice
2. Contact local gas or propane supplier
3. Replace burner orifice
4. Reconnect or tighten lead
Delayed burner ignition
1. Pilot flame is obstructed
1. Clear media/debris from lighting port
Burner flame is too low
1. Incorrect gas supply or pressure
2. Blocked burner orifice or burner ports
3. Improper burner orifice size
1. Check for proper gas supply pressure
2. Free burner orifice and burner ports of
any burrs, paint, or other blockage
3. Verify proper burner orifice sizing (see
page 9)

