Palo Alto Networks
Installing the Hardware •
11
Connecting Cables to the Device
2.
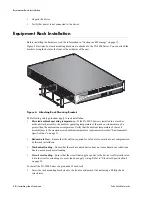
Lift the device and position it in the rack. It is recommended that two people perform this function.
3.
Align the mounting holes on the side of the device with holes in the rack rail. Make sure that rack
rail holes are selected so that the PA-5000 Series is level.
4.
Insert mounting screws into the aligned holes. Tighten with a Phillips head screwdriver.
Connecting Cables to the Device
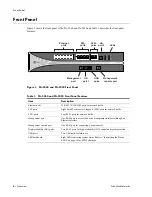
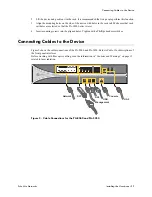
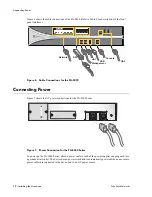
Figure 5 shows the cable connections of the PA-5060 and PA-5050. Refer to Table 1 for descriptions of
the front panel interfaces.
Before working with fiber optic cabling, read the information in “Cautions and Warnings” on page 15
related to laser radiation.
Figure 5. Cable Connections for the PA-5060 and PA-5050
1 3 5 7 9 11 13 15 17 19 21 23
2 4 6 8 10 12 14 16 18 20 22 24
USB
SFP
HA2
HA1
Console
Management
Network
Summary of Contents for PA-5000 Series
Page 1: ...PA 5000 Series Hardware Reference Guide...
Page 14: ...Connecting Power 14 Installing the Hardware Palo Alto Networks...
Page 28: ...Replacing the Fan Tray and Air Filter 28 Maintaining the Hardware Palo Alto Networks...
Page 32: ...Environmental Specifications 32 Specifications Palo Alto Networks...


