Palm Xplore G18 Quick Manual Download Page 45

Section 2 : Communication and PDA Features

1. Using the Phone

Xplore G18 Quick Access Guide


39

3.When finish

ed

 setting, Tap Save button to save the setting, then Tap 

Left Arrow icon to exit. 
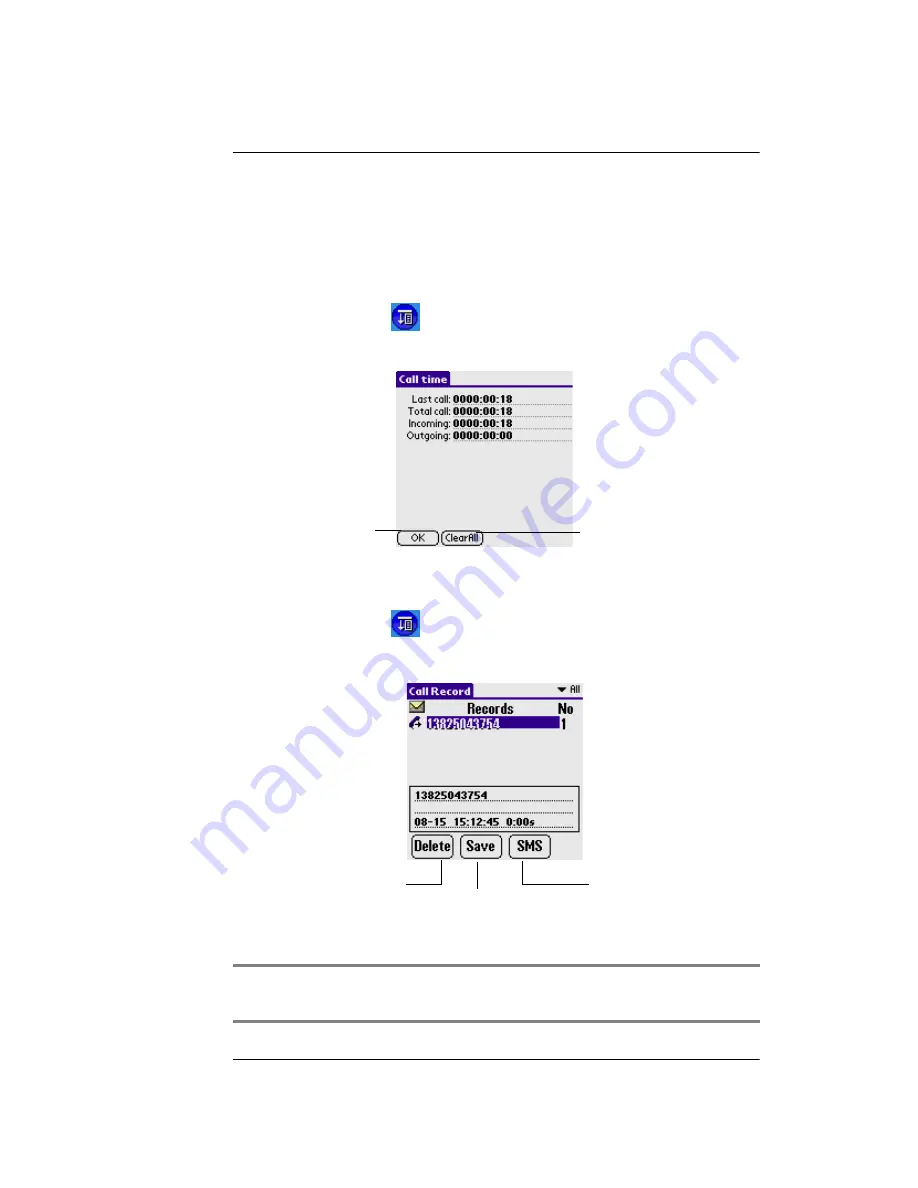
Call Time

1.Tap the Menu icon

.

2.Select Call > Call Time. 

Call Records

1.Tap the Menu icon

.

2.Select Call > Call Records. 

TIP:

In the call interface , you can press Call key to enter the 

call record interface directly.

Tap  back  button
to exit

Tap Delete button to reset timer.


Tap Delete to delete the de-
tail of the call record  (figure
needed) 

Tap Save to save the phone
number in the call record (fig-
ure needed) 

Tap SMS to send the short
message to the selected
number 

Summary of Contents for Xplore G18

Page 1: ...Xplore G18 Quick Access Guide...

Page 2: ...ed trademarks of PalmSource Inc a subsidiary of Palm Inc Palm Desktop the HotSync logo and Palm Powered are trademarks of PalmSource Inc a subsidiary of Palm Inc THE CHINESE HANDWRITING RECOGNITION SY...

Page 3: ...system interface language 12 13 Setting up phone to phone IRDA data transfer 13 14 GPRS communication setting 14 15 Using the onscreen keyboard 15 Using Graffiti 2 16 The Graffiti 2 alphabet 17 Writin...

Page 4: ...onnection 46 2 Using the jMMS Multimedia Message Service 49 To launch the jMMS application 49 Settings 51 Browse 53 New and Send 54 Deleting 56 Draft 56 Sorting 56 3 Using the SMS Short Message 57 To...

Page 5: ...to Album 75 Album management 75 To play album 77 To delete photos 77 To browse photos 77 Transfer album to MMS Picture 78 8 Using the Photo Editor 79 To launch the Photo Editor application 79 To edit...

Page 6: ...4 Xplore G18 Quick Access Guide Appendix I Safety 89 Appendix II Install CD 92 Appendix III Specification 94 Appendix IV Care and maintenance 95 Appendix V Reset your Xplore G18 96...

Page 7: ...operate Palm Desktop on Windows your computer system should meet the following minimum hardware requirements Windows 98 NT 2000 XP 16 MB RAM 64MB recommended for Windows 2000 or above 20 MB available...

Page 8: ...G18 components Sub Menu Icon Escape Key Scroll Down Key Scroll Up Key Enter Key Scroll Right Key End Call Key Camera Key Increase Volume Key Decrease Volume Key Sleep Power Button Camera Search Icon T...

Page 9: ...se the backlight to illuminate the screen in low light conditions Text Input Area Write letters and numbers in this area using the Graffiti 2 alphabet Up Down Key Displays text and other information t...

Page 10: ...to click icons on your computer screen you use the stylus to tap on icons on your G18 touch screen Tapping is the basic action used to execute tasks on your G18 IMPORTANT Always use the point of the...

Page 11: ...screen 1 Turn on your device 2 Tap the brightness of screen background icon at the screen bottom 3 Tap the contrast icon at the screen bottom 6 To launch applications You can use the Applications Laun...

Page 12: ...pplications have a menu bar Command bar Let you tap icons or write a ShortCut stroke to initiate a command instead of tapping a command in the menu bar The icons displayed in the Command bar vary with...

Page 13: ...tapped note that the cursor must be in an input field for this option to work A 123 dot in the input area that displays the numeric keyboard when tapped note that the cursor must be in an input field...

Page 14: ...enter information 8 Setting up the G18 interface Interface setting The G18 provides two user selectable interfaces 1 The GSL interface The GSL interface have two setup launcher the mobile telephone t...

Page 15: ...ication To return to the GSL interface you can enter the main interface screen and tap on the GSL launcher icon 9 Setting date time and time zone Enter the system screen tap the preferences then selec...

Page 16: ...g Sleep Mode Go to preferences setting screen from the drop menu tap the general setting option In the general setting screen the options available are sleeping state thirty seconds to three minutes s...

Page 17: ...k Access Guide 11 11 Setting alert sound and volume To set alert sounds and volume select the alarm sound in the General settings option of the preferences screen To personalise your phone ringtone se...

Page 18: ...rom the drop menu Select the Enable Chinese OS option Tap the General option Select the simple Chinese font and top OK option Tap the icon to complete the system language change Note If the system lan...

Page 19: ...ck Access Guide 13 Tap the icon 13 Setting up phone to phone IRDA data transfer Select the connection For data transfer using IrDA Beaming You could first shift to the Application Interface thetap the...

Page 20: ...unication setting Enter into the Prefs and select Network select GPRS in the Connection menu Input relational information at the APN field you can get the information from the Network master builder T...

Page 21: ...display the alphabetic or numeric keyboard Tap abc on the front panel of your G18 to display the alphabetic keyboard Tap 123 on the front panel of your G18 to display the numeric keyboard To display t...

Page 22: ...Tap the screen where you want to write text TIP Some characters have two different stroke shapes You can select either as you want Use the tables on the following pages to find the stroke shape for th...

Page 23: ...tters according to the following alphabet Writing punctuation marks and other special characters TIP Using an additional Shift stroke to finish writing the character as shown in the demo is optional i...

Page 24: ...e that s easiest for you Press firmly 16 Installing add on applications Many applications such as Date Book Address Book To Do List and Note Mail are pre installed for your convenience you can use the...

Page 25: ...s 16 Installing add on applications Xplore G18 Quick Access Guide 19 TIP You can also select the Install Tool dialog box by selecting Install Tool from the Palm Desktop program group or by double clic...

Page 26: ...that you want to install on your phone then click Open 4 Then return to the Install Tool interface and tap Done 17 Removing applications You can remove add on applications patches and extensions from...

Page 27: ...ion to Palm functions 18 HotSync Setting Xplore G18 Quick Access Guide 21 1 tap the application you want to remove Select the data storage for example selecting Handheld 2 Select about App Tap Delete...

Page 28: ...anager icon in the Windows system tray 3 Click Profiles 4 Select the profile that you want to load on the G18 and click OK 5 Click Yes to transfer all the profile data to the G18 The next time you per...

Page 29: ...Palm Desktop is not running Available Only When Palm Desktop Is Running starts HotSync Manager and monitors requests automatically when you open Palm Desktop Manual monitors requests only when you sel...

Page 30: ...G18 and the software of Palm Desktop Try the As Fast As Possible rate first and adjust downward if you experience problems This setting allows Palm Desktop and your G18 to find and use the fastest sp...

Page 31: ...r in this section Preparing your computer for IRDA communication Before you can perform a HotSync operation using the IR port the computer you want to synchronize with must meet the following requirem...

Page 32: ...lete the steps to prepare for an IR HotSync operation it is easy to perform the actual operation To perform an IR HotSync operation 1 In the Applications Launcher tap the HotSync icon 2 Tap Local 3 Ta...

Page 33: ...Options Check Enable Low Bat Backup and Enable Auto Backup Select the backup time as you require in the Time field Tap OK button to return the Backup Restore interface select the data to backup from...

Page 34: ...e detail of the steps is what as below 1 Backup the user data For every Desktop user the Palm Desktop will create a directory in the installed directory The directory which stores all the user data is...

Page 35: ...18 with the Desktop and create a new user At the first synchronization between G18 and the phone a dialogue as is shown in Figure 1 will open tap the New button input the new username such as user2 in...

Page 36: ...schedule information memopad subdirectory for memoire directory todo subdirectory for the to do matter Expense subdirectory for personal financing record Album subdirectory for photos 3 Set the Synchr...

Page 37: ...an change the synchronize option in this box as is shown on Figure 4 First tap the drop down list in the top of the box and select the username then select the information whose synchronize option nee...

Page 38: ...tep 1 as method 1 2 Delete the files which you think can be deleted and the files which can only be used in the previous model from the Backup directory Note Some documents in backup directory can onl...

Page 39: ...on and PDA Features 1 Using the Phone To launch the Phone application The telephone function can be activated by 1 Tap the Applications icon 2 Select Communication from the pick list in the upper righ...

Page 40: ...ore G18 Quick Access Guide Function Key battery capacity indicatator SMS Keyboard PDA function icon Camera Hangup Clear the wrong number Escape Call list dial up Speed Dial Address list Quick Switch P...

Page 41: ...tion 2 Communication and PDA Features 1 Using the Phone Xplore G18 Quick Access Guide 35 Making a call 1 Tap Numeric keyboard 0 9 and to key in telephone numbers 2 Press the Call key to dial the numbe...

Page 42: ...creen TIP Alternatively the user can press the Call key to accept the call while pressing the End Call Key to reject the call Tap New button to pause the calling to call another number Tap Hold button...

Page 43: ...connected Call Setting 1 Tap the Menu icon 2 Select Call Call Setting a Call Waiting Tap New button to go to Ap plications Launcher and press the CALL key to return Tap Hold button to hold the call T...

Page 44: ...ID c Country Code Setting d Auto redial On to enable Off to disable Network Determined by GSM network Display Select to display the Call line ID Hide Select to hide the Call line ID Only code Add a re...

Page 45: ...ect Call Call Time Call Records 1 Tap the Menu icon 2 Select Call Call Records TIP In the call interface you can press Call key to enter the call record interface directly Tap back button to exit Tap...

Page 46: ...d Dial 1 Tap the Menu icon 2 Select Call Speed dial Phone Security Setting 1 Tap the Menu icon 2 Select Security Setting a Changing PIN PIN2 Barring Code Tap Edit to edit the phone number figure added...

Page 47: ...rvice provider and obtain the SIM PIN Unblocking Key PUK code from your service provider If you unsuccessfully enter the PUK code ten times the SIM card is permanently blocked and must be replaced If...

Page 48: ...he pick list to disable the PIN Code If there is an enabled PIN Code a dialog box will appear and ask you to input the PIN Code If your input is right the PIN Code will be disabled Voice Call Barring...

Page 49: ...on to save the setting 4 Tap left arrow to exit Phone ringing Setting a Profile Tap the Profile you can find the following pre defined profiles Deactivated means that accepting all incoming calls All...

Page 50: ...ng below c Alert d Melody NOTE You can pick up one of your favourite melody For the usage of Melody please refer to User Manual in CD Chapter 7 Using the Melody Manager for details You can edit each p...

Page 51: ...e Quick Switch Tap the Enter Key in front panel of your G18 you can enter the Quick switch dialog Than tap GSM On Off Tap Address book button to enter Address application you can pick up the phone num...

Page 52: ...hone number from Speed dial list Reference to the part of Call Recodr in this chapter Tap Country Code button to select the country code Tap cancel to quit without selecting Tap Return to quit to main...

Page 53: ...on to launch the phone connection test 6 Wait for a while there will appear a dialog box to show wether it s ok or anything fails 7 If the test is ok you could try to launch the Phone application to c...

Page 54: ...the tap Call Call Setting select On in the Call divert option then tap to save your setting C calls A Switch the call with B or C by us ing Call Devert function A calls D to enter the conference call...

Page 55: ...2 Select Communication from the pick list in the upper right corner 3 Tap the jMMS icon and enter the inbox interface Doodles 1 Tap the New icon at the bottom of the inbox and enter the Compose inter...

Page 56: ...lor selection interface 3 Select your favorite color and tap OK or tap Cancel Setting the thickness of line 1 Tap the icon in the upper right corner to pop a list Drawing 1 Tap icon or icon in the upp...

Page 57: ...ick Access Guide 51 3 Tap icon or icon in toolbar select Pict Clear to erase everything 4 Tap Save icon in the toolbar to save the picture Settings Tap Menu icon to pop up the pulldown menu and then s...

Page 58: ...dress please input the IP address corresponding to the local MMS service center example 10 0 0 7 the default port is 9201 change it correspondingly if necessary Tap OK to save the settings or tap Canc...

Page 59: ...g Browse In Inbox screen tap any message Tap View in the pick list to browse the message Tap Title Name or shortcut menu icon to pup up the pulldown menu and execute the corresponding operation Restri...

Page 60: ...res and music Input area you can use stylus or keyboard to input words or numbers Tap the Insert Picture icon on the toolbar to enter the picture library or dooles yourself and then select a picture t...

Page 61: ...ail of recipients CC The number or E mail of CC recipients BCC The number or E mail of BCC recipients Subject The subject of MMS Send MMS Save MMS to Draft Edit MMS properties after taping Select the...

Page 62: ...and select a MMS b Select Delete from the pulldown menu to delete the selected MMS 2 Delete all messages a Tap icon b Show a message box for confirmation of deletion Draft Tap Save icon on the outbox...

Page 63: ...S application 1 Tap the Applications icon 2 Select Communication from the pick list in the upper right corner 3 Tap the SMS icon SMS setting In the main screen which lists out Inbox messages by defaul...

Page 64: ...Center Before sending any short message you must input the short message service center number which you can get from your service provider The number can be recognized once the SIM card was inserted...

Page 65: ...ve functions for example tap Send icon to send the message 4 You can also set the font Tap the function title After the menu pops up tap Font and then select Set Font to complete the operation Receivi...

Page 66: ...to enter SMS short message interface You can do relative operation according to the prompt of icons Deleting SMS Delete the short mssage to dustbin Select any of the message you want to delete Tap th...

Page 67: ...the message tap the Delete All button then the all message in the directory will be deleted tap the Cancel button then canel the operation Delete forever Tap the MENU icon then a pick list will appea...

Page 68: ...On the main screen of Emailer default is the index interface of the inbox tap the Menu icon on the front panel of your G18 pop up the menu model showing as the following 1 Choose Options Preferences...

Page 69: ...ccess Guide 63 3 Choose Options HotSync Options to set local synchronization or remote synchronization You can select an e mail account from the poplist or just input directly Input username Tap here...

Page 70: ...ee choices Auto GB2312 and Big5 To choose the folder Tap the pick list in the upper right corner there are five folders Inbox Outbox Deleted Filed and Draft Tap any folder to enter the corresponding f...

Page 71: ...interface Cancel the current operation and return to the previous interface Show the message details See Pic 3 Select Outbox from the pick list in the upper right corner 4 Tap the Menu icon on the fro...

Page 72: ...the list screen of a folder choose the e mail you want to edit and enter its browse interface and tap the Edit button to enter the e mail editing interface 2 Tap the Menu icon on the front panel of yo...

Page 73: ...d from Inbox Outbox Filed and Draft will be moved to Deleted folder But the e mails that have been deleted in Deleted folder will be deleted permanently To reply an e mail You can reply the e mails on...

Page 74: ...pplications icon 2 Select Communication from the pick list in the upper right corner 3 Tap the jBrowser icon Setting To View the current settings tap the Menu icon on the front panel of your PDA phone...

Page 75: ...p to load your home page on starting the application By default the Load home page on startup is disabled Click Apply to enable the connection settings Click Cancel to close the dialog box To edit a p...

Page 76: ...In the Options dialog box under the Cache Cookie tab click the Clear button in the Cache group or go to Tools Clear Cache from the menu Cookie Information related to a session can be stored as a cook...

Page 77: ...n the site You can also enter the URL of the site to open in the address bar and click Go You can open the URL wizard by clicking More from the Popup list displayed to the left of the address bar See...

Page 78: ...are stored in History To see the URLs stored in History click on Go History History entries can be viewed by Page Title or by Page URL Select your option from the list provided To visit a site from h...

Page 79: ...he Camera To launch the Camera application Tap the Applications icon Select Studio from the pick list in the upper right corner Tap the Camera icon or press the Camera key To set the preferences of a...

Page 80: ...rface Five modes of White balance sunny cloudy daylight lamp bulb auto Zooming Tap to zoom in or zoom out the photo focusing Zoom in Zoom out Three modes of taking photos Normal mode press button afte...

Page 81: ...he photo after 3 minutes of without power To launch the Photo Album application Tap the Applications icon Select Studio from the pick list in the upper right corner Tap the PhotoAlbum icon Album manag...

Page 82: ...r My Notes Store pictures and edit by Photo Editor To create an album Tap New a dialog box of creating new album appears Enter the name of the album and select where is the album going to be stored Ta...

Page 83: ...key on the front panel of your G18 to enlarge reduce pictures You can also use the up or down hard button to browse the previous or next picture Tap the screen again to return to the previous page To...

Page 84: ...MMS Pictures from the field Album Tap OK button NOTE If the photo stored in the Address List is used for incoming call information the album will disappear at the same time when the photo is deleted f...

Page 85: ...Editor application Select Studio from the pick list in the upper right corner Tap the Photo Editor icon To edit a picture Tap the Menu icon on the front panel of your G18 Select File Open the picture...

Page 86: ...on of the Toolbar icon To save pictures Tap the Menu icon on the front panel of your G18 Choose File Save to save pictures 1 Select Color 2 Line 3 Select Seal 4 Frame 5 Add smart record 6 Icon Exchang...

Page 87: ...application Tap Applications icon Select Main from the pick list in the upper right corner Tap the Address icon Lookup The list will be sorted in phonetic order You just need to input the first letter...

Page 88: ...to personal information screen Details Tap this button to show a dialog box In the dialog box you can set the current record delete or add notes to current record Note Tap this button to enter edit i...

Page 89: ...cel to cancel deletion Note Tap this button to attach a note to current entry Note editing interface Done Finish editing and return to previous interface Delete Delete current note 10 Using the Date B...

Page 90: ...mns to set the End Time Tap All Day if the event lasts all day The default hours of a standard business day are set by the user and may be changed using the Preferences command in the Date Book applic...

Page 91: ...Next Week to scroll Tap Go To at the bottom to open the Go To Date dialogue box Tap to select a day in the calendar Follow the steps as Scheduling timed events to continue To set an alarm for an event...

Page 92: ...to select a melody Tap OK When the alarm sounds follow one of the steps as below Tap OK to stop the alarm and return NOTE You can also set the option in the tab of SMS MMS to alert you by sending mes...

Page 93: ...events for an entire week This view lets you quickly review your appointments and available time slots In addition the graphical display helps you spot overlaps and conflicts in your schedule To disp...

Page 94: ...w appointments untimed events and To Do List items in a single screen When you tap an appointment or an untimed event it will switch to Day view make you able to view the detail of the event You can a...

Page 95: ...off your phone whenever it is forbidden to use it or when it may cause interference or danger When connecting read the Owner s Guide for detailed safety instructions Do not connect it to incompatible...

Page 96: ...e facilities may be using equipment that could be sensitive to external RF signal Vehicles RF signals may affect improperly installed or inadequately shielded electronic systems in motor vehicles Chec...

Page 97: ...boats fuel or chemical transfer or storage facilities areas where fuel odors are present i e if a gas propane leak occurs in a car or home areas where the air contains chemicals or particles such as g...

Page 98: ...n t work please select Install in the CD You must finish the first part Install Palm Disktop4 1 and the second part Install Album Desktop and Conduits or your G18 will not synchronize the software inf...

Page 99: ...he first time You can also select the following software to install Frame Converter Melody Converter Otherwise you can also select some useful software to install in the following folders bbbox Includ...

Page 100: ...m 4 1 2 Size 100mm X 48mm X 21mm Weight 105 g LCD SIZE 260K 160 X 240 dots GSM standby time Phone 100 hours Estimated talk time 3 hours Ringing tone 32 chords Accessories Travel Charger CD ROM Lithium...

Page 101: ...rformance of the product and cause damage Do not place it in hot places High temperatures can shorten the life of electronic devices damage batteries and warp or melt certain plastic parts Do not atte...

Page 102: ...y the Date and Time Preferences screen to set date and time To perform a soft reset Use the reset tip tool or the tip of an unfolded paper clip or similar object without a sharp tip to gently press th...

Page 103: ...3 When a message Erase all data appears on the screen warning that you are about to erase all the data in your G18 4 Press the upper half of the scroll button on the front panel of your G18 to complet...

Page 104: ...Appendix V Reset your Xplore G18 98 Xplore G18 Quick Access Guide...

Page 105: ......

Reviews: