background image

3 Wired controller

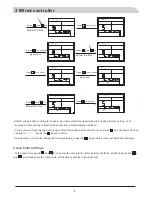
Timing 1set on/off each day

Timing 2sets on/off each day

Timing 3sets on/off each day

Need to set 2 time points

Need to set 4 time points

Need to set 6 time points

3 3 Week and Clock Setting

.

Press and hold

key for 3 seconds until the week digits on the screen start flashing.

Press

or

to select the

, press

to confirm, the number of hour

and

press

or

key to adjust hour, press

to confirm, then

minute

and fl

press

and

key to adjust minute , press

to confirm and exit set

interface.

key

day

key

appears

flickers.

key

the number of

appears

ickers.

up

Weekly timer function

There is a timer on the control system that can be used to program the time that the unit switches on and off.

turn on

Timing is set to a cycle every week, Mon-Sun each day can be set three different time to

,and three

different time

off, there is an option to select the time set for just one week effective and weekly repeat

circulation

to turn

effective.

Single week effective and

effective

repeated

,

es

“ ”

“ ”

“ ”

“ ”

“ ”

“ ”

Press and hold

and

simultaneously for 3 seconds

key

single week effective,

i always effective single week

effective

.

the screen appears and flash

S

or

C

,

press

key to select

S

or

C

, press

to confirm. Select

S

is

choice

C

s

,

effective and circulation

timing set in the same way

Single week effective

circulation effective

6

Summary of Contents for AC Series

Page 1: ...AIR TO WATER HEAT PUMP Installation and Operation Manual For H series Only Heating series AC series Heating Cooling series HC series Mutifunctional Heating Cooling Hot water ...

Page 2: ...0 Heat pump test run General Transport and storage Display and button Operating the unit Week and clock setting Timer setting Parameter inquiry and setting Black box historical data function Installation information Installation method Dimensions Installation position General Cable connection Wiring diagram Preparation Water replenishing Technical data table 2 1 1 1 4 4 5 7 8 10 12 14 15 15 16 18 ...

Page 3: ... so this must be validated carefully Make sure that the foundation of installation is stable If no electric leakage protection switch is fitted at the beginning of the electric supply it maybe cause electric shocks or fires Make sure that the electric leakage protection switch is fixed Before cleaning shut off the electric supply of the unit firstly to avoid injuries caused by fan in operation Do ...

Page 4: ...outlet 1 19 Gas liquid separator 1 5 A C water outlet 1 20 Safety valve 1 6 Water return 1 21 PCB 1 7 Drain 1 22 AC contactor 1 8 Ball valve switch 1 23 Transformer 1 9 Circulation m water p optional 1 24 Fan motor capacitor 1 pu 10 Temperature thermistor 7 25 Wire t rminals 3 e 11 Thermal expansion valve 1 26 AC relay 1 1 12 Water differential pressure switch 1 27 AC relay 2 2 13 High pressure re...

Page 5: ...ration mode 5 Antibacterial legionella function 6 A C returned water temp or Outdoor ambient temp in only Heating series 7 Timer number 8 DHW temperature or Outdoor ambient air temp in heating cooling series 9 Clock 1 2 3 4 5 6 7 8 22 23 24 25 18 13 16 15 14 10 Anti freezing running 11 A C heater 12 Main water pump C4 13 A C water pump C6 14 Compressor 15 Defrost running Button 19 ON OFF button 20...

Page 6: ...utomatically we have to pressed button to confirm the setting effective and if not pressed button the setting is invalid 3 2 5 C key function description Click the C key to cancel current setting not confirmed by pressing button and exit setting 3 2 6 the current time adjustments steps A press M key 6 seconds then release week icon for example 4 flashes Press or selecting between the 1 SUN and the...

Page 7: ... press or key to select number between 0 23 and then key to confirm C at this time the number of minutes flashing press or key to select number between 0 59 and then press button to confirm and exit setting automatically after 15 seconds or press C key to exit setting 5 ...

Page 8: ...ickers up Weekly timer function There is a timer on the control system that can be used to program the time that the unit switches on and off turn on Timing is set to a cycle every week Mon Sun each day can be set three different time to and three different time off there is an option to select the time set for just one week effective and weekly repeat circulation to turn effective Single week eff...

Page 9: ...1 digital clock DAY 1 adjust the time 3 Wired controller DAY DAY 1 1 Press to confirm DAY 1 Press to activation digital clock Press and to DAY 1 adjust the time DAY 1 Press to confirm Press to activation digital clock DAY 1 Press and to adjust the time DAY 1 Press to confirm Press to activation digital clock DAY 1 7 ...

Page 10: ...ame time press and for seconds enter into the timer setting interface and then press the and for seconds all the timer settings to be canceled 3 simultaneously 3 adjust the time DAY 1 Press and to DAY 2 Press to confirm After monday s timer setting is finished it will be automatically switched to Tuesday s timer setting until sunday s timer setting is finished then return to normal display interfa...

Page 11: ... error P2 2 Outdoor coil temp sensor error P1 3 Outdoor ambient temp sensor error P7 4 Air conditioning returned water temp sensor error P3 5 Air conditioning Outlet water temp sensor error E1 6 DHW tank water temp sensor error E9 7 Solar tank water temp sensor error Pb 8 High pressure protection E4 9 Low pressure protection P9 10 Outdoor water flow error P8 11 Indoor water flow error Pd 12 Miss p...

Page 12: ... as follows DHW tank Recommended water volume tank and minimum water flow volume All outdoor pipes must be thermally insulated with at least 19 mm thick pipe insulation Pipe installation must be carried out in accordance with current standard and directives To keep the heat pump from freezing please do not shut off the power supply of the heat pump in winter If the electricity is out of supply in ...

Page 13: ...5 2 Installation method 5 Installation Method 1 11 Method 2 DHW with Room Heating ...

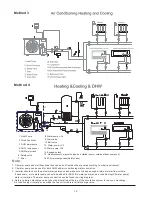
Page 14: ...e water pump connection can be found in wiring diagram 4 Safety valve air discharge valve should be installed at the top of the circulation system for easy air discharge Air conditoning circulation can utilize the fan coil or radiator air discharge valve Method 4 Method 3 12 Note 16 17 Air discharge valve Safety Valve 1 Heat Pump 2 Wired Controller 3 DHW water pump 4 DHW temp sensor 5 DHW water ta...

Page 15: ...5 3 Installation with solar assistant 5 Installation Application 1 Application 2 13 ...

Page 16: ...5 3 Installation with solar assistant 5 Installation Application 3 The most energy saving application 14 G2 G1 DHW and AC switching valve G2 Solar automatic selection valve ...

Page 17: ...5 Installation 15 W B 5 3 Dimensions D H A AH 8 9 1090 400 818 412 Model W D H A 810 B AH 8 9 AH 14 15 W D H B Model W D H A B 1090 400 412 1018 810 AH 14 15 A ...

Page 18: ...on of accumulated water in rainy season In snowy areas it is important to prevent accumulated snow from blocking up the air out The recommended height is 20cm to 30cm 2 Drain ditch or other facilities should be arranged under the outdoor unit to avoid the environment influence because of water discharge 3 To install the unit at balcony or top of building the installation site must meet the allowab...

Page 19: ...nder the supervision of a qualified electrician Electrical installation and wiring must be carried out in accordance with the stipulations in force Wires spare parts and materials etc must satisfy the relevant standards issued by the host country or region Isolator switch If an insulation test is to be carried out in the building please make sure to disconnect the heat pump To avoid the possibilit...

Page 20: ...nal parts according to actual installation requirement C4 water pump for both DHW and A C C5 water pump is addtional option for DHW C6 water pump is additional option for A C C4 water pump is not built inside for standard model There will be C4 connection port at the terminals in that case Single Phase ...

Page 21: ...antifreeze function if the electricity is connected So please keep the electricity always connected even when you don t use the heat pumps If you don t want to use the heat pumps for long time in winter or if the electricity is cut off by accident for more than 30 minutes you need to drain out all the recycling water to protect the heat pump to be freezen In cold area for the safety you d better u...

Page 22: ... 3 2 3 4 174 2 026 50 1 10 14 54 16 085 2 2 3 6 176 1 955 51 1 11 0 56 15 357 1 2 3 8 178 1 884 52 3 11 2 58 14 679 0 2 3 10 180 1 816 53 4 11 4 60 14 047 0 7 3 12 182 1 748 54 6 11 6 62 13 455 1 7 3 14 184 1 683 55 7 11 8 64 12 900 2 6 4 0 186 1 618 57 0 11 10 66 12 379 3 5 4 2 188 1 555 58 2 11 12 68 11 888 4 4 4 4 190 1 494 59 5 11 14 70 11 426 5 3 4 6 192 1 433 60 8 12 0 72 10 989 6 1 4 8 194 ...

Page 23: ...3 4 7 7 1 1 8 6 4 3 0 0 00 2 2 4 0 1 8 6 3 7 63 4 8 7 1 1 10 6 6 2 8 7 88 3 0 4 2 1 8 8 3 6 17 4 9 8 1 1 12 6 8 2 7 6 47 3 8 4 4 1 9 0 3 4 74 5 0 8 1 1 14 7 0 2 6 5 71 4 5 4 6 1 9 2 3 3 33 5 1 9 1 2 0 7 2 2 5 5 56 5 3 4 8 1 9 4 3 1 96 5 3 1 1 2 2 7 4 2 4 5 95 6 1 4 1 0 1 9 6 3 0 61 5 4 2 1 2 4 7 6 2 3 6 84 6 8 4 1 2 1 9 8 2 9 29 5 5 4 1 2 6 7 8 2 2 8 21 7 5 4 1 4 2 0 0 2 8 00 5 6 7 1 2 8 8 0 2 2 0...

Page 24: ...onditioning circuit and manually rotate the water pump axis This action should also be done when electric power disconnected for more than 24 hours to avoid block 4 Be sure the two water tanks are full of water If the water tanks are empty the electric heaters inside is dangerous to be broken 5 Insulation test of power supply circuit Please inspect it by a ohmmeter of 500V Apply the voltage of DC ...

Page 25: ......

Reviews: