background image

3. Charger & Battery   


Do not short-circuit the terminals by using metallic objects.   


Do not apply pressure to the cord or the plug. Placing the cord tightened between a wall and a 

window frame, or placing heavy objects on the cord or the plug may result in electric shock or fire.   


Be sure to insert the plug fully into a wall socket.   


Do not touch the plug with wet hands.   


Keep out of reach of children or pets.   


Don’t attempt to use another brand/model’s charger to charge the battery.   


Don’t use the charging plug and/or the power source plug when they are dusty. Pull out the 

power source plug and clean it with a dry cloth.   


To remove a cable from a socket, do not pull the cable, pull the plug. Always pull the charging 

cable gently.   


Do not rotate the pedals when charging the battery while it is mounted on the bicycle. The cord 

may twist around the pedal or the crank, and the damage to the plug may result, causing electric shock or 
fire.


Do not use sockets, connectors and other wiring devices with a power source other than 

standard rated volts (AC 110~240 volts) power supply.   


Do not use damaged components such as charge case, power cord, plug, if the supply cord is 

damaged, it must be replaced by the manufacture or its service agent or similarly qualified person in 
order to avoid a hazard.   

When charging is finished, please plug off the charger and then detach batteries from the 

charger.   

09

Summary of Contents for Easy EK2.0

Page 1: ...EASY OWNER S MANUAL ...

Page 2: ...tric bicycle differs from the non electric bikes The Electric bicycle differs only slightly from a non electric bike The following parts are specific to the Electric bicycle The battery pack hidden inside main tube The Motor in the rear wheel hub The controller hidden in the rear side of main tube The display of controller on the handlebars The brake switch ...

Page 3: ... please take a moment to read through this manual before you ride Sharing the Joy of the Ride Nothing makes us happier than seeing people out riding bikes For over twenty years Palby Marine has manufactured and distributed quality bicycles for every type of terrain and rider imaginable EASY bicycles have allowed millions of cyclists just like you to have happier healthier lives because of the joy ...

Page 4: ...t hand control 1 Assist mode select button 2 Assist mode indicator 3 Battery level indicator 4 ON OFF button 5 Front light button C Carrier 4 Service Maintenance 11 A Recommendation for washing B Avoid leaving your bicycle out in the weather 5 Trouble shooting guide 12 6 Guarantee 13 NOTE This manual is not intended as a comprehensive use service repair or maintenance manual Please see your dealer...

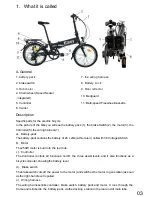
Page 5: ...ack Thebattery packcontainsthe battery of 24 Li Mn Lithium ion cellswith 36 Voltages 8 8Ah b Motor The250W motor is built into the rear hub c Controller The Controller controls all functions on off the three assist levels and it also functions as a bicyclecomputer showingthe battery level d Brake switch Thebrakeswitch cuts off the power to the motor and switchesthe motor to generation assoon asthe...

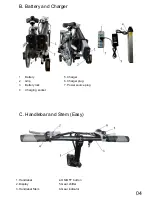
Page 6: ...harger 1 Battery 5 Charger 2 Grip 6 Charger plug 3 Battery lock 7 Power source plug 4 Charging socket C Handlebar and Stem Easy 1 Handlebar 4 ON OFF button 2 Display 5 Gear shifter 3 Handlebar Stem 6 Gear indicator 04 ...

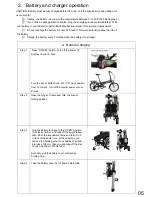
Page 7: ...Charging Step 1 Press ON OFF button Turn off the power of Display on your E bike Turn the key of battery lock into 3 O clock position from 12 O clock turn off the electric power of your E bike Step 2 Open the hinge of frame and fold the bike at folding position Turn the battery lock key to the OPEN position 5 o clock position and take off the key Please note Push the key upward firstly and turn it...

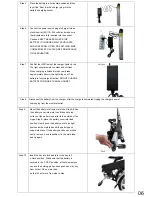
Page 8: ...GE BATTERY FOR MORE THAN 24 HOURS Step 8 Disconnect the battery from the charger after the charge is completed Unplug the charger s power source plug from the electrical outlet Step 9 Mount the battery into frame main tube Step A Slide the battery cover into main tube Make sure top surface of the battery is parallel to the outside of the hinge Step B place the battery cover into fixed position Gen...

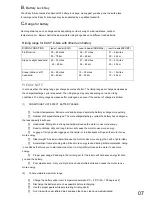
Page 9: ...ECT BATTERY RANGE Ambient temperature Extreme cold and heat can deplete the battery s charge more quickly Number of charges discharges The more charge discharge cycles the battery has undergone the less capacity it will have Headwinds Riding into a strong headwind will cause the motor to use more energy Road conditions Hilly and rough terrain will cause the motor to use more energy Luggage Carryin...

Page 10: ...precautions are provided for your benefit to protect you and those around you Please read and follow them carefully to avoid unnecessary injury damage to the product or damage to other property 1 Battery Do not throw the battery in to a fire Do not apply the battery to other appliances Use the specified charger only to charge the battery Do not disassemble or modify the battery Do not connect posi...

Page 11: ...clean it with a dry cloth To remove a cable from a socket do not pull the cable pull the plug Always pull the charging cable gently Do not rotate the pedals when charging the battery while it is mounted on the bicycle The cord may twist around the pedal or the crank and the damage to the plug may result causing electric shock or fire Do not use sockets connectors and other wiring devices with a po...

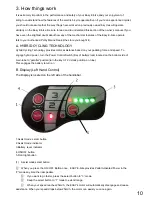
Page 12: ...brid power turn the Power Control Switch Key of battery lock located on the bottom side of main tube to parallel position turn the key to12 o clock position on tube This engages the battery to turn on A HYBRID CYCLING TECHNOLOGY B Display Left Hand Control The Display is located on the left side of the handlebar 1 Assist mode select button 2 Assist mode indicator 3 Battery level indicator 4 ON OFF...

Page 13: ...rything is securely fixed and free from the rear wheel chain etc Total weight of the luggage must not exceed 15 kg 35lbs The Rear Rack is equipped with rack straps Please use straps to tie your luggage so that luggage can be carried safely Never carry a passenger Do not attach a child carrier to the EASY E bike 2 Battery level indicator LEDs illuminated Battery Capacity System status 100 90 The ba...

Page 14: ...current load condition 3 Riding at high gear ratio Select the optimum position of the gear shift and or Assist mode depending on up hill or down hill head wind or tail wind and your physical condition 5 Trouble shooting Guide Do not take other solutions to wash those plastic components With non neutral solutions it will cause color change distortion scratch etc Do not use high pressure water or ai...

Page 15: ...al L 171 and respectively the correspondent national legislature of the country in which the EASY E bike has been bought are valid Article 2 Specifications and terms 2 1 A guarantee for the period of 5 years is applicable for regular EASY frames and regular EASY forks 2 2 A guarantee for the period of 3 years is applicable for EASY Suspension frame 2 3 A guarantee for the period of 2 years is appl...

Page 16: ...re the first owner must also hand over the duplicate guarantee registration card to the Authorized Dealer of Palby Marine 4 4 On issuing the claim the dealer completes a guarantee application form that in all cases must include the following data name and address of the owner of the bike date of purchase frame number of the bike description of the part that comes under the guarantee stamp of the A...

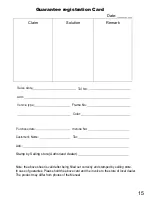
Page 17: ...ase date Invoice No Customer s Name Tel Add Stamp by Selling store Authorized dealer Note the above sheet is valid after being filled out correctly and stamped by selling store In case of guarantee Please hold the above card and the invoice to the store of local dealer The product may differ from photos of the Manual 15 ...

Page 18: ......

Reviews: