


6
Document # 106050
© 2019 PalatiumCare, Inc - Rev 1.3.3
External Powered Keypad Testing
If operating the keypad external power, the LED backlight should be on. Ensure that you see the
backlight turned on.
Enter the master code into the keypad (default is 1234). You should here a slight audible click from
the relay activating and the keypad LED should turn green. Ensure locking device unlocks the door.
Open the door and hold it open. The propped door alarm should activate after 20 seconds.
Close the door. The propped door alarm should clear. Ensure propped door and clear messages
were received on the monitoring system.
Open the door without entering a code. The forced door alarm should activate immediately.
Enter the master code into the keypad (default is 1234). The LED should turn green and the forced
door alarm should clear. Ensure forced door and clear messages were received on the monitoring
system.
Mounting Instructions
1. Determine the height that the device is to be mounted from floor to the top of the
device.
2. Make a small horizontal mark on the wall one inch lower than the top of the intended
height.
3. Install a single gang drywall box at this mark matching the top of the mark with the top
of the drywall box cutout.
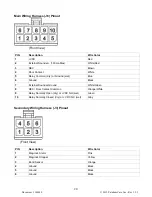
4. Feed the needed wires into the drywall box and connect them to the proper pigtails.
Cap unused wires. See wiring diagrams and pigtail pinouts for further details.
5. Push the pigtail connectors through the wide oval hole in the mounting plate and mount
the top hole of the back plate onto the top hole of the single gang box with the included
screw.
6. Using a level on the side of back plate, make sure the back plate is level on the wall.
7. Screw the bottom of the mounting plate to the bottom hole of the single gang box.
8. Plug the pigtails into the AIO Keypad.
9. If powering the device from batteries, install two batteries into the keypad.
10. Learn keypad into the PalatiumCare system, and test to ensure it is functioning
properly.
11. Hang the AIO Keypad on the back plate.
12. Screw in bottom mounting screw until tight.
Caution:
Over-tightening the housing screws can result in microcracks in the plastic and/or
stripping of the bushing. Any of these conditions can compromise the stability of the device as
well as future secure mounting.


