background image

User’s Manual 


14 


Highlighting 

Clear All Data…

 and pressing the   button will clear all video data.  You will be asked to verify that 

you wish to clear all data before the DVR erases the video data.  

Clear All Data…

 will not clear the System Log. 


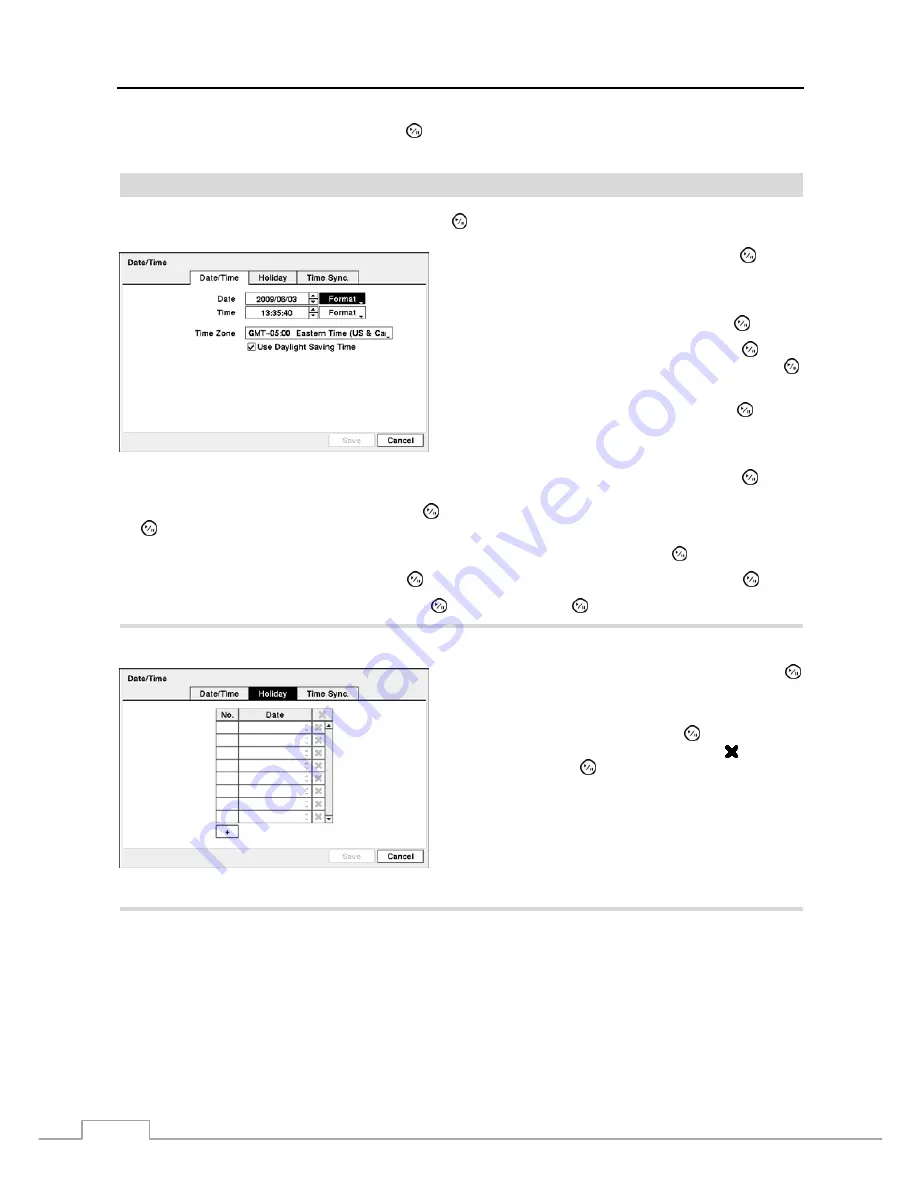
Date/Time 


Highlight 

Date/Time

 in the System menu and press the   button.  The 

Date/Time

 setup screen appears. 


Figure 10 — Date/Time setup screen.


Highlight the first box beside 

Date

 and press the   button.  

The individual sections of the date will highlight.  Use the 

Up


and 

Down

 arrow buttons to change the number.  Use the 

Left


and 

Right

 arrow buttons to move between month, date and 

year.  Once you have the correct date, press the   button. 


Highlight the Format box beside 

Date

 and press the   button.  

Select from the three available date formats and press the   
button to save your selected format. 


Highlight the first box beside 

Time

 and press the   button.  

The individual sections of the time will highlight.  Use the 

Up


and 

Down

 arrow buttons to change the number.  Use the 

Left


and 

Right

 arrow buttons to move between hour, minutes and 

seconds.  Once you have the correct time, press the   button. 


Highlight the Format box beside 

Time

 and press the   button.  Select from the three available time formats and press 

the   button to save your selected format. 


NOTE:  The clock will not start running until you have highlighted Save and pressed the 

 button. 


Highlight the box beside 

Time Zone

 and press the   button.  Select your time zone from the list and press the   button. 


Highlight 

Use Daylight Saving Time

 and press the   button.  Pressing the   button toggles between 

On

 and 

Off

.  


Highlight the 

Holiday 

tab, and the Holiday setup screen appears. 


You can set up holidays by highlighting 

+

 and pressing the   

button.  The current date appears. 


Highlight the month and day and change them by using the 

Up

 and 

Down

 arrow buttons.  Press the   button to add the 

date.  Dates can be deleted by highlighting the   beside the 
date and pressing the   button. 


NOTE:  Holidays that do not fall on the same date each 

year should be updated once the current year’s 
holiday has passed.


Figure 11 — Holiday setup screen. 


Highlighting the 

Time Sync.

 tab causes the Time Sync. screen to display.  You can set up time synchronization between 

the DVR and standard time servers that are available in most time zones and countries, or between the DVR and another 
DVR. 

Summary of Contents for PDRH-16-RT

Page 1: ......

Page 2: ......

Page 3: ... PROVIDE REASONABLE PROTECTION AGAINST HARMFUL INTERFERENCE WHEN THE EQUIPMENT IS OPERATED IN A COMMERCIAL ENVIRONMENT THIS EQUIPMENT GENERATES USES AND CAN RADIATE RADIO FREQUENCY ENERGY AND IF NOT INSTALLED AND USED IN ACCORDANCE WITH THE INSTRUCTION MANUAL MAY CAUSE HARMFUL INTERFERENCE TO RADIO COMMUNICATIONS OPERATION OF THIS EQUIPMENT IN A RESIDENTIAL AREA IS LIKELY TO CAUSE HARMFUL INTERFER...

Page 4: ...echnician to restore the equipment to its normal operation E If the equipment has been dropped or the cabinet damaged F When the equipment exhibits a distinct change in performance this indicates a need for service 15 Replacement Parts When replacement parts are required be sure the service technician has used replacement parts specified by the manufacturer or that have the same characteristics as...

Page 5: ...nnector 5 Chapter 3 Configuration 7 Front Panel Controls 7 Camera Buttons 1 to 16 8 HDD LED 8 Alarm Out LED 8 Network LED 8 Clip Copy LED 8 Power LED 9 PANIC Button 9 ALARM Button 9 CLIP COPY Button 9 ZOOM PTZ Button 9 DISPLAY SPOT Button 9 GROUP SEQUENCE Button 9 PLAYBACK Button 9 MENU CAMEO Button 10 Arrow Buttons 10 PLAY PAUSE Button 10 USB Port 10 ID Button on Remote Control 10 Turning on the ...

Page 6: ...ing 43 Live Monitoring Menu 44 Active Cameo Mode 45 Zoom Mode 45 PTZ Mode 45 Event Monitoring 47 Covert Camera 47 Spot Monitoring 47 Using a Mouse 47 Recording Video 48 Panic Recording 49 Recording Audio 49 Playing Recorded Video 49 Searching Video 50 Search Menu 51 Event Log Search 52 Record Table Search 53 Calendar Search 54 Motion Search 55 Text In Search 56 Clip Copy 57 Print 58 Appendix 59 US...

Page 7: ...ure 10 Date Time setup screen 14 Figure 11 Holiday setup screen 14 Figure 12 Time Sync screen 15 Figure 13 Storage Information screen 15 Figure 14 Storage Status screen 16 Figure 15 User setup screen 16 Figure 16 Shutdown screen 18 Figure 17 Network menu 18 Figure 18 Network setup screen 18 Figure 19 LAN Manual setup screen 19 Figure 20 DVRNS setup screen 20 Figure 21 WebGuard setup screen 21 Figu...

Page 8: ...een 35 Figure 51 Video Blind Settings screen 36 Figure 52 Video Blind Actions 1 screen 36 Figure 53 Video Blind Actions 2 screen 37 Figure 54 Text In Settings screen 37 Figure 55 Text In Device screen 37 Figure 56 Text In Actions 1 screen 38 Figure 57 Text In Actions 2 screen 39 Figure 58 Health Check screen 39 Figure 59 Storage screen 40 Figure 60 System Event Actions screen 40 Figure 61 Event St...

Page 9: ...sk drive S M A R T protocol Technical Overview In addition to replacing both a time lapse VCR and a multiplexer in a security installation your DVR has many features that make it much more powerful and easier to use than even the most advanced VCR The DVR converts analog NTSC or PAL video to digital images and records them on a hard disk drive Using a hard disk drive allows you to access recorded ...

Page 10: ...the 8 and 16 channel digital video recorders The DVRs are identical except for the number of cameras and alarms that can be connected and the number of cameras that can be displayed For simplicity the illustrations and descriptions in this manual refer to the 16 camera model ...

Page 11: ...install the DVR Refer to the installation manuals for the other items that make up part of your system Figure 2 16 Channel DVR rear panel Video Input Video Loop Through RS485 Port Alarm Input Output Network Port RS232C Port Audio In Out Video Out Factory Reset Switch Power Cord Connector Your DVR can be used with either NTSC or PAL equipment NOTE You cannot mix NTSC and PAL equipment For example y...

Page 12: ...o the C Common and NC Normally Closed or C and NO Normally Open connectors NC NO is a relay output which sinks 2A 125VAC and 1A 30VDC See Chapter 3 Configuration for configuring alarm output ARI Alarm Reset In An external signal to the Alarm Reset In can be used to reset both the Alarm Out signal and the DVR s internal buzzer Mechanical or electrical switches can be wired to the ARI Alarm Reset In...

Page 13: ... until all the LEDs on the front panel are lit NOTE When the DVR successfully resets to factory defaults all the LEDs on the front panel flash five times 5 Release the reset switch All of the DVR s settings are now at the original settings it had when it left the factory Power Cord Connector WARNING ROUTE POWER CORDS SO THAT THEY ARE NOT A TRIPPING HAZARD MAKE CERTAIN THE POWER CORD WILL NOT BE PI...

Page 14: ...User s Manual 6 ...

Page 15: ... and operates much like a VCR combined with a multiplexer Many of the buttons have multiple functions The buttons on the infrared remote control while laid out differently perform the same functions as those on the front panel The following describes each button and control Take a few minutes to review the descriptions You will use these to initially set up your DVR and for daily operations NOTE T...

Page 16: ...on 1 zooms in the screen and the button 2 zooms out the screen pressing the button 3 focuses near and button 4 focuses far and pressing the button 5 moves to the preset and button 6 saves the preset HDD LED The HDD LED flickers when the DVR is recording or searching video on the hard disk drive Alarm Out LED The Alarm Out LED is lit when alarm output or internal buzzer is activated Network LED The...

Page 17: ...PTZ mode Pressing the arrow buttons or MENU CAMEO button allows you to control properly configured cameras DISPLAY SPOT Button Pressing the DISPLAY SPOT button toggles between different display formats The available formats are PIP 2x2 3x3 and 4x4 Pressing and holding the button for three seconds or longer allows you to select which cameras will display on the Spot monitor GROUP SEQUENCE Button Wh...

Page 18: ...d Pressing the button again toggles the playback speed from and The screen displays and respectively When in the pause mode pressing the button moves to the next image and pressing the button moves to the previous image PLAY PAUSE Button In the live monitoring mode pressing the button freezes the current screen and the screen displays icon When in the playback mode pressing the button plays back i...

Page 19: ...he screen Press the MENU button or move the mouse pointer to the top of the screen and then select Login in the Live Monitoring menu to enter the setup screens The Login screen appears Select a User and enter the password by pressing the appropriate combination of Camera number buttons and then the button There is no default password when logging in the admin user for the first time Figure 5 Login...

Page 20: ...on screen you can name the site location assign a System ID number select the language the screens are displayed in display software version number upgrade the software show the System Log display recorded time data and clear all data Highlight the Site box and press the button A virtual keyboard appears that you can use to enter a Site Name Once you have entered your title highlight OK and press ...

Page 21: ...ettings connect the USB device to the DVR Highlight Setup Export and press the button Highlight the box beside File name and press the button A virtual keyboard allows you to enter the file name Selecting Export will save the current settings in dat file format on the USB device NOTE Even after changing the DVR settings by importing saved settings the time related settings Date Time Time Zone and ...

Page 22: ...conds Once you have the correct time press the button Highlight the Format box beside Time and press the button Select from the three available time formats and press the button to save your selected format NOTE The clock will not start running until you have highlighted Save and pressed the button Highlight the box beside Time Zone and press the button Select your time zone from the list and pres...

Page 23: ...evices The information in the Type column describes the storage device The capacity of the storage device is displayed in the Capacity column The Format column displays whether the device is used for recording Record or not Not Using Not formatted indicates the device is not formatted indicates when the device has temporary space set aside so that video clips can be saved on a DVD RW Figure 13 Sto...

Page 24: ...r supported NOTE When the storage condition is Bad the Event Status Storage screen displays and you can check the storage condition for details Once the Bad message displays replacing the hard disk drive is recommended usually within 24 hours Temperature and S M A R T information will be available only for internal hard disk drives supporting the SMART Self Monitoring Analysis and Reporting Techno...

Page 25: ...stem shutdown and logout on a local system or a PC running RAS System Time Change The user can change the system date and time on a local system or a PC running RAS Data Clear The user can clear all video data or format disks on a local system or a PC running RAS PTZ Control The user can control the PTZ camera on a local system or a PC running RAS Alarm Out Control The user can reset the DVR s out...

Page 26: ...and press the button You can select the Resolution from High Half D1 and Standard CIF Press the button to set the Resolution NOTE The higher Quality and Resolution settings require higher Transfer Speed settings The transfer speed you set is the maximum speed Depending on the network environment this speed may not be achieved The DVR supports two way audio communication between a local system and ...

Page 27: ...ight the Port Number Setup box and press the button The Port Number Setup screen appears NOTE You will need to get the appropriate Port Numbers for each RAS and WebGuard related program Admin Callback Watch Search and Audio from your network administrator Change the numbers by highlighting them and using the Up and Down arrow buttons to increase or decrease the number The factory default Port sett...

Page 28: ...address or domain name of the DVRNS server Figure 20 DVRNS setup screen NOTE You will need to get the IP Address or domain name of the DVRNS Server from your network administrator You can use the domain name instead of IP address if you already set up the DNS Server when setting up the LAN Highlight the box beside Port and press the button Set the port number of the DVRNS server using the Up and D...

Page 29: ...ss or domain name of the SMTP server NOTE You will need to get the IP Address or domain name of the SMTP Server from your network administrator NOTE You can use the domain name instead of IP address if you already set up the DNS Server when setting up the LAN Highlight the box beside Port and press the button Use the arrow buttons to enter the SMTP Server port number obtained from your system admi...

Page 30: ...Figure 24 Devices menu Camera Highlight Camera in the Devices menu and press the button The Camera setup screen appears Figure 25 Camera setup screen You can turn the camera number On or Off and you can change the Title of each camera using the virtual keyboard You can also determine which cameras will display on the monitors by selecting Normal Covert 1 or Covert 2 from a drop down list in the Us...

Page 31: ...nd pressing the button Change the number by highlighting it and using the Up and Down arrow buttons to increase and decrease the number The PTZ ID number can be set from 0 to 256 Highlight the Setup box and press the button The Port Setup window appears Configure the port s setting based on the PTZ camera manufacturer s instructions Audio Highlight Audio in the Devices menu and press the button Th...

Page 32: ...chedule Highlighting the boxes under the Column heading and pressing the button allows you to edit the information in those boxes The Day box allows you to select the days that the alarm schedule will be active The choices are Sun Mon Tue Wed Thu Fri Sat M F Hol and All The Range box allows you to set the time that the alarm schedule will be active in 15 minute increments from 00 00 to 24 00 Figur...

Page 33: ...text input strings display on the screen You can adjust the Display Dwell time sec for the text input strings displayed on the screen You can adjust the transparency of the setup screens by highlighting Transparency and using the Left and Right arrow buttons Highlighting OSD Margin and pressing the button displays how OSD text will be displayed on the monitor You can adjust the horizontal and vert...

Page 34: ...hlight the box in the Channels column and press the button Figure 32 Spot Monitor screen Highlight the VGA tab to switch to the VGA screen Highlight the box beside Resolution and press the button You can select from 800x600 1024x768 and 1280x1024 Highlight Full Screen and press the button Pressing the button toggles between On and Off When it is On the screen on the VGA monitor displays in full sc...

Page 35: ...ge space has been used When Recycle is turned off the DVR stops recording once all available storage space has been used Highlight the Event Record Dwell box and set the length of time you would like to record for the associated event You can set the dwell from 5 seconds to 30 minutes Refer to Event Actions screen in this chapter for information regarding event recording Figure 36 Record Settings ...

Page 36: ...ne disk is installed in the unit the DVR records video on the disks sequentially based on time And these sequentially recorded videos have the advantage that you can search recorded video easily even though a disk is removed from the unit However video recorded in the same time range might be saved on different disks by channel and by the type of recording mode Once the Limit Time Lapse Recording ...

Page 37: ...place The smallest time segment you can use is 15 minutes Highlight the box under the Mode heading and press the button to change the recording mode that will be used Choose from No Record Time Event and Time Event Simple Mode Only When the DVR is in the No Record mode it will not record during the preset day and time range as long as the PANIC button is not pressed Use the No Record mode when you...

Page 38: ... recording You can select from 1 00 to 30 00 ips 25 00 ips PAL Highlighting boxes under Quality and pressing the button allows you to set the recorded image quality for Time and Event recording You can select from Very High High Standard and Basic Highlighting boxes under Resolution and pressing the button allows you to set the recorded image resolution for Time and Event recording You can select ...

Page 39: ...ording whenever it senses an input on one of its alarm input connectors Highlight the box beside Panic Record and press the button A list of Alarm Inputs appears and you can select which alarm input you want associated with panic recording The DVR will continue panic recording until an input on the selected alarm input is released as long as the PANIC button is not pressed to stop the panic record...

Page 40: ... in the RAS Remote Administration System Highlight the desired box under the PTZ heading and press the button A list of PTZ presets appear Select the preset position for each PTZ camera where you want PTZ cameras to move to whenever the DVR detects an input on the associated alarm input Highlight the desired box under the Spot Monitor heading and press the button A list of SPOT monitors and camera...

Page 41: ...e minimum number of detection blocks for Daytime and Nighttime independently Smaller numbers provide greater sensitivity because fewer detection blocks must be activated Turning Zone View On will allow you to observe how the DVR is reacting to motion When in the motion viewing mode the detection zone of video will be displayed Any detected motion within the zone will be displayed in red You can co...

Page 42: ...hanges NOTE For the Notify action the notify item you select should be enabled in the Notification setup screen and the DVR should be registered in the RAS Remote Administration System Highlight the desired box under the PTZ heading and press the button A list of PTZ presets appear Select the preset position for each PTZ camera where you want PTZ cameras to move to whenever the DVR detects motion ...

Page 43: ...e the DVR s internal buzzer sound if video is lost on the selected camera NOTE For the Alarm Out action the alarm output and beep you select should be set to the Event mode in the Alarm Out setup screen Schedule tab Highlight the box under the Notify heading and press the button You can toggle the entire list On and Off by highlighting Notification and pressing the button You can toggle the indivi...

Page 44: ...ger an Alarm Out connector sound the DVR s internal buzzer notify a number of different devices move PTZ cameras to preset positions and or display a camera on a SPOT monitor Highlight the box under the Record heading and press the button A list of cameras appears You can associate as many cameras with that camera as you wish If the DVR detects video blind on the selected camera it starts recordin...

Page 45: ...x under the Setup heading and press the button Selecting the Setup heading changes all the parameters excluding Port settings of all the text input channels NOTE The system performance might be affected when a large quantity of text inputs are detected from several channels at the same time Figure 55 Text In Device screen Highlight the box beside Port and press the button Select from None RS232 RS...

Page 46: ...t for the new text string The DVR will consider a transaction complete if no new text strings are entered between the last text input and the dwell time out You can adjust the Time Out dwell from 5 seconds to 15 minutes Highlight the Actions 1 and Actions 2 tabs and the Text In Actions 1 and Actions 2 screens display Figure 56 Text In Actions 1 screen The DVR can be set to react to text input Text...

Page 47: ...diagnostics and report the results Highlighting the box beside System and pressing the button allows you to select the interval that you want the DVR to run self diagnostics on the system You can select from 1 hr to 30 days or Never Highlight the Setup box beside Check Recording and press the button The Check Recording screen appears Highlighting Schedule On and pressing the button toggles On and ...

Page 48: ... the DVR s internal buzzer and or notify a number of different devices Highlight the Alarm Out box beside the desired event Check Recording Check Alarm In Disk Almost Full Disk Full Disk Bad Disk Temperature or Disk S M A R T and press the button A list of Alarm Outputs appears You can associate as many Alarm Outs with the Event as you wish If the DVR detects that event it triggers output signals ...

Page 49: ...etected based on the settings you made in the System Event setup screen on the Event menu Panic Record will be highlighted while the DVR is in the panic recording mode Disk Almost Full will be highlighted when the DVR is not in the Recycle mode and the level of disk usage reaches the Disk Almost Full percentage you made in the System Event setup screen on the Event menu Disk Full will be highlight...

Page 50: ...User s Manual 42 ...

Page 51: ...iguration Turning on the Power Once you have installed the DVR following the instructions in Chapter 2 Installation it is ready to record Live Monitoring As soon as the DVR completes its initialization process it will begin showing live video on the attached monitor and playing live audio through the attached speaker The default mode is to display all cameras at once Pressing any camera button wil...

Page 52: ...quence for the cameo sequence monitoring should be selected in the Display setup screen Main Monitor tab Camera Menu Selecting Camera Menu in the Live Monitoring menu displays the following Camera Menu Audio Selecting Audio toggles audio output On and Off Color Control Selecting Color Control and choosing the camera number allows you to control brightness contrast hue and saturation for each camer...

Page 53: ... the cameo menu displayed when pressing the CAMEO button also exits the Active Cameo mode The active cameo mode will remains in effect for 15 seconds if there is no further operation In active cameo mode press the button for the camera you want to display in the active cameo After setting the camera number to active cameo the DVR moves the active cameo to the next cameo When the camera number exis...

Page 54: ...ppear Select the desired preset and press the button to load the preset Set Preset Move to Preset Figure 64 PTZ Preset menu While in the PTZ mode pressing the MENU button and selecting Advanced PTZ in the menu displaying at the top of the screen displays the Advanced PTZ menu Set the feature you wish to control by selecting it from the menu Refer to the camera manufacturer s instructions for the p...

Page 55: ...ngs tab that camera appears to be Off unless a user with Covert Camera View authority logs into the system The camera title will be grayed out and status icons will not be displayed on the monitor NOTE When a camera is set up as Covert 1 the DVR displays the camera title and status icons on the covert video When set up as Covert 2 the DVR displays only the camera title on the covert video If a use...

Page 56: ...the previous or next page It is the same as pressing the GROUP button OSD Selecting OSD in the Mouse Display menu toggles OSD On and Off Recording Video Once you have installed the DVR following the instructions in Chapter 2 Installation it is ready to record The DVR will start recording based on the settings you made in the Record setup screen See Chapter3 Configuration Recycle On or Recycle Off ...

Page 57: ...f the selected camera When in the single screen display format the camera currently displayed on the screen will be selected and when in the PIP display format the camera displayed on the PIP screen will be selected for the search channel During the Triplex mode the DVR maintains the same display format as it does in the live mode A red outline surrounding the video and the camera title indicates ...

Page 58: ...ZOOM button zooms in the current image on the screen DISPLAY SPOT Button Pressing the DISPLAY SPOT button toggles different display formats The available formats are 2x2 3x3 and 4x4 Pressing and holding the button for three seconds or longer allows you to select which cameras will display on the Spot monitor GROUP Button Pressing the GROUP button changes the screen from the current camera group to...

Page 59: ...will display If no video was recorded during the selected time a message appears alerting you that no image was recorded at that time The button and arrow buttons can now be used to review the surrounding video Export Selecting Export in the Search menu displays the following Export menu See the following Clip Copy and Print sections for details A B Clip Copy Selecting A B Clip Copy will set the s...

Page 60: ...s to live monitoring NOTE It is possible that no recorded image displays on the current screen Press the DISPLAY button and change the screen mode to 4x4 You will be able to easily see the camera have recorded video during target time You can also narrow your event search by selecting the Option button and setting up the new search condition You can search video from the first to last recorded ima...

Page 61: ...elf diagnostic System Events as part of your search The choices are Panic Record Check Recording Check Alarm In Disk Almost Full Disk Bad Disk Temperature Disk S M A R T Fan Error Once you set your desired search conditions highlight Search and press the button to display the search results in the Event Log Search screen Selecting Cancel exits the screen without saving the changes Record Table Sea...

Page 62: ...ching Video Go To section of this chapter for more details Clip Copy Clips a video segment and saves it see the following Clip Copy section for more details Print Prints the current playback image Zoom Zooms the current playback image Slow Play Plays video at low speed x1 2 x1 3 x1 4 x1 6 and x1 8 The individual playback controls at the bottom perform the following functions as described below Go ...

Page 63: ...ed image Highlight the box beside Type and press the button You can select between Motion Search and Museum Search Motion Search detects motion in the defined area Museum Search detects if a defined object has moved Highlight the box beside Zone and press the button An image from the video appears with a grid overlaid You can turn sensor blocks On and Off to define the area of the picture in which...

Page 64: ...e first recorded image Highlight the box beside To and press the button to toggle between On and Off When set to Off you can enter a specific Date and Time When set to On the search will be from the last recorded image Highlight the Channel and press the button Select the text in devices that you want to search for text input Highlight the Text Input Device box and press the button Select your Tex...

Page 65: ...will be from the first recorded image Highlight the box beside To and press the button to toggle between On and Off When set to Off you can enter a specific Date and Time When set to On the search will be from the last recorded image Highlight the box beside Channels and press the button You can select the cameras that you would like to include in your video clip Highlight the box beside Password ...

Page 66: ...ple 3 individual 2GB files will be created when saving a 6GB video clip However the file size for the One Touch Clip Copy is limited to 2GB You can use other functions on the DVR while video is being backed up To do this highlight the Close button and press the button You can return to the Clip Copy screen at any time to check the progress You do not need to install any special software on your pe...

Page 67: ...isk drive in Windows 98 NOTE Preparing a USB hard disk drive under Windows ME is almost identical to Windows 98 1 Connect the USB hard disk drive to your computer using the USB Cable 2 Turn on your computer The Add New Hardware wizard window will appear 3 Install the device driver for the USB backup device following the instructions provided with your USB hard disk drive 4 If the USB hard disk dri...

Page 68: ...ant to search for Coke with a Qty Quantity of more than 1 and Hotdog with an amount totaling over 8 the following search condition can be set Search Example II 1 2 3 4 5 6 123456789012345678901234567890123456789012345678901234567890 Item Unit price Qty amount Coke 2 20 1 s 2 20 Fanta 2 20 1 s 2 20 Hotdog 3 50 3 s 10 50 Pepsi 1 95 1 s 1 95 total 16 85 Thank you In the above text in data you can fin...

Page 69: ...etup screen WebGuard tab Or http DVRNS server address DVR name The DVRNS server address and the DVR name registered on the DVRNS server Or http www dvronline net Entering the DVR IP address or the DVR name will be required when logging in NOTE You will need to get the appropriate IP address for the DVR you want to connect to and the WebGuard port number from your network administrator WebGuard onl...

Page 70: ...ct the Run as administrator option from the context menu Otherwise some functions of the WebGuard might be limited to use There might be a problem with screen display or screen update due to low image transmission speed when using the Microsoft Windows Vista operating system In this situation it is recommended that you disable the Auto Tuning capability of your computer Run the Command Prompt with...

Page 71: ...the audio control panel displays click the to send audio to the connected remote site and click the button again to stop sending audio Click the to monitor live audio from the connected remote site through the attached speaker and click the button again stop monitoring live audio Clicking both and allows two way communication Clicking the disables audio communication Aspect Ratio Changes the image...

Page 72: ...und within the time parameters The Timetable window located at the bottom displays the time information for the image of the date selected on the calendar If more than one video stream in the same time range you can select the video stream you want to search Clicking a specific time displays the image recorded at that time on the screen Selecting the allows you to display an image from a specific ...

Page 73: ...ge In this case you can search overlapping video streams individually by selecting a specific segment For example when the DVR has recorded video from one to five o clock and the user changes the time backward from five to three o clock and then continues recording until six o clock there will be two video streams and segments from three to five o clock You can search overlapping video streams by ...

Page 74: ...User s Manual 66 Map of Screens ...

Page 75: ... Check camera video cable and connections Check monitor video cable and connections Confirm that the camera has power Check camera lens settings Live Video Very Bright If a cable is attached to the Loop connector make certain it is connected to a properly terminated device DVR has stopped recording If hard disk drive is full you will either need to delete video or set the DVR to the Overwrite Mode...

Page 76: ...int End Setup Export Cancel Print Cancel Schedule On Schedule Off Error Code Notices System Upgrade Related Clip Copy Related No Description No Description 0 Unknown error 0 Unknown error 1 File version error 1 Device error 2 Operating system version error 2 Mounting failed 3 Software version error 3 No media 4 Kernel version error 4 Invalid media 100 Upgrade device mounting failed 5 File already ...

Page 77: ... System is busy clip copying Specifications VIDEO Signal Format NTSC or PAL Auto Detect Video Input Composite 8 or 16 looping inputs 1 Vp p auto terminating 75 Ohms Monitor Outputs Composite 1 BNC 1 Vp p 75 Ohms SPOT 1 BNC 1 Vp p 75 Ohms VGA 1 Video Resolution Composite 720x480 NTSC 720x576 PAL VGA 800x600 1024x768 1280x1024 60Hz Record Speed images per second Real time 480ips NTSC 400ips PAL CIF ...

Page 78: ...drive or flash drive When installing an internal DVD RW drive connect the SATA I O cable to the SATA3 socket GENERAL Dimensions W x H x D 16 9 x 3 5 x 15 9 430mm x 88mm x 405mm Unit Weight 16 8 lbs 7 6kg Shipping Weight 26 3 lbs 11 9kg Shipping Dimensions W x H x D 21 3 x 11 4 x 23 2 540mm x 290mm x 590mm Operating Temperature 41 F to 104 F 5 C to 40 C Operating Humidity 0 to 90 Power 100 to 240 V...

Reviews: