background image

User’s Manual 


16 


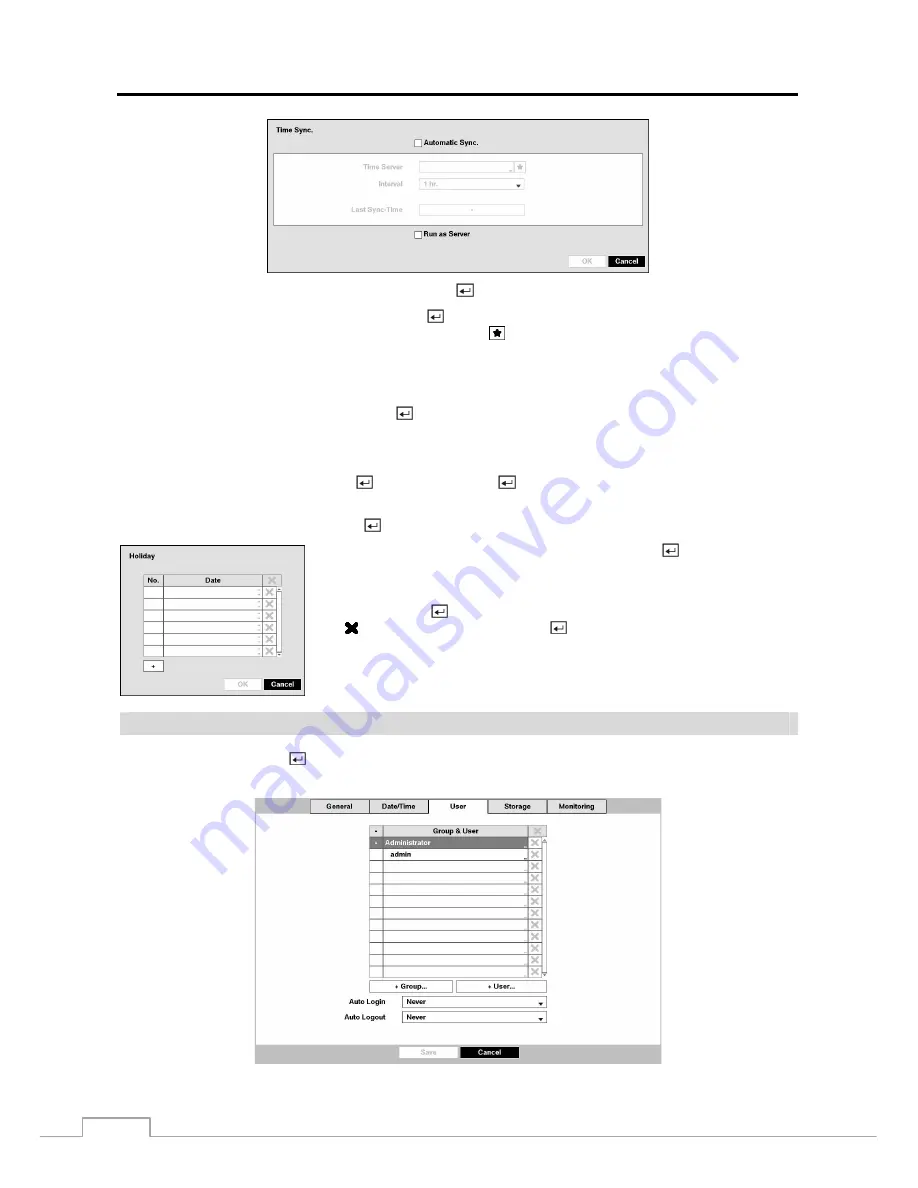
Highlight the box beside 

Automatic Sync. 

and press the 

 button.  This toggles between 

On

 and 

Off

.


Highlight the box beside 

Time Server

 and press the 

 button.  A virtual keyboard appears that you can use to enter 

the IP address or domain name of the time server.  Highlighting   allows you to select your time server from a list of 
registered time servers. 


NOTE:  You can use the domain name instead of IP address if you already set up the DNS Server when setting 

up the Network – IP Address. 


Highlight the box beside 

Interval

 and press the 

 button.  Set the time interval for synchronization from 30 minutes 

to 1 day at various time intervals.


Last Sync-Time

 displays the last time the DVR was synchronized with the time server.


Highlight 

Run as Server 

and press the 

 button.  Pressing the   button toggles between 

On

 and 

Off

.  When it is 

On

, the DVR you are setting up will run as a time server.


Highlighting 

Holiday… 

and pressing the   button displays the Holiday


screen. 


You can set up holidays by highlighting 

+

 and pressing the   button.  The current 

date appears. 


Highlight the month and day and change them by using the 

Up

 and 

Down

 arrow 

buttons.  Press the 

 button to add the date.  Dates can be deleted by highlighting 

the   beside the date and pressing the   button. 


NOTE:  Holidays that do not fall on the same date each year should be updated 
once the current year’s holiday has passed. 


User 


Highlight 

User 

and press the 

 button.  The User setup screen displays the authorized groups and users.  You can add 

and delete groups and users.  When adding a group, you can assign authority levels to the group. 


Figure 10 :  System – User setup screen. 

Summary of Contents for PDR960H-8HD

Page 1: ...PDR960H 8HD S84674 12 Channel 8 Analogue 4 IP Hybrid Digital Video Recorder PDR960H 16HD S84675 20 Channel 16 Analogue 4 IP Hybrid Digital Video Recorder User Manual Hybrid Digital Video Recorder...

Page 2: ......

Page 3: ...ERATES USES AND CAN RADIATE RADIO FREQUENCY ENERGY AND IF NOT INSTALLED AND USED IN ACCORDANCE WITH THE INSTRUCTION MANUAL MAY CAUSE HARMFUL INTERFERENCE TO RADIO COMMUNICATIONS OPERATION OF THIS EQUI...

Page 4: ...chnician to restore the equipment to its normal operation E If the equipment has been dropped or the cabinet damaged F When the equipment exhibits a distinct change in performance this indicates a nee...

Page 5: ...Connector 6 Chapter 3 Configuration 7 Front Panel Controls 7 Camera Buttons 1 to 16 8 LED 8 Jog Dial Shuttle Ring 8 Enter Button 9 Arrow Buttons 9 Playback Buttons 9 PTZ Button 9 Alarm Button 9 Panic...

Page 6: ...Network Audio 41 Alarm Out 42 Remote Control 43 Display Setup 43 OSD 43 Primary Monitor 44 Spot Monitor 45 Status Setup 46 Event 46 Storage 47 Camera Setup 48 General 48 PTZ 48 Network Camera 49 Chapt...

Page 7: ...ing 87 Specifications 88 List of Illustrations Figure 1 Typical DVR installation 2 Figure 2 16 Channel DVR rear panel 3 Figure 3 16 Channel DVR front panel 7 Figure 4 Infrared remote control 8 Figure...

Page 8: ...3 Device Remote Control setup screen 43 Figure 34 Display OSD setup screen 43 Figure 35 Display Primary Monitor setup screen 44 Figure 36 Display Spot Monitor setup screen 45 Figure 37 Status Event se...

Page 9: ...nputs Two way Audio Communication 4 Channel Audio Recording and 1 Channel Audio Playback Text Input for ATM and POS Alarm Connections Include Input Output and Reset Input Built in Alarm Buzzer Live or...

Page 10: ...record monitored video and play back recorded video You can view video and control your DVR remotely by connecting via Ethernet There is an eSATA port that can be used to record video or archive to ex...

Page 11: ...install the DVR Refer to the installation manuals for the other items that make up part of your system Figure 2 16 Channel DVR rear panel Video Input Video Loop Through eSATA Port Network Port Video...

Page 12: ...ons CAUTION The network connector is not designed to be connected directly with cable or wire intended for outdoor use Video Out NOTE Connect the monitor before the DVR boots so that video can be disp...

Page 13: ...off 2 Turn it on again 3 While the DVR is initializing the front panel LEDs will blink When the front panel LEDs blink poke the straightened paperclip into the unlabeled hole to the left of the RS232...

Page 14: ...ALL POWER CORDS UNDER RUGS OR CARPET THE POWER CORD HAS A GROUNDING PIN IF YOUR POWER OUTLET DOES NOT HAVE A GROUNDING PIN RECEPTACLE DO NOT MODIFY THE PLUG DO NOT OVERLOAD THE CIRCUIT BY PLUGGING TOO...

Page 15: ...ultiple functions The buttons on the infrared remote control while laid out differently perform the same functions as those on the front panel The following describes each button and control Take a fe...

Page 16: ...recording or searching video on the hard disk drive Jog Dial Shuttle Ring Jog Dial When in the playback mode you can play video forward image by image by turning the Jog Dial clockwise and backward i...

Page 17: ...lar speed The screen displays when the DVR is in the Pause mode and the screen displays when the DVR is playing back video The button is also used for Far Focus in the PTZ mode Fast Forward Pressing t...

Page 18: ...ternal drives close enough to the DVR so that you can make the cable connections usually less than 6 feet Use the USB cable provided with the hard disk drive to connect it to the DVR A USB mouse not s...

Page 19: ...to exit the screen Press the MENU button or move the mouse pointer on the right edge of the screen and then select Login in the Live Monitoring menu to enter the setup screens The Login screen appear...

Page 20: ...appear Use the arrow keys to highlight the character you want in the name or title and press the button That character appears in the title bar and the cursor moves to the next position Pressing togg...

Page 21: ...are not part of an RS485 network If this is the case all will be controlled at the same time when using the infrared remote control Highlight the box beside Language and press button A drop down menu...

Page 22: ...System Log The System Log screen lists system activities up to 5 000 from the latest that have occurred along with the time and date The icon will be displayed in the last column for system activities...

Page 23: ...e the Up and Down arrow buttons to change the number Use the Left and Right arrow buttons to move between hour minutes and seconds Once you have the correct time press the button Highlight the Format...

Page 24: ...with the time server Highlight Run as Server and press the button Pressing the button toggles between On and Off When it is On the DVR you are setting up will run as a time server Highlighting Holiday...

Page 25: ...upgrade the software on a local system or a PC running RAS Color Control The user can control brightness contrast hue and saturation for cameras on a local system or a PC running RAS System Check The...

Page 26: ...isplayed in the Capacity column The Format column displays whether the device is used for recording Record archiving Archive or not Not Using Not formatted indicates the device is not formatted indica...

Page 27: ...disks to designated Dest destination disks selected from internal hard disk drives Refer to the Chapter 4 Disk Mirroring for further information on setting up disk mirroring Monitoring Highlight Moni...

Page 28: ...Disk Bad and press the button Select percentage level of bad disk sectors at which you want the DVR to trigger an alert Percentage levels range from 10 to 90 Highlight the Settings box beside Disk Tem...

Page 29: ...than the preset Limit Time Lapse Recording period the DVR records over the oldest video data time lapse or event video as it would in the Recycle mode even if this feature is turned On The maximum sto...

Page 30: ...ading and press the button to change the time range that the scheduled recording will take place The smallest time segment you can use is 15 minutes Highlight the box under the Mode heading and press...

Page 31: ...l be reset to the supported maximum value when the ips Quality Resolution and Dwell are all set to the highest value Advanced Mode Only When the ips quality and resolution for the network video transm...

Page 32: ...mode it is possible to have it record images before the event occurs The Pre Event screen allows you to define how to handle pre event recording You can turn individual cameras On or Off for pre even...

Page 33: ...video data will overwrite the oldest archived data When Recycle is Off the DVR will stop archiving video data until more space is made available CAUTION When the Recycle is On changing the start date...

Page 34: ...n to toggle between On and Off When it is On the security of data except video and audio transmitted for remote monitoring or remote recording can be enhanced by using the SSL Secure Sockets Layer aut...

Page 35: ...trolling the DVR remotely using a keyboard shortcut keys perform the following functions as described below Key Function or h Pressing the or h key moves to the left in the menu It is the same as pres...

Page 36: ...ator Highlight the box beside DNS Server Press the Up and Down arrow buttons to set the IP address of the DNS server Highlight the Port Number Setup box and press the button The Port Number Setup scre...

Page 37: ...the current IP address of the DVR configured by DHCP Dynamic Host Configuration Protocol network Highlight Auto Default and press the button to toggle between On and Off When it is On the DVR will ob...

Page 38: ...ress if you already set up the DNS Server when setting up the Network IP Address Highlight the box beside Port and press the button Set the port number of the FEN server using the Up and Down arrow bu...

Page 39: ...ight Use Mobile and press the button to toggle between On and Off When set to on you can access a remote DVR using a Blackberry or other mobile devices NOTE Selecting Use Mobile sets the WebGuard serv...

Page 40: ...Notify heading and press the button The Schedule Notify menu appears You can toggle the entire list On and Off by highlighting Notification and pressing the button You can toggle the individual items...

Page 41: ...the character to be a valid address Highlight the box under the heading and press the button to toggle between On and Off The DVR will clip an event detected video segment and attach it to an email wh...

Page 42: ...ight SNS Setup and press the button and the SNS screen appears The DVR can be set up to post a message via SNS Social Network Service when an event occurs You can add and edit the SNS account on this...

Page 43: ...mage area using the Up and Down arrow buttons and individual blocks within the block groups are selected or cleared using the camera buttons Press the button to display the menu screen The menu on the...

Page 44: ...ge The DVR will consider the remaining time range as the Nighttime Alarm In Highlight Alarm In and press the button and the Alarm In setup screen appears Local Cameras Only Figure 24 Event Alarm In se...

Page 45: ...ns and or display a camera on a SPOT monitor Highlighting the box beside Video Loss Ignoring Interval and pressing the button allows you to set the duration of a signal loss before the DVR will report...

Page 46: ...ernal buzzer notify a number of different devices move PTZ cameras to preset positions and or display a camera on a SPOT monitor Highlight Use Ignoring Time and press the button to toggle between On a...

Page 47: ...s the button Use the virtual keyboard to enter the Transaction End string Refer to the device manufacturer s documentation for the text string that the device sends when a transaction ends Highlight t...

Page 48: ...events is supported when the network device is networked with the DVR Highlighting the box under the Use and pressing the button turns each selected event On and Off Highlighting the box under the Act...

Page 49: ...nd you can select which camera you want associated with that audio input Network Audio Highlight Network Audio and press the button and the Network Audio setup screen appears Figure 31 Device Network...

Page 50: ...hting the boxes under the Day box and pressing the button allows you to select the days that the alarm schedule will be active The choices are Sun Mon Tue Wed Thu Fri Sat M F Hol and All Highlighting...

Page 51: ...f the RS232 port and RS485 port are in use for PTZ control networking or text input the remote keyboard cannot be configured Highlight Setup and select the correct Baud Rate Parity Data Bits and Stop...

Page 52: ...screen displays in black Camera No The camera number displays at the top left corner of each camera screen Camera Title The camera title displays at the top left corner of each camera screen Record T...

Page 53: ...ociated with the event when an event occurs Highlight Fit To Screen and press the button Pressing the button toggles between On and Off When it is On the DVR will resize video to fit the primary monit...

Page 54: ...s systems and inputs Events will be highlighted and related channels or events will flicker for five seconds when detected Alarm In Motion Video Loss Video Blind and Text In will be highlighted when e...

Page 55: ...storage device The S M A R T column displays Good Bad or N A depending on storage conditions Good The storage condition is normal Bad Data cannot be written on or read from the storage device N A Sto...

Page 56: ...itle and status icons on the covert video When selecting the Covert 2 the DVR displays only camera title on the covert video A user who does not have Covert Camera View authority cannot view video fro...

Page 57: ...anufacturer s instructions You can assign IDs to each camera by highlighting the box under the ID heading and pressing the button Change the number by highlighting it and using the Up and Down arrow b...

Page 58: ...ocol Refer to the network device manufacturer s instructions about enabling the ONVIF TM Conformance protocol in the device as procedures may differ for each model Highlight the box beside Mode and pr...

Page 59: ...S server should be configured during Network IP Address setup Using the IP Address Scan you can search for a network device that cannot be searched for using the Auto Scan LAN mode After selecting the...

Page 60: ...umber by highlighting it and using the Up and Down arrow buttons to increase and decrease the number 4 ch Network Video Transmitter Only Highlight the box beside Network Type and press the button Sele...

Page 61: ...lighting Apply applies the changes to the network device Highlight Event Motion Zone Setup and press the button The motion zone screen displays Setting up the motion zone is nearly identical to settin...

Page 62: ...cation and press the button An Authentication screen appears and entering Authentication information is required to change the device settings Highlight Use Audio Recording and press the button to tog...

Page 63: ...rning on the Power Once you have installed the DVR following the instructions in Chapter 2 Installation it is ready to record Live Monitoring As soon as the DVR completes its initialization process it...

Page 64: ...he location of the PIP by clicking the left mouse button on the PIP window and dragging it to where you want it located and change the size of the PIP by clicking the left mouse button at the corner o...

Page 65: ...Refer to the following Zoom Mode section for details Audio Selecting Camera Menu Audio toggles audio output On and Off Mic Selecting Camera Menu Mic toggles the DVR s audio that is sent to the network...

Page 66: ...ressing the ZOOM button a rectangle displays on the screen A rectangle shows the area that will be enlarged You can move the rectangle around using the arrow buttons Pressing the button or turning the...

Page 67: ...to display the toolbar again position the mouse pointer at the bottom of the screen Change the toolbar location by clicking the empty space on the left side of the toolbar and drag it to where you wan...

Page 68: ...t to Covert unless the user has authority to view covert cameras will be excluded from the sequence When the Spot Monitor is in the sequence mode you can set the camera s display dwell time Refer to C...

Page 69: ...e PIP format You can also change the screen layout in the same way as you do in the live mode Selecting the camera number under Triplex enters the Triplex mode and plays back video of the selected cam...

Page 70: ...n the Playback mode The Shuttle Ring is spring loaded and returns to the center position when released Turning the ring clockwise plays video forward Turning the ring counterclockwise plays video back...

Page 71: ...a message appears alerting you that no image was recorded at that time The playback buttons Jog and Shuttle can now be used to review the surrounding video Bookmark Selecting Go To Bookmark adds the...

Page 72: ...le in the search mode Export A B Clip Copy Selecting Export A B Clip Copy will set the starting point of the video to be clip copied and the icon displays at the bottom left corner of the screen Selec...

Page 73: ...een On and Off When set to Off you can enter a specific Date and Time When set to On the search will be to the last recorded image Highlight the box beside Check Time Overlap and press the button It t...

Page 74: ...Events as part of your search The choices are Panic Record Check Recording Check Alarm In Disk Almost Full Disk Bad Disk Temperature Disk S M A R T Fan Error eSATA Disconnected Once you set your desir...

Page 75: ...ording mode in the same time range the recording status bar displays recording information in the following priority order Panic Pre Event Event Time Irregular Irregular recording caused by temporary...

Page 76: ...an enter a specific Date and Time When set to On the search will be from the first recorded image Highlight the box beside To and press the button to toggle between On and Off When set to Off you can...

Page 77: ...want to delete the previous search results from the list Text In Search Figure 50 Text In Search screen The DVR maintains a log of each time there is Text Input The Text In Search screen displays this...

Page 78: ...itive and press the button This will toggle between On and Off When this feature is On the search will find only those text strings in which the case matches Highlight Load and press the button to loa...

Page 79: ...ys the source from which you make a video clip copy The data source can be selected from Record or Archive in the Search menu You can search video from the first to last recorded images or you can set...

Page 80: ...clip copy starts you can cancel it by selecting Cancel or hide the screen by selecting Close When selecting Close Clip Copy continues and a confirmation screen will display when complete NOTE Only 4 7...

Page 81: ...e button to print NOTE If your printer only supports an LPT connection parallel use an LPT to USB converter cable The printer cable is not provided Disk Mirroring The DVR supports disk mirroring to pr...

Page 82: ...s at the same time will start Once disk mirroring starts you can cancel it by highlighting Stop and pressing the button Selecting Stop displays a confirmation screen asking you to confirm whether or n...

Page 83: ...ated region of the USB hard disk drive Then click Create Partition 6 In the Create Partition wizard click Next then Primary Partition and follow the instructions on the screen Make sure that the FAT32...

Page 84: ...mparison value is located at 17th Unit price mark will be ignored automatically 28th Qty and 40th amount characters including spaces from the left but the value of amount category is located on a diff...

Page 85: ...PASSWORD and clicking the LOGIN button logs in using the selected mode You will need to enter the DVR IP address in the DVR ADDRESS field when running the WebGuard program by entering http www dvronl...

Page 86: ...with elevated administrator permissions Restart your computer to apply the changes Web Monitoring Mode WebWatch is a remote web monitoring program that allows you to monitor live video transmitted in...

Page 87: ...live audio Clicking both and allows two way communication Clicking the disables audio communication Aspect Ratio Changes the image aspect ratio Anti Aliasing Screen Enhances image display quality by...

Page 88: ...nt image in a bitmap or JPEG file format Click the to print the current image on a printer connected to your computer Click the to reload the recording data The Timetable displays recorded data of the...

Page 89: ...of the second segment From four o clock of the second segment to five o clock of the second segment Remote Setup of Network Devices The following describes how to set up the network devices using the...

Page 90: ...l factory settings Security Setup User Adds or deletes a user Media Setup ONVIF Profile Adds or deletes an ONVIFTM profile Video Sets up the video source and encoder The frame rate cannot exceed 15 ip...

Page 91: ...an appropriate IP address for the current network conditions supported only for devices that provide the function Network Protocol Changes the port numbers for the network protocols that are used in t...

Page 92: ...ts I O Connector Pin Outs AI 1 to 16 Alarm Inputs 1 to 16 GND Chassis Ground 5 connectors NC Relay Alarm Output Normally Closed C Relay Common NO Relay Alarm Output Normally Open ARI Alarm Reset In RS...

Page 93: ...D General Schedule Pre Event Archive NETWORK General IP Address FEN RTSP Notification EVENT Motion Alarm In Video Loss Video Blind Text In Network DEVICE Local Audio Network Audio Alarm out Remote Con...

Page 94: ...ng is out of time 402 Copying upgrade package on the USB device failed 19 Connecting device failed 403 USB device is not connected 20 Device is busy 404 USB device is being used 21 Unsupported file sy...

Page 95: ...oting Problem Possible Solution No Power Check power cord connections Confirm that there is power at the outlet No Live Video Check camera video cable and connections Check monitor video cable and con...

Page 96: ...2A 125VAC 1A 30VDC Alarm Reset Input 1 TTL terminal block Internal Buzzer 80dB at 10cm Network Connectivity 10Mbps 1Gbps Ethernet RJ 45 Audio Input Local RCA Input 4 Line In Network 4 100Mbps 1Gbps Et...

Page 97: ...ing Temperature 41 F to 104 F 5 C to 40 C Operating Humidity 0 to 90 Power 100 to 240 VAC 1 2 0 6 A 50 60Hz Power Consumption Max 46W Approvals FCC UL CB CE CAUTION Risk of Explosion if Battery is rep...

Page 98: ......

Page 99: ...read the Owner s Manual before installing the device x Never place the Equipment in a confined space eg bookcase built in cabinet unless proper ventilation is available It is advised to leave a 10cm s...

Page 100: ...must return the Equipment to Pacific Communications The consumer will be responsible for the collection and freight costs of returning the Equipment to Pacific Communications or to any designated Paci...

Page 101: ......

Page 102: ...V1 0 ISO 14001 Environmental Management System in use Fibre sourced from pulp suppliers who use sustainable forestry techniques...

Reviews: