background image

Section 5

LABELING UNIT

-


14


-

English

F

412

0501

00.fm

ID

M

version:

Module 40/60/90/120

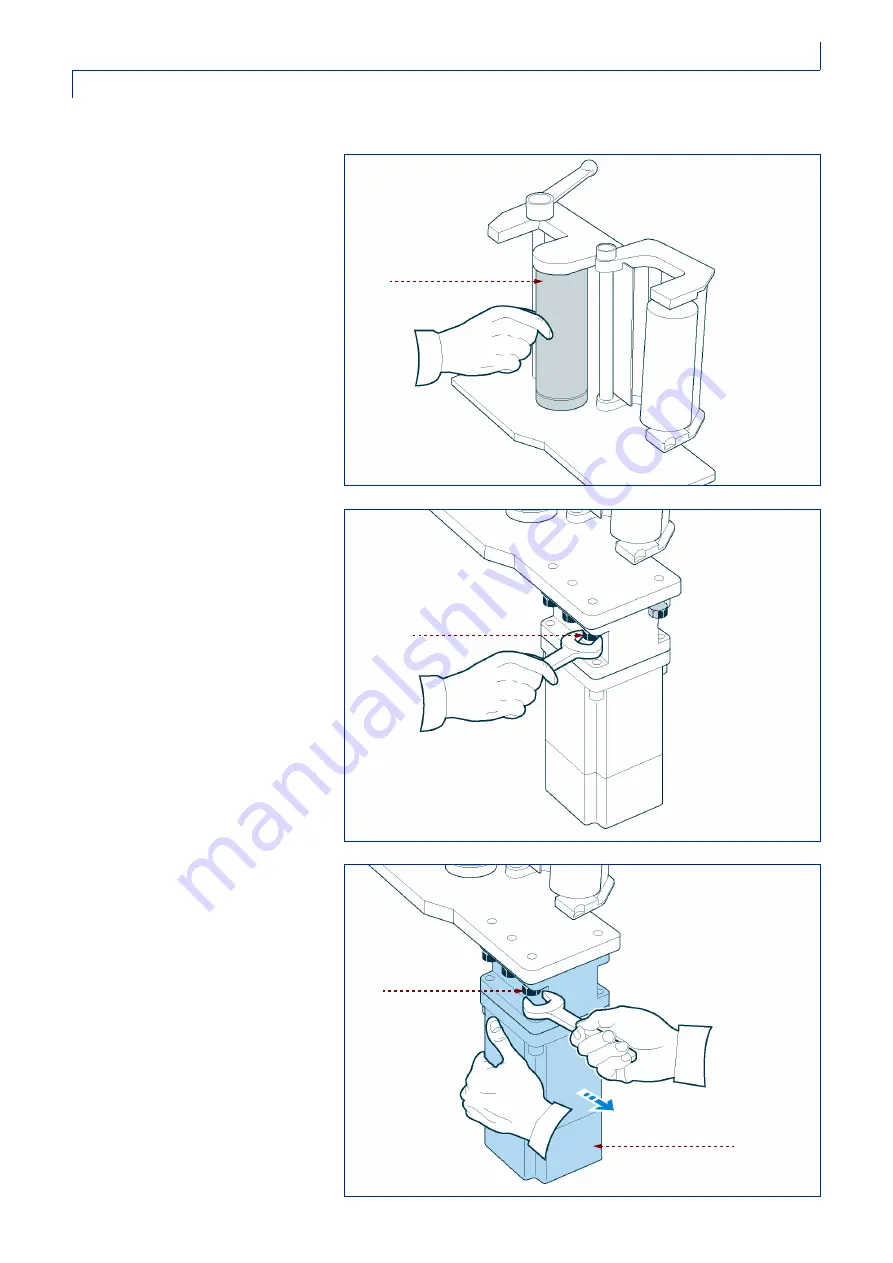
DRIVING MOTOR BELT ADJUSTMENT

In some versions (e.g. MODULE 120), 
there is a belt and pulley drive between 
the motor and the driving roller. Refer 
to the “Assembly drawings” document 
for further details.
To pull the belt taut, proceed as follows.

1 -Open the guard over the driving 

unit and make sure there is no 
slack on the 

roller

. A flexible 

displacement of approximately 0.5 
mm is normal. If the roller moves 
more, proceed with the steps listed 
below.

2 -Loosen the driving motor coupling 

cage 

bolts

.

3 -Move the 

motor

 with one hand, 

shifting it outwards without exerting 
an excessive force, then tighten the 

bolts

.

An automatic sprung tensioning 
system ensures the right tension on the 
drive belt. Refer to the “Assembly 
drawings” document.

IDM-41200601100.tif

roller

IDM-41200601200.tif

screw

IDM-41200601300.tif

motor

screw

Summary of Contents for MODULE 120

Page 1: ...cturer implements a policy of continuous improvement and reserves the right to make changes that do not affect safety to this document without prior notice 2003 Text illustrations and layout by IDM esperti in comunicazione tecnica Forlì The text in this manual is copyright and the intellectual property of IDM It may be quoted in full or in part provided reference to the author is made Serial numbe...

Page 2: ......

Page 3: ...00 fm IDM Section 1 GENERAL AND SAFETY INFORMATION 2 PURPOSE OF THE MANUAL 2 IDENTIFICATION OF MANUFACTURER AND MACHINE 2 GLOSSARY AND TERMINOLOGY 3 METHODS FOR REQUESTING ASSISTANCE 3 ACCOMPANYING DOCUMENTATION 3 SAFETY REGULATIONS 3 ...

Page 4: ...t needs to be consulted The manufacturer reserves the right to make modifications without any obligation to provide advance notice Several symbols whose meaning will be described below have been adopted to emphasize some particularly important parts of the text or to indicate important specifications Danger Warning Indicates situations of serious danger that if ignored could seriously jeopardize t...

Page 5: ...o with the machine provide the information shown on the identification plate the approximate hours of use and the type of defect encountered ACCOMPANYING DOCUMENTATION The customer is being provided with the indicated documentation in addition to this manual Electrical diagram Spare parts SAFETY REGULATIONS General rules During the design and construction phase the manufacturer has paid particular...

Page 6: ... anticipated dimensions If necessary provide the appropriate signs All the installation phases must be taken in account starting the with the creation of an overall plan In addition to defining the installation site before beginning these phases the person authorized to perform these operations must if necessary actuate a safety plan to protect those directly involved from injury and to rigorously...

Page 7: ... danger damaging the safety and health of yourself and others Maintenance and adjustments must be performed by authorized personnel who must provide all necessary safety conditions and observe the indicated procedures All maintenance interventions that require a precise skill or particular ability must be performed exclusively by qualified personnel with recognized experience earned in the specifi...

Page 8: ......

Page 9: ...EED ADJUSTMENT 15 AUTOMATIC ADJUSTMENT OF THE LABEL READING PHOTOCELL S SENSITIVITY 15 MANUAL ADJUSTMENT OF THE LABEL READING PHOTOCELL S SENSITIVITY 16 ADJUSTING FOR NARROW LABELS MODULE 40E 16 page DESCRIPTION OF THE CONTROLS VERS 60 90 120 40 KEYBOARD 17 Basic terminal functions 18 Setting the configuration parameters 18 Setting the size related operating parameters 19 Diagnostic functions 21 F...

Page 10: ...L INFORMATION IDM 412006001 tif Winding roller it is a powered paper feedback roller MODULE 40 with clutch Reel carrier disk Control panel Single button for MODULE 40E Support tubing Electric switchboard Unwinding device it is a device for the support of the unwinding reel Reel carrier disk Encoder unit to be installed on the carousel gear START photocell reads the bottle to be labelled at its pas...

Page 11: ...FERENT CONFIGURATIONS VERSIONS The machine can have the following configurations for specificneeds MODULE 40 rated surface speed 40 m min MODULE 60 rated surface speed 60 m min MODULE 90 rated surface speed 90 m min MODULE 120 rated surface speed 120 m min DX VERSION carousel clockwise rotation SX VERSION carousel anticlockwise rotation 150 SIZE for max 150 mm high reels 200 SIZE for max 200 mm hi...

Page 12: ... 150 Label speci fications Recommended backing material thicknesses Clear polyester 0 03 0 05 mm Silicone paper 0 05 0 06 mm The tolerance on dimensions C and G may influence positioning accuracy The narrower the tolerance on these dimensions the greater the precision of the label s positioning on the container Module 40 mm 60 90 120 mm A Max 290 300 Max 395 400 B 45 75 45 75 C 15 480 15 480 D 2 5...

Page 13: ...must be such that the label does not come away as the film slides around a roller 35 mm in diameter the label easily comes away from the backing film as it slides around an edge no more than 2 mm in diameter Reel winding direction IDM 41200204100 tif LEFT HAND GROUP RIGHT HAND GROUP container feed container feed IDM 41200204200 tif ...

Page 14: ...ctions and set up shall be carried out solely by the qualified personnel authorised by the Manufacturer Lifting Lift the machine as per instructions and place it in its specific installation area Installation 1 The pre arranged installation area shall be adequately lighted and provided with an external power socket 2 Install the tubing on the basement of the labelling machine by using the two thre...

Page 15: ... s Service Department for any further information Encoder assembly The encoder provides the signal for synchronizing the self adhesive labeling units One encoder can control up to 4 units In the case of a rotary labeling machine the encoder unit must be installed underneath the base making a size M8 hole as illustrated in the figure Refer to the tables GR 0015 C P 00165 B and SK 00130 A in the ASS...

Page 16: ...ircuit on the electric system of the machine including the unit Such devices shall comply with the EN 60204 1 regulation Using the special tools for the purpose make sure that the earth system of the plant and the power supply line to which the machine will be connected are perfectly efficient The unit shall be connected to a single phase power feeding check that the line voltage V and the frequen...

Page 17: ...n the hand wheel to raise or lower the column 3 Tighten the handle Important If the 5 axis column is installed it may be necessary to take action on the rolling pitching and depth adjustments too according to the values given in the size tables REEL CARRIER DISKS ADJUSTMENT The height of the reel carrier disk can be adjusted 1 Loosen the locking screw 2 Rotate the disk so that it can be raised or ...

Page 18: ...the paper on the rollers Position the upper ring by hand so that the top edge of the paper just comes into contact with the ring Important It is very important for all the bottom rings to lie on the same level as the unwinding device and winder disks which is typically 30 mm or 38 mm from the top surface of the 80x80 support tubing so that the paper just comes into contact with the rings BRAKE UNI...

Page 19: ... you are working with new labels it is important to calibrate the photocell s sensitivity as illustrated in chapter 4 LABEL DETACHING BLADE ADJUSTMENT For a correct detachment of the label from the paper the detaching blade must be oriented at approximately 20 5 in relation to the tangent of the carousel or in relation to the direction from which the containers come 1 Loosen the locking nut and or...

Page 20: ... the driving unit and or the motor may seize under the thrust from the counter roller Proceed as follows 1 open the driving unit by unlocking the handle 2 tighten the adjusting screws of the elastic supports 3 unscrew the adjusting screws with the same number of turns e g four turns both up and down so that the force of the contact between the driving roller and the counter roller is uniform along...

Page 21: ...ing motion of the winder spool is driven by the main motor by means of a belt transmission with an adjustable clutch control To increase the tension on the paper proceed as shown on the right 1 Tighten the knurled knob underneath the winder Important Avoid pulling the paper too taut otherwise the motor could seize Tighten the knob if the paper is not winding neatly onto the spool or if it tends to...

Page 22: ...e driving unit and make sure there is no slack on the roller A flexible displacement of approximately 0 5 mm is normal If the roller moves more proceed with the steps listed below 2 Loosen the driving motor coupling cage bolts 3 Move the motor with one hand shifting it outwards without exerting an excessive force then tighten the bolts An automatic sprung tensioning system ensures the right tensio...

Page 23: ...versions of the MODULE 40 a program is installed that enables the sensitivity of the photocell reading the labels to be adjusted automatically This software only works with the standard PackLab photocell for machines without this option you should refer to the section Manual adjustment of the label reading photocell s sensitivity later on in the chapter entitled OPERATING INSTRUCTIONS The photocel...

Page 24: ... necessary to proceed as follows remove the cover from the switchboard locate the PL006 card and the STOP light and trimmer P1 on board the card position some backing paper without any labels in the groove where the photocell takes its reading if the STOP light is off turn the trimmer P1 clockwise until the light comes on if the light is on turn the trimmer anticlockwise until the light goes off t...

Page 25: ...TEST key when the machine is in pause mode after pressing the STOP key this key enables you to deliver a single label A key pressed simultaneously with another key it enables you to obtain an alternative function The possible combinations are A P A UP A DOWN A TEST P key this is used to access the procedure for setting the machine operating parameters associated with a particular size of label and...

Page 26: ...tc In these conditions the machine is ready to work in automatic mode In the event of any alarm on the other hand the display shows the word ALARM followed by a short message that identifies the cause of the alarm The alarm messages that are normally used are as follows Driver anomaly standard this indicates a malfunction in the electronic control of the stepping motor Rollers open standard this i...

Page 27: ...he UP and DOWN keys to change the setting from YES to NO and vice versa Setting the size related operating parameters The size parameters are specified in much the same way as the configuration parameters the password to input is the same The size parameters are correlated with a size number the machine can store 10 different sets of parameters associated with ten different sizes When you recall a...

Page 28: ...instance if the parameter is set at 1000 the delay will amount to 0 25 seconds Minimum value 1 Maximum value 10000 P02 STOP delay The parameter P02 establishes by how many motor steps to delay the stoppage of the label Increasing the value of P02 has the effect of increasing the length of the protruding part of the label on the label detaching blade Bear in mind that a motor step on the Module 60 ...

Page 29: ... signals to be ignored The values associated with each signal are Alarm 1 driver 1 Alarm 2 roller microswitch 2 Alarm 3 reel empty 4 Alarm 4 torn paper 8 Alarm 5 reel 2 empty 16 Alarm 6 32 Internal alarm 1 step limit 64 In the default configuration the code is 71 which coincides with enabling the first 3 external alarms plus the step limit alarm C05 Constant speed This parameter is used to choose ...

Page 30: ...oard which is normally installed on the support tubing supporting the unit contains the general circuit breaker for the labeling unit s electric circuit and a red light that comes on to indicate that the electric circuit is powered The red light is situated on the top of the switchboard while the circuit breaker is on the underside In certain special versions the switchboard may be installed in a ...

Page 31: ...ler number of flashes Green The green light only comes on during the procedure for adjusting the label delivery speed and during the procedure for the automatic adjustment of the label reading photocell the latter is not available on all machines For further details see the paragraphs on speed adjustment and automatic adjustment of the label reading photocell s sensitivity in the chapter ADJUSTMEN...

Page 32: ...stment of the label reading photocell s sensitivity adjustments for narrow labels Important The last two adjustments cannot be made from the push button control panel INSERTING A REEL Important The path covered by the paper varies slightly from one model to another Refer to the figure attached to the guard over the driving unit to see the path the paper has to follow To introduce a new reel follow...

Page 33: ...h the rollers and adjust the position of the rings so that they just come into contact with the edge of the paper 6 Turn the handle to open the driving unit and thread the paper in from above Close the driving unit again when you have finished 7 Position the paper braking pad in the center IDM 41200601400 tif rollers rings IDM 41200601500 tif handle IDM 41200601600 tif paper braking pad ...

Page 34: ... unit from above Important At this point on versions MODULE 60 90 120 the paper passes through a system of dandy rollers as indicated on the label showing the path covered by the paper attached to the driving roller guard 10 Pull the paper about 20 centimeters beyond the winder spool for Module 40 only IDM 41200601700 tif IDM 41200601800 tif IDM 41200601900 tif winder spool ...

Page 35: ...paper braking pad 12 Thread up to about 10 15 mm of the paper into the unwinding device If necessary fold the paper over to double its thickness 13 Fix the end of the paper in place by turning the lever radially outwards and then turning in the direction indicated by the arrow IDM 41200602000 tif handle IDM 41200602100 tif unwinding device IDM 41200602200 tif lever ...

Page 36: ... 1 Tear off the paper near the winder spool Danger Warning If there is a dandy roller arm tearing the paper can be dangerous because the dandy roller arm may jerk violently back outwards In such cases keep the dandy roller arm steady with one hand while you tear or cut the paper with the other 2 Move the lever radially inwards and remove the reel Important The lever can only turn clockwise do not ...

Page 37: ...ervice life of the machine We recommend an effective and periodical cleaning of the machine and of the whole operating area as this represents an additional safety factor for the operator Do not use water petrol or any solvents as they may damage the machine paint the transparent parts etc Use only neutral detergents Remove all the dust from the equipment external surfaces Use an air jet for the i...

Page 38: ...cting surface because it could rapidly become damaged CLEANING THE STOP PHOTOCELL Clean the inside of the groove for the passage of the paper with a jet of clean air Important The air pressure must be no higher than 1 bar CLEANING THE DIVERTER ROLLERS Remove the paper guiding rings and clean with a cloth dipped in a liquid detergent Do not use sharp tools that could damage the surface treatment Yo...

Page 39: ...cid based detergents are not effective ask the supplier of the labels which solvent is most suitable for removing the adhesive without damaging the rubber If necessary dismantle the counter roller assembly as illustrated in the section Changing the driving rollers to clean them more thoroughly CLEANING THE LABEL DETACHING BLADE 1 Clean the edges of the label detaching blade with a cloth dipped in ...

Page 40: ...tion of the unit to the power supply network upstream Check that the safety fuses of the network voltage supply as shown in the electric diagram are efficient otherwise replace them with new fuses with the same capacity and features The unit is not working no labels are ejected the main switch pilot light is on but the other pilot lights are off Referring to the electric diagram check that the saf...

Page 41: ...runs during the test procedure carried out by operating the TEST command but it doesnotrunduringnormaloperation with the labelling machine working Check that the START photocell is working regularly i e emits a 24VDC signal when it is in the light and a 0V signal when it is darkened by the passage of the bottle to be labelled Check that the encoder is mechanically and electrically connected In cas...

Page 42: ...nately every other bottle From the display lower the value of the START DELAY parameter or increase the RAMP parameter by 1 unit The labels backing paper remains loose after the label has been attached to the container The label does not protrude far enough from the label detaching blade and is pulled off the backing paper before the driving motor has stopped Increase the length of label protrudin...

Page 43: ...ect the feeding cables of the motor before carrying out any intervention on the unit 1 Unscrew the fastening screw and disassemble the reel carrier disk 2 Unscrew the fastening screw and disassemble the dandy roller The labeling unit runs on half speed One of the three phases of the encoder is faulty Change the encoder The paper on the winder spool is wrapped like a cone or like a fir tree Check t...

Page 44: ...ing it onto the bench 2 Unscrew the fastening screws of the guard and disassemble it 3 Unscrew the fastening screw of the belt and unwind it from the wheel 4 Unscrew the screw located under the other end of the belt and take it out until you can remove the belt 5 Fit a new belt and repeat assembling operations the other way round IDM 01_028_0 tif winding unwinding unit IDM 01_029_0 tif guard IDM 0...

Page 45: ...osen the locking knob and remove the blade 2 Push the new label detaching blade right down until it comes up against the frame 3 when the blade has been replaced tighten the knob DRIVING UNIT MOTOR REPLACEMENT 1 Disconnect the motor cables and take the unit onto the bench 2 Open the driving unit by releasing the handle 3 Unscrew the motor fastening screws IDM 01_037_0 tif knob blade IDM 4120060070...

Page 46: ...t the same operations the other way round DRIVING ROLLERS REPLACEMENT Disconnect the motor cables and take the unit onto the bench Powered roller To disassemble and replace the powered roller follow the procedure described at paragraph Driving unit motor Replacement Idle roller counter roller 1 Open the driving unit by releasing the handle IDM 01_039_0 tif roller motor IDM 01_040_0 tif roller IDM ...

Page 47: ...ve the bushing 3 Remove the hinged unit from its housing 4 Unscrew the fastening screws of the upper plate 5 Now you can remove the idle roller from its housing to mount a new roller follow the same operations the other way round IDM 41200603200 tif bushing IDM 41200603300 tif hinged unit IDM 41200603400 tif plate idle roller ...

Page 48: ...ish F412050100 fm IDM version Module 40 60 90 120 DISPOSAL OF THE MACHINE In case of machine disposal please address to the Manufacturer who will arrange for and authorise it according to the applicable laws and regulations in force ...

Reviews: