background image

Page 13

CalcFeeder Calcium reactor user’s manual

How Calcium Reactors Work

It is very important to maintain the proper amounts of calcium and alkalinity in a reef tank. Both can be quickly 

depleted by growing organisms, and need to be supplemented in order to maintain levels equivalent to natural 

sea water. A calcium carbonate reactor is the easiest and most accurate method of maintaining calcium and 

alkalinity.

A calcium reactor works by dissolving small amounts of solid calcium carbonate media into liquid form, which is 

then dosed back to the tank. The concentrated liquid that is added back to the tank contains the correct ratio of 

calcium to alkalinity, which is essential to maintain the proper balance of water chemistry. Unlike most additives 

or kalkwasser, a properly functioning calcium reactor should maintain the appropriate balance between calcium 

and alkalinity over the longterm.

The reactor is filled with calcium carbonate media (such as reef sand, shells, ready to use media like ARM from 

CaribSea etc.) and saltwater. We recommend a grain size from 10mm upwards as this creates a better flow and 

will avoid partial compression of the granules at bottom

of reactor. 

A small amount of carbon dioxide is added to the water inside the reactor, which lowers the pH to a range of 

6.5-6.8. At such a low pH, the calcium media begins to dissolve, thereby releasing the calcium and alkalinity 

ions so that they can be dosed back to the aquarium. 

This solution is very concentrated, so only a small amount of liquid, or effluent, needs to be dripped back to the 

aquarium.

Over time, both the calcium media and carbon dioxide gas will become depleted. 

The rate of consumption will depend on your aquarium’s calcium demand, but in most cases you can expect 

the reactor to work for several months without any major maintenance. 

It is important to periodically check the CO2 input rate (measured in bubbles per minute) and the effluent drip 

rate, to make sure that everything is flowing smoothly. Also, it is critical that you test your aquarium’s calcium 

and alkalinity levels with a reliable test kit on a regular basis.

Acceptable Range for Calcium and Alkalinity

2.5-4.0 meq/L (7-11 dKH) alkalinity and 375-450 ppm calcium

Do not proceed if your results fall outside this range!

Preparation for start-up

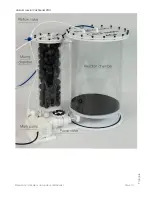
1. Remove covers from both reactor columns.

2. Flush the main reactor columns and fill it with calcium.

3. Flood the CO2 mixing column with water to remove the air totally, close the cover of the mixing column (with 

bioballs). Tighten the bolts to make a leak-proof closing. Tighten the opposite bolts alternately to distribute the 

closing load evenly.

4. Pour water to the column with calcium bed to the very top of the reaction column.

5. Carefully close the reaction column and again tighten the bolts alternately. 

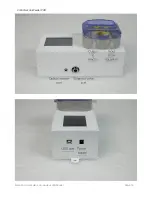
6. Connect the CalcFeeder PRO controller. Do not connect the solenoid valve at that stage.

7. Start the main pump (white, fastened to the reactor’s base) – water will start to circulate in the reactor’s circuit.

8. Start the metering pump at about 2 liters/hour – the pomp will add water to the reactor and remove the air 

residues present under the cover of the reactor’s man column.

Now your reactor is ready to connect the controller and the fixtures such as CO2 cylinder and solenoid valve.

Connect the solenoid valve to the CO2 cylinder (equipped with a pressure gauge and precise CO2 outflow re-

gulator) We recommend to set the cylinder pressure so that the CO2 feed at the regulator output is 2-4 bubb-

les per second.

Important!

Dosing pump will not start working till optical sensor will not read carbon dioxie in mixing chamber.

You need to wait few minutes (if regulator output is set for 2-4 bubbles per second) for reaching proper CO2 

level in mixing chamber. If during regular time sensor will not read CO2 and on screen controller inform about 

ERROR - simply restart it(disconnect for few seconds from power supply and connect again). 

Repeat procedure till sensor will read proper carbon dioxide level and dosing pump start working(optical sensor 

status will turn into GREEN).

English

Summary of Contents for CalcFeeder PRO

Page 1: ...Calcium Reactor CalcFeeder PRO Model CalcFeeder AC1 PRO CalcFeeder AC2 PRO CalcFeeder AC3 PRO CalcFeeder AC4 PRO Deutsch English Français ...

Page 2: ...hrem Meerwasseraquarium einstellen und auf einem optimalen Niveau halten Für beste Ergebnisse lesen Sie diese Anleitung bevor Sie den Reaktor auf Ihrem System installieren Sollten Sie während oder nach der Installation Fragen zu Ihrem neuen Calciumreaktor haben wenden Sie sich bitte an unser Supportteam unter info pacific sun eu Pacific Sun Team Seite 2 Calciumreaktor CalcFeeder PRO Model CalcFeed...

Page 3: ...CalcFeeder Calciumreaktor Seite 3 Deutsch ...

Page 4: ...We have included enough tubing for standard installations If you require greater lengths of tubing you can use standard 1 4 polyethylene tubing RO tubing supplied by your local hardware store Seite 4 ...

Page 5: ...azität 28 0 Liter Für Aquarien von bis zu 4000 Liter CalcFeeder AC5 PRO Hauptmedienkammer ø400mm Gesamthöhe 56cm Medienkapazität 46 0 Liter Für Aquarien von bis zu 10000 Liter Der CalcFeeder PRO Satz beinhaltet 1 Calciumreaktor mit Umwälzpumpe und im Reaktorkörper montiertem optischen Sensor 2 Dosierpumpe mit Schrittmotor und eingebautem Rechner zur Überwachung der Funktion des Magne tventils und ...

Page 6: ...u überprüfen Es ist auch sehr wichtig regelmäßig Calcium und Alkalinitätswerte mit einem zu verlässigen Test zu messen und falls erforderlich den Sickerwasserfluss am Calkfeederregler zu korrigieren Zulässiger Calcium und Alkalinitätsbereich 2 5 4 0 meq l 7 11 dKH Alkalinität und 375 450 ppm Calcium Nicht fortsetzen wenn die Ergebnisse nicht in diesem Bereich liegen Vorbereitung der Anlage zur Inb...

Page 7: ...st die Steuerung häufig CO2 zu und startet das Magne tventil Dies hängt mit der Notwendigkeit zusammen das Wasser in der Reaktorsäule mit einer entsprechenden Menge Gas zu sättigen Zu einem späteren Zeitpunkt wird die Aktivierung Deaktivierung des Magnetventils wesentlich seltener sein und nur von der Wassermenge abhängen die der Reaktor dem Aquarienfiltersystem zuführt 7 In den ersten Betriebstag...

Page 8: ...hnische Unterstützung benötigen Bitte kontaktieren Sie service pacific sun eu Copyright Pacific Sun Sp Z o o I Brygady Pancernej WP 10 84 200 Wejherowo Polen Tel 48 58 778 17 17 E Mail office pacific sun eu Seite 8 ...

Page 9: ...re able to adjust the calcium level as well as the carbonate hardness in your seawater tank efficiently and to keep it on an optimum level For best results please read through this instruction manual before installing the reactor on your system During or after installation do not hesitate to contact our technical support team at info pacific sun eu if you have any questions about your new calcium ...

Page 10: ...Page 10 CalcFeeder Calcium reactor user s manual CalcFeeder PRO controller ...

Page 11: ...dard installations If you require greater lengths of tubing you can use standard 1 4 polyethylene tubing RO tubing supplied by your local hardware store Page 11 CalcFeeder Calcium reactor user s manual Calcium reactor CalcFeeder PRO English ...

Page 12: ...a capacity 28 0 liters For aquariums up to 4000 liters Original package with CalcFeeder PRO include 1 Calcium reactor with recirculation pump and optical sensor assembled in reactor body 2 step motor dosing pump with internal computer for solenoid valve and optical sensor control 3 solenoid valve 12V with 6 3mm plug 4 power supply for CalcFeeder PRO controller 5 connection tubings 6 2pcs tubing ho...

Page 13: ...to make sure that everything is flowing smoothly Also it is critical that you test your aquarium s calcium and alkalinity levels with a reliable test kit on a regular basis Acceptable Range for Calcium and Alkalinity 2 5 4 0 meq L 7 11 dKH alkalinity and 375 450 ppm calcium Do not proceed if your results fall outside this range Preparation for start up 1 Remove covers from both reactor columns 2 F...

Page 14: ...e disconnected from the controller and the controller should be disconnected from the power supply 2 The main circulation pump should run and no air should be present in the reactor s column 3 Connect the solenoid valve to the controller and plug in the optical sensor placed in the reactor s column 4 Connect the power supply to the CalcFeeder controller After the preliminary test the device is rea...

Page 15: ...nd If your pressure gauge does not allow a precise adjustment we suggest that you buy a sufficiently accurate valve as the reliable and correct operation of the whole system largely depends on this component Make sure the optical sensor is correctly plugged to the controller 2 The optical sensor does not indicate a correct CO2 level an error message appears on the controller display Answer make su...

Page 16: ...n 1 2 bubbles per second If your pressure gauge does not allow a precise adjustment we suggest that you buy a sufficiently accurate valve as the reliable and correct operation of the whole system largely depends on this component Make sure the optical sensor is correctly plugged to the controller 2 The optical sensor does not indicate a correct CO2 level an error message appears on the controller ...

Page 17: ... optimal Pour obtenir les meilleurs résultats nous vous conseillons de bien lire ce manuel avant d installer le réacteur Pour toutes questions complémentaires concernant votre nouveau réacteur à calcium n hésitez pas à contacter notre équipe de support technique à l adresse suivante info pacific sun eu Manuel de l utilisateur du réacteur CalcFeeder Réacteur à calcium CalcFeeder PRO Manuel de l uti...

Page 18: ...Page 18 Manuel de l utilisateur du réacteur CalcFeeder Contrôleur CalcFeeder PRO ...

Page 19: ...d installations If you require greater lengths of tubing you can use standard 1 4 polyethylene tubing RO tubing supplied by your local hardware store Page 19 Manuel de l utilisateur du réacteur CalcFeeder Calcium reactor CalcFeeder PRO Français ...

Page 20: ...00 litres L ensemble de CalcFeeder PRO comprend 1 un réacteur à calcium avec une pompe de circulation et un capteur optique installé dans le corps du réac teur 2 une pompe doseuse à moteur pas à pas avec un ordinateur intégré pour contrôler le fonctionnement de l électrovanne et du capteur optique 3 une vanne électromagnétique de 12V avec une fiche de 6 3 mm 4 un dispositif d alimentation pour le ...

Page 21: ...t important de contrôler de temps en temps le débit de CO2 mesuré en bulles par minute introduit dans le réacteur à calcium Il est également nécessaire de mesurer régulièrement le niveau de calcium et d alca linité avec un test fiable et si nécessaire de corriger l écoulement du rejet via le contrôleur du calkfeeder Niveau admissible de calcium et d alcalinité 2 5 4 0 meq l 7 11 dKH d alcalinité e...

Page 22: ...tes Assurez vous que le gaz CO2 est connecté et que la vanne est ouverte l électrovanne doit être déconnectée du contrôleur Le contrôleur doit être déconnecté du dispositif d alimentation Démarrez la pompe principale de circulation du réacteur pour éliminer l air de la colonne Connectez l électrovanne au contrôleur ainsi que la prise du capteur optique placé dans la colonne du réac teur Connectez ...

Reviews: