background image

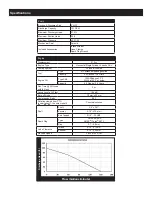
Flow (Gallons/minute)

Discharge Head (ft.)

Pump

Suction & Discharge Size

2" NPT

Discharge Capacity

151 GPM

Maximum Discharge Head

97.5 ft.

Maximum Suction Head

26 ft.

Maximum Pressure

42.2 PSI

Mechanical Seal

Ceramic

Included Accessories

Intake Strainer

Hose Clamps

Spark Plug Wrench

Engine

Displacement

212cc

Engine Type

Horizontal Single Cylinder 4 stroke OHV

Cooling System

Forced air cooled

Fuel

Type

87+ octane unleaded gasoline

Capacity

0.9 Gallons / 3.6 Liters

Engine Oil

Type SAE

10W-30 above 32° F

 5W30 at 32° F or below

Capacity

0.5 Quarts / 0.5 Liters

Run Time @ 50% Load  

with full tank

3 hr.

Sound Level at 22 feet

104 dB

Bore x Stroke

70 mm x 55 mm

Compression Ratio

8.5:1

Rotation viewed from PTO  

(power takeoff - the output shaft)

Counterclockwise

Shaft

Shaft

3/4" x 2.41"

Keyway

3/16" (4.76 mm)

End Tapped

5/16" - 24 UNF

Spark Plug

Type

 NGK

®

 BP-6ES

NHSP

®

 / Torch

® 

F6TC

Gap

0.7 - 0.8 mm

Valve Clearance

Intake

0.10 - 0.15 mm

Exhaust

0.15 - 0.20 mm

No Load Speed

3,800 ±100 RPM

Specifications

Summary of Contents for PacificHydrostar 2" Gasoline Powered Clear Water...

Page 1: ...ct has no serial number record month and year of purchase instead Note Some parts are listed and shown for illustration purposes only and are not available individually as replacement parts Visit our website at http www harborfreight com Email our tech support at tech harborfreight com Email our Engine support at predator harborfreight com Copyright 2010 by Harbor Freight Tools All rights reserved...

Page 2: ...oled Fuel Type 87 octane unleaded gasoline Capacity 0 9 Gallons 3 6 Liters Engine Oil Type SAE 10W 30 above 32 F 5W30 at 32 F or below Capacity 0 5 Quarts 0 5 Liters Run Time 50 Load with full tank 3 hr Sound Level at 22 feet 104 dB Bore x Stroke 70 mm x 55 mm Compression Ratio 8 5 1 Rotation viewed from PTO power takeoff the output shaft Counterclockwise Shaft Shaft 3 4 x 2 41 Keyway 3 16 4 76 mm...

Page 3: ...te WARNING marking concerning Risk of Eye Injury Wear ANSI approved safety goggles with side shields Read the manual before set up and or use WARNING marking concerning Risk of Hearing Loss Wear hearing protection WARNING marking concerning Risk of Respiratory Injury Operate engine OUTSIDE and far away from windows doors and vents WARNING marking concerning Risk of Fire while handling fuel Do not ...

Page 4: ...commended by Harbor Freight Tools for your model Accessories that may be suitable for one piece of equipment may become hazardous when used on another piece of equipment 11 Do not operate in explosive atmospheres such as in the presence of flammable liquids gases or dust Gasoline powered engines may ignite the dust or fumes 12 Stay alert watch what you are doing and use common sense when operating...

Page 5: ...service technician may adjust parts that may increase or decrease governed engine speed 4 Wear ANSI approved safety goggles heavy duty work gloves and dust mask respirator during service 5 Maintain labels and nameplates on the equipment These carry important information If unreadable or missing contact Harbor Freight Tools for a replacement 6 Have the equipment serviced by a qualified repair perso...

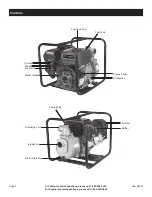
Page 6: ... 444 3353 Item 68375 For Engine technical questions please call 1 800 520 0882 Controls Fuel Tank Cap Throttle Air Filter Choke Fuel Valve Muffler Starter Handle Engine Switch Oil Dipstick Fuel Tank Water Drain Plug Intake Port Priming Cap Discharge Port ...

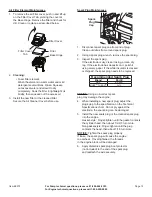
Page 7: ...not over tighten Hose Clamps as the clamp may damage the hose or other components 1 Slide one of the Hose Coupling Rings over one of the Hose Couplers a then place a Gasket on the end of the Hose Coupler b 2 Gasket Hose Coupler Hose Coupling Ring a b Thread the Hose Coupling Ring onto the Intake Port a and turn clockwise until fastened securely b Intake Port 3 Slide one of the Hose Clamps over the...

Page 8: ...ling Ring over the remaining Hose Coupler a and place a Gasket onto the end of the Hose Coupler b 6 a b Thread the Hose Coupling Ring clockwise onto the Discharge Port until tightened securely Discharge Port 7 Slide a Hose Clamp over the end of the Discharge Hose a Slide the Discharge Hose onto the Hose Coupler b Use a screwdriver to tighten the Hose Clamp until secure a b ...

Page 9: ...f a thread sealant is recommended 4 Strainer Secure the Intake Hose in place to keep it from moving once the Pump is turned on The Intake Hose should be as short as possible for more efficient operation 5 Route the discharge hose to the desired discharge location If necessary connect additional discharge hoses to direct the discharge to the desired location Make sure to secure the discharge hose i...

Page 10: ...e Dipstick and the area around it Remove the Dipstick by threading it counterclockwise and wipe it off with a clean lint free rag 4 Full level Full level Reinsert the Dipstick without threading it in and remove it to check the oil level The oil level should be up to the full level as shown above 5 If the oil level is at or below the low mark add the appropriate type of oil until the oil level is a...

Page 11: ...gasoline to flow into the Engine s carburetor Then pull the Starter Handle gently until resistance is felt Allow Cable to retract fully and then pull it quickly Repeat until the engine starts Note Do not let the Starter Handle snap back against the engine Hold it as it recoils so it doesn t hit the engine 6 Allow the Engine to run for several seconds Then if the Choke lever is in the CHOKE positio...

Page 12: ...ment Do not operate the engine at its maximum speed c The maintenance break in period will last about 20 hours of use After this period Change the engine oil Note Failure to change the oil regularly may damage the engine and void the warranty Under normal operating conditions subsequent maintenance follows the schedule explained in the Maintenance and Servicing section Stopping the Engine 1 To sto...

Page 13: ...service the equipment instead Cleaning Maintenance and Lubrication Schedule Note This maintenance schedule is intended solely as a general guide If performance decreases or if equipment operates unusually check systems immediately The maintenance needs of each piece of equipment will differ depending on factors such as duty cycle temperature air quality fuel quality and other factors Note The foll...

Page 14: ...o evaporate before starting engine To prevent FIRE do not start the engine while the smell of fuel hangs in the air Engine Oil Change CAUTION Oil is very hot during operation and can cause burns Wait for engine to cool before changing oil 1 Make sure the engine is stopped and is level 2 Close the Fuel Valve 3 Place a drain pan not included underneath the crankcase s drain plug 4 Remove the drain p...

Page 15: ...e spark plug 3 Inspect the spark plug If the electrode is oily clean it using a clean dry rag If the electrode has deposits on it polish it using emery paper If the white insulator is cracked or chipped the spark plug needs to be replaced Recommended Spark Plug Brand Part NGK BP 6ES NHSP TORCH F6TC NOTICE Using an incorrect spark plug may damage the engine 4 When installing a new spark plug adjust...

Page 16: ...e fuel to drain from there as well d Open the fuel valve After all fuel has drained reinstall the drain bolt and sediment cup and tighten securely 3 Lubrication a Change engine oil b Clean out area around spark plug Remove spark plug and pour one tablespoon of engine oil into cylinder through spark plug hole c Replace spark plug but leave spark plug cap disconnected d Pull Starter Handle to distri...

Page 17: ...p water 1 Pump is not primed 2 Intake Strainer clogged 3 Air leak at intake connector 4 Hose leaks 5 Suction hose has collapsing wall 6 Hose has too small diameter 7 Pump is too high above water surface 1 Prime Pump 2 Clean Intake Strainer or replace if damaged 3 Replace Coupling Gasket or tighten clamp 4 Replace hose 5 Use hose with non collapsible wall 6 Use hose with diameter 2 or greater 7 Loc...

Page 18: ...crewdriver handle 8 Turn Choke to RUN position Remove spark plug and pull the start handle several times to air out the chamber Reinstall spark plug and set Choke to CHOKE position 9 Replace Fuel Filter Ignition spark Related 1 Spark plug cap not connected securely 2 Spark plug electrode wet or dirty 3 Incorrect spark plug gap 4 Spark plug cap broken 5 Incorrect spark timing or faulty ignition sys...

Page 19: ...ine Do not use gasoline with more than 10 ethanol E15 E20 E85 etc 3 Test replace fuel tank cap 4 Have qualified technician service magneto 5 Secure spark plug cap Engine stops when under heavy load 1 Dirty air filter 2 Engine running cold 1 Clean or replace element 2 Allow engine to warm up prior to operating equipment Engine knocks 1 Old or low quality gasoline 2 Engine overloaded 3 Incorrect spa...

Page 20: ... 1 56 Bolt 3 57 Shroud 1 58 Cylinder Body Shroud 1 59 Lower Shield 1 60 Oil Protector 1 61 Engine Switch Subassembly 1 62 Bolt 2 63 Bolt 1 64 Collar 1 65 Bolt 1 66 Bolt 4 67 Carburetor Assy 1 68 Air Cleaner Gasket 1 69 Carburetor Gasket 1 70 Carburetor Insulator Plate 1 71 Carburetor Insulator Gasket 1 72 Nut 2 73 Air Cleaner 1 74 Exhaust Outlet Gasket 1 75 Nut 2 76 Muffler Assy 1 77 Fuel Tank 1 7...

Page 21: ...9 26 25 28 28 27 1 7 8 6 9 6 0 7 7 6 40 32 36 39 33 34 35 33 37 38 91 92 93 94 95 96 97 98 88 85 87 89 89 86 90 62 57 66 66 66 58 62 65 63 60 64 59 61 66 78 77 80 81 82 81 83 84 84 79 47 48 47 48 47 16 21 22 15 14 17 18 18 17 20 23 19 13 23 100 101 102 103 103 102 102 102 103 103 103 102 102 102 104 104 102 104 104 105 106 107 108 107 108 109 110 111 112 113 114 115 116 118 119 120 121 123 123 123...

Page 22: ...pleased to explain the emission control system warranty on your 1997 and later Small Off Road Engine herein engine Within the United States new off road spark ignition engines certified for model year 1997 and later must be designed built and equipped to meet the stringent anti smog standards set forth by the EPA HFT must warrant the emission control system on your engine for the periods of time d...

Page 23: ...ted to a Use of parts which are not authorized by HFT b Improper installation adjustment or repair of the engine or of any warranted part unless performed by an authorized warranty center c Failure to follow recommendations on fuel use contained in the Owner s Manual d Improper or inadequate maintenance of any warranted parts e Repairs performed outside of the authorized warranty service dealers f...

Page 24: ...Notes 3491 Mission Oaks Blvd PO Box 6009 Camarillo CA 93011 www harborfreight com ...

Reviews: