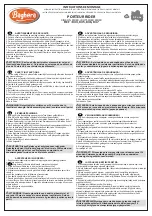
background image

6

Assembly: 

Attach the wheels

  Insert the rear axle.
❷  Insert the gear box through the 

rear axle and into the wheel well.

•  Connect the white wire 

connectors on the gearbox to 

the wire connector coming from 

the battery 

  Attach the rear wheel assembly's

•  Insert  a  wheel insert into each 

side of the wheel hole

• Slide the washer onto the axle 

until it meets the axle stop.

• Slide the wheel completely  

onto the axle until it stops.  

Tip! when attaching the wheel 

to the gear box, be sure the  

gear wheel is completely 

inserted by into the gearbox.

• Slide the second washer onto 

the rear axle.

• Fasten the wheel nut onto the 

end of the axle. 

  Tighten the rear wheel nuts.


Using the two wrenches, tighten 

each rear wheel nut, turning  

in opposite directions at the  

same time.

  Attach the front wheel assembly's


Repeat step three. 

  Tighten the front wheel nuts.

  Attach the hubcaps.


Align the tabs on the hubcaps with 

the slots in the wheel rim. Press 

the hubcaps firmly until they snap 

into place.

Follow the assembly steps in the order listed below.


The wrench comes 

packed in the 

hardware bag.


Summary of Contents for KT1550I

Page 1: ...anual for future reference An adult must read this entire manual Adult supervision is required at all times Age 3 5 years Weight Maximum 77 lbs 35 kg Maximum Speed 2 5 MPH Battery 6 volt Owner s Manua...

Page 2: ...ility to follow safety rules Published age guidelines are not a substitute for careful evaluation of your own child Adults must teach children about thinking ahead while riding as this may be the firs...

Page 3: ...res or charger can cause damage to the battery and may result in a fire Always lift the battery by its case or handles Plug wall charger directly into a wall outlet Do not use an extension cord when c...

Page 4: ...battery is fully charged The charging cord is NOT attached to the ride on in any way All connectors are securely snapped in place and will not come detached while riding No wiring is exposed worn or...

Page 5: ...Hardware Bag Tools Required 5 x2 x1 Parts Before you begin assembling check that all parts listed are present x3 x4 1 3 14 15 13 4 5 6 7 8 9 10 11 12 2 16 17 18...

Page 6: ...taching the wheel to the gear box be sure the gear wheel is completely inserted by into the gearbox Slide the second washer onto the rear axle Fasten the wheel nut onto the end of the axle Tighten the...

Page 7: ...7...

Page 8: ...to the hex shape opening on the steering wheel Insert the bolt through the steering wheel and steering column and fasten into the nut Attach the mirrors Insert the end of the mirror into the mirror in...

Page 9: ...9 mirrors and seat...

Page 10: ...r property damage Always inspect the supply cord connector and charger for damage e g frayed or kinked wires exposed inner wires missing insulation before use If damaged do not use the supply cord con...

Page 11: ...rge the Battery Connect the Battery Charger 18 24 Charge Times 10 First charge Regular charge No more than The product will not turn on while plugged into the charger Remove from charger prior to turn...

Page 12: ...MP3 USB Prev Next Pause Play Mode 12 Controls and Functions On Off Switch Forward Reverse switch MP3 Player FM Radio Horn Sounds Press the pedal to accelerate Maximum Speed 2 5 MPH Lift foot off peda...

Reviews: