background image

8

USInG.THE.ZaPPInG.WInDOW

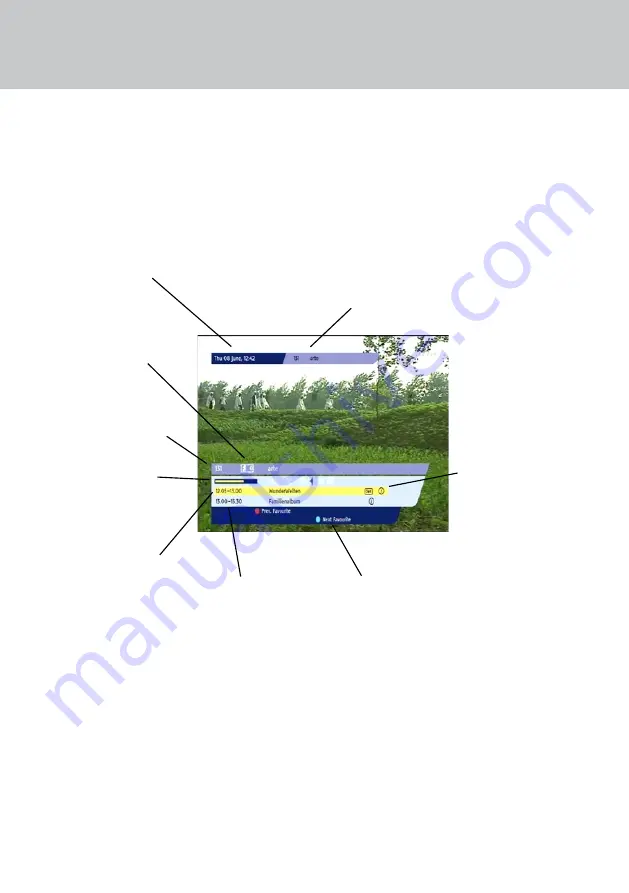
When you change channel, the 

Zapping Window 

appears briefly on the screen . To display the Zapping 
Window at any other time, press the 

i

 button .

FInDInG out moRe ABout WHAt’s on

Current date and time

note: You can adjust how long the Zapping 
Window remains on the screen (see page 31).

The channel’s ‘short-
cut’ number in the 
Favourites List

Number and name of 
the channel showing in 
the Zapping Window

Start and finish times 
and the name of a 
programme . At first, the 
current programme is 
highlighted .

Start and finish times 
and the name of the 
next programme

The functions of some 
of the buttons on your 
remote control

Number and name of the 
channel currently showing 
on the TV

Various symbols can display 
in the Zapping Window . 
For their meanings, see 
‘Symbols and codes that 
display’ on page 19

A progress bar that 
shows how much of the 
current programme has 
already been broadcast

Summary of Contents for DS810

Page 1: ...DS810 HIGH DEFINITION DIGITAL RECEIVER 502 1008123 DS810XE Germ Fre Manual q 12 6 06 3 34 pm Page 1...

Page 2: ...se a screwdriver to remove the plug s back cover Never put the plug into the mains socket when its cover is removed Lever out the fuse and replace it with a new one Replace the plug s back cover 3 AMP...

Page 3: ...play 19 Showing information 19 Displaying Options 19 Favourite Channels in the Zapping Window 19 Removing the Zapping Window 19 Using the EPG 20 Navigating around the EPG Grid 20 Symbols and codes tha...

Page 4: ...copied reproduced translated or reduced to any electronic or machine readable form without prior consent in writing from Pace Micro Technology plc Pace Micro Technology 2006 All rights reserved Pace a...

Page 5: ...ty places Do not block the ventilation holes of your set top box Leave a gap of at least 5 cm above and around it to allow for adequate ventilation Never stand it on soft furnishings Do not put anythi...

Page 6: ...the channel number when tuned to a TV or radio channel Standby button S To switch your set top box on and off Indicator light Red in standby Blue switched on and out of standby CI module door Push to...

Page 7: ...right stereo audio Connect phono leads not supplied between here and a TV VCR or hi fi amplifier OPTICAL AUDIO OUT Connect an optical digital audio lead not supplied between the optical audio connect...

Page 8: ...the supplied HDMI lead to the HDMI socket on your set top box then use an HDMI DVI adapter not supplied between the HDMI lead and the DVI socket on your HDTV or C Connect component video leads not sup...

Page 9: ...ead not supplied between the VCR SCART socket on your set top box and the SCART socket on your VCR or DVD recorder NOTE If you want to make additional audio connections between your set top box and yo...

Page 10: ...ke the most of your set top box and digital television you may also wish to connect your set top box to audio equipment such as a hi fi amplifier or home cinema system If you have connected an HDTV us...

Page 11: ...op box to the mains supply its indicator light just below the Standby button S will light up If your set top box is in standby the light will be red if your set top box is out of standby the light wil...

Page 12: ...e control see page 14 to highlight a language then press the OK button to save the setting Opening the CI module door Push on the top left hand side of the CI module door to open it as shown below Usi...

Page 13: ...x s SCART connector Auto zoom This feature is not yet enabled HD resolution You can also choose the method that your set top box uses to handle different video resolutions Use the U D buttons to highl...

Page 14: ...uttons to display the satellite name you want NOTE If you have a DiSEqC motor system you must also choose your location for example country and city You can also press the red button to search for a s...

Page 15: ...d To change any of the Frequencies or Symbol rates first use the U D buttons to highlight the one you want to edit Then use the L R buttons to underline each digit and the number buttons to enter digi...

Page 16: ...and next displaying the Information Window to see information about a programme displaying the EPG Electronic Programme Guide to see what s on for the next few days Occasional use organising your Fav...

Page 17: ...vailable U D arrow buttons To highlight the previous or next item in a list or on screen menu L R arrow buttons To move to the left and the right through on screen menus lists or items To change setti...

Page 18: ...main channel numbers are all 3 digit numbers for example 103 using the number buttons to enter a 1 or 2 digit Favourite channel number see right NOTE To change channel more quickly press OK after you...

Page 19: ...annel you want to watch NOTE The name of currently tuned channel appears in yellow text Use the U D buttons to highlight the previous next channel on the list NOTE You can also use the L R buttons to...

Page 20: ...rites List Number and name of the channel showing in the Zapping Window Start and finish times and the name of a programme At first the current programme is highlighted Start and finish times and the...

Page 21: ...eir symbols display in a much paler colour See the table on the left for details of the various symbols Showing information If there is a symbol next to a programme you can press the i button to displ...

Page 22: ...he list of channels To view the previous next page of channels use the P button You can also use the blue and yellow buttons on your remote control to move forwards and backwards by 1 day through the...

Page 23: ...ss the i button to display the programme s Information Window To remove the Information Window and redisplay the EPG Grid press i again or press OK or EXIT Choosing a programme to watch When you highl...

Page 24: ...options If you do not want to save your changes press OPT or EXIT The options and settings that are available will depend on the programme The possible options are shown below Option To make your sel...

Page 25: ...ncy and the local time setting see pages 31 and 32 Language to change the language setting see page 32 Using the settings screens On a screen where you can change the setting for an item use the U D b...

Page 26: ...lease see page 33 Antenna On this screen you can select the method you have used to connect your set top box to your satellite dish es See also page 25 TV settings This menu allows you to specify the...

Page 27: ...tup menu You use the Setup menu in the same way as the Main menu Press the U D buttons to move the highlighting up or down and press OK to select an item The selected item s screen appears on the righ...

Page 28: ...ng affects widescreen transmissions shown on standard 4 3 TVs With LetterBox the whole of a widescreen transmission displays but the picture does not fill the screen With Pan Scan the screen is filled...

Page 29: ...deo information may be slightly greater than the time taken for the audio signal to reach the loudspeakers In this case you would hear someone speaking just before his her lips moved To correct this s...

Page 30: ...On means that if Dolby Digital audio is being transmitted this will automatically be sent to the OPTICAL AUDIO OUT connector The setting Off means that your set top box will automatically select the f...

Page 31: ...ency polarisation and symbol rate for the transponder you want Carrying out a network scan To scan for channels press the MENU button to display the Main menu see page 23 Use D to highlight Channels p...

Page 32: ...List Press the blue button to move the highlight to the Favourites List To move the highlight back to the full channel list press the blue button again Use the U D buttons to highlight the channel yo...

Page 33: ...channel number then disappears from the screen Saving your changes When you have made the changes you wish to make press OK If you do not want to save your changes press the EXIT button Changing the...

Page 34: ...must alter the setting twice a year to take account of winter and summer time When you have made the changes you wish to make press OK If you do not want to save your changes press the EXIT button Us...

Page 35: ...not listed above you may need to change one or more of these settings If you have a dish positioner you can select the satellite you want Use the U D buttons to highlight the Satellite setting then pr...

Page 36: ...d alkaline batteries must never be thrown into a fire We recommend disposing of them in an environmentally friendly way When your set top box first tries to find and store the digital channels you see...

Page 37: ...escreen TV set 16 9 Otherwise set 4 3 NOTE If you have a widescreen TV its remote control may have a zoom button which alters the way that the picture appears on the screen so you may also need to use...

Page 38: ...ctors or leads may be affecting the signal iv If the break up is temporary but often there may be interference caused by other electrical items in your home i Try connecting your satellite dish direct...

Page 39: ...e to Content Protection on its front panel and your HDTV will not display a picture for HDCP protected programmes In addition to the above the output from your set top box s component video connectors...

Page 40: ...OMPONENT VIDEO OUT Phono component video out sockets Y Pb Pr HDMI High definition HD video audio out connector OPTICAL AUDIO OUT Optical S PDIF digital audio out socket USB 2 0 USB Type A socket TELEP...

Page 41: ...DS810 HIGH DEFINITION DIGITAL RECEIVER 502 1008123 DS810XE Germ Fre Manual q 12 6 06 3 34 pm Page 1...

Reviews: