background image


MAN 9040020 EN V2


P. Lindberg A/S 

Sdr. Ringvej 1 

www.p-lindberg.dk 

Tlf: 70212626 

DK-6600 Vejen 

e-mail: [email protected] 


4.


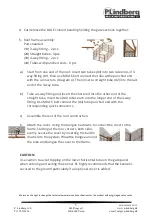
Cut/remove the BLUE colored banding holding the gate sections together.


5.


Roof frame assembly:


Parts needed 


(1#) 3-way fitting – 2 pcs 

(2#) Straight tubes - 3 pcs 

(3#) 4-way fitting – 2 pcs


(4#) Tubes with punched ends - 8 pcs 
 

a)


Start from one end of the roof. Insert two tubes (#4) into two side ends of 3-
way fitting (#1), then use M8x16 bolt connect the tube withe punched end 
with the connectors. (Diagram A). Then insert a straight tube (#2) into the last 
end of the 3-way tube.


b)


Take a 4-way fitting and insert the short end into the other end of the 
straight tube. Insert two (#4) tubes each into the longer end of the 4-way 
fitting. Use M8x16 bolt connect the (#4) tube punched end with the 
corresponding quick connectors. 


c)


Assemble the rest of the roof construction.


6.


Attach the cover. Using the bungee tie downs to connect the cover to the 
frame. Starting at the four corners, both sides 
evenly, secure the cover by inserting the ball tie 
downs into the eyelets. Wrap the bungee around 
the tube and bungee the cover to the frame. 


CAUTION:


Use caution to avoid tripping on the lower horizontal tube on the gate panel 
when entering and exiting the kennel. PL highly recommends that the kennel is 
secured to the ground particularly if an optional cover is added. 


We reserve the right to change the technical parameters and specifications for this product without giving advance notice. 

Summary of Contents for 9040020

Page 1: ...040020 Hundeg rd br ndely DK Hundg rd vedf rr d SE Hundeauslauf Brennholzablage DE Outdoor kennel EN www p lindberg dk www p lindberg no www p lindberg se www p lindberg de Original manual DK SE DE EN...

Page 2: ......

Page 3: ...Varenr 9040020 Hundeg rd Br ndely Sdr Ringvej 1 6600 Vejen Tlf 70 21 26 26 Fax 70 21 26 30 www p lindberg dk DK Original Brugsanvisning...

Page 4: ...pakker dem ud OBS De bl b nd p d rmodulet m IKKE fjernes f r alt er monteret 2 Modulerne samles Topmodulet s ttes ned over bundmodulet U r ret i topmodulet passer n jagtigt over tr dnettet i bundmodu...

Page 5: ...tangen og monter de to st nger 4 i de langer ender af topkrydset og monter modsatte flade ender i modulet med unbrakoskruer c Forts t indtil tagkonstruktionen er monteret f rdig d Montering af tag dug...

Page 6: ......

Page 7: ...Art 9040020 Hundg rd vedf rr d Myrangatan 4 745 37 Enk ping Tel 010 209 70 50 order p lindberg se www p lindberg se SE Original Bruksanvisning...

Page 8: ...m OBS De bl banden p d rrmodulen f r INTE tas bort innan allt r monterat 2 Montera modulerna Toppmodulen s tts ned ver bottenmodulen U r ret i toppmodulen passar exakt ver tr dn tet i bottenmodulen N...

Page 9: ...ta nda med toppst ngen och montera ihop de tv st ngerna 4 med de l ngre ndarna av toppkrysset Montera ihop de motsatta platta ndarna p st ngerna med modulen med insexskruvar c Forts tt tills takkonstr...

Page 10: ......

Page 11: ...Artikel Nr 9040020 Hundeauslauf Brennholzablage P Lindberg GmbH Flensburger Str 3 D 24969 Gro enwiehe Tel 03222 1097 888 Fax 03222 1097 900 www p lindberg de DE Original Bedienungsanleitung...

Page 12: ...erden bevor alles montiert wurde 2 Zusammensetzen der Module Das obere Modul wird auf das untere Modul gesetzt Das U Rohr im oberen Modul passt genau auf das Drahtnetz im unteren Modul Wenn die Teile...

Page 13: ...n der oberen Stange montieren und die beiden Stangen 4 an den langen Enden des Topkreuzes befestigen Die entgegengesetzten flachen Enden mit Innensechskantschrauben am Modul befestigen c Fortfahren bi...

Page 14: ......

Page 15: ...Varenr 9040020 Outdoor kennel Sdr Ringvej 1 6600 Vejen Tlf 70 21 26 26 Fax 70 21 26 30 www p lindberg dk EN Original User instructions...

Page 16: ...olored banding on the gate section until assembly is completed 2 Assemble each panel section The top section of each panel is attached to the bottom section as shown here The U channel on the upper se...

Page 17: ...end of the straight tube Insert two 4 tubes each into the longer end of the 4 way fitting Use M8x16 bolt connect the 4 tube punched end with the corresponding quick connectors c Assemble the rest of t...

Reviews: