P.I.T. PKE405-C7 Instruction Manual Download Page 5

Electric Chain Saw

4

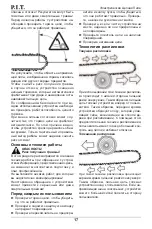
Danger of stumbling!

Always saw at a high chain speed.

Do not saw any wood which is under 

tension.

Do not work alone! Ensure that you 

have an aural, visual or other connec-

tion with another person who is in a 

position to administer fi rst aid in emer-

gency situations.

With each change of location, switch 

the motor off and activate the chain 

brake. 

The device may only be carried 

with the saw rail facing towards the back 

and a protective cover on.

Never operate the device in moist or 

wet environments.

Always keep the cable out of the work-

ing area of the device. 

Always guide the 

cable behind the device.

If necessary, only use extension cables 

suitable for the device and its environ- 

ment.

Symbols appearing on your product 

may not be removed or covered.

 Infor-

mation on the product that are no longer 

legible must be replaced immediately.     

Product Description and Specifi-

cations

Read all safety warnings and all in-

structions. 

Failure  to  follow  the 

warnings and instructions may result 

in electric shock, fi re and/or serious injury.

Intended Use

Electric chain saw is designed for easy and 

fast sawing of fresh, dry and wet wood, chip-

boards, wood harvesting, and works in the 

garden of any level of complexity.An important 

advantage of the electric chain saw in com-

parison with the gasoline chain saw is the ab-

sence of exhaust gases and gasoline vapors, 

so that the electric chain saw can work even 

in unventilated areas. 

Product Features 

The numbering of the components shown re-

fers to the representation of the power tool on 

the graphic pages.

1.Handle

2.Saw chain

3.Chain bar

4.Chain adjustment ring

5.Fastening  bolt  for  chain  sprocket  chain 

wheel cover

6.Sight glass for oil level

7.Rear hand guard

8.Hand guard 

9.Handle

10.Oil tank cover

11.Switch fuse

12.Start button

13.Cable hook 

Technical Data

Model

PKE405-C7

3BUFEWPMUBHF

220 V~/50 Hz

3BUFEQPXFS

2400 W

3BUFEOPMPBETQFFE

8500 r/min

$IBJOTQFFE

14.5 m/s

Bar length

405 mm (16")

Weight

6.25 kg

Contents of delivery

Electric chain saw                    

1pc                                                  

Guide rail       

1pc                                                

Chain       

1pc                                                

Instruction manual    

1pc 

Note

The text and numbers of the instructions may 

contain technical errors and typographical er-

rors.

Since  the  product  is  constantly  being  im-

proved,  P.I.T.  reserves  the  right  to  make 

changes to the specifications and product 

specifi cations specifi ed here without prior no-

tice.

Assembly

DANGER!

Risk of injury during operation!

Improperly mounted parts can cause severe 

and even fatal injuries when using the device! 

This device may only be commissioned if all 

parts are mounted completely and tightly and 

no part is damaged!

– Therefore, read the whole chap- ter before 

you assemble the parts!

– Assemble the parts carefully and com-

pletely.

– Use tools when their use is sug- gested.

WARNING!

Risk of injury during assembly!

Parts may only be assembled and disassem-

bled when the motor is switched off  (de-ener-

gise device).

DANGER!

Risk of injury!

An improperly mounted saw chain causes 

uncontrolled cutting behaviour of the device! 

When assembling the chain, heed the pre-

scribed running direction!

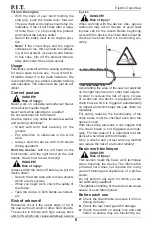
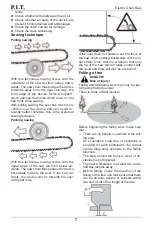
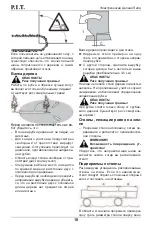
Installing the bar and saw chain

A i

Summary of Contents for PKE405-C7

Page 1: ......

Page 2: ...Electric Chain Saw 1 11 6 10 12 13 1 7 9 8 5 2 3 4 ...

Page 3: ...c shock Personal safety Stay alert watch what you are doing and use common sense when operating a power tool Do not use a power tool while you are tired or under the influ ence of drugs alcohol or medication A moment of inattention while operating power tools may result in serious personal injury Use personal protective equipment Always wear eye protection Protective equipment such as a dust mask ...

Page 4: ...the device to ensure that it works correctly especially check the correct and secure fit of the chain rail saw chain tensioned according to regu lations and correct function of the chain brake Check all screw connections regularly to ensure tight fit Before use ensure that there are no people or animals in the work area Make certain that the work area is free of obstacles Always keep an eye on your ...

Page 5: ...oduct Features The numbering of the components shown re fers to the representation of the power tool on the graphic pages 1 Handle 2 Saw chain 3 Chain bar 4 Chain adjustment ring 5 Fastening bolt for chain sprocket chain wheel cover 6 Sight glass for oil level 7 Rear hand guard 8 Hand guard 9 Handle 10 Oil tank cover 11 Switch fuse 12 Start button 13 Cable hook Technical Data Model PKE405 C7 3BUFE...

Page 6: ...ain brake Launching the device Move the chain brake lever toward you to position Unscrew the cover locking knob and re move the tensioner cover Slide the saw chain onto the bar so that the cutting edge points in the direction of travel of the chain as indicated by the di rection of travel on the chain itself Be careful the saw chain is sharp To protect your hands use gloves when installing the saw...

Page 7: ... the engine With the back of your hand holding the side grip push the brake lever forward The saw chain and engine should stop im mediately If the circuit stops after a delay of more than 1 s stop using the product and contact the service center Return the brake lever to its original posi tion Note If the circuit stops and the engine continues to run this can lead to overheat ing of the product it...

Page 8: ...e backwards towards the user If the saw rail twists the device can fly towards the user with great force If the user does not balance out the force of the saw chain pushing backwards with his or her bodily force there is a danger that only the tip of the saw rail will make contact with the wood and there will thus be a rebound Felling a tree DANGER Risk of injury Felling and delimbing work may onl...

Page 9: ... little multi purpose grease in the lu brication hole while moving the chain with hand Sharpening the saw chain DANGER Danger of death A worn or improperly sharpened chain can The felling of a tree occurs in two steps Notch the trunk by approximately one third of its diameter on the felling direc tion side On the other side make the felling cut which must be somewhat higher than the felling notch ...

Page 10: ...number from left to right Year of production the third and fourth digits indicate the month of production the The fifth and sixth digits indicate the produc tion day TERMS OF WARRANTY SERVICE 1 This Warranty Certificate is the only docu ment that confirms your right to free warranty service Without presenting this certificate no claims are accepted In case of loss or dam age the warranty certificate is...

Page 11: ...of anthers piston and sealing rings during the warranty period is a paid service The service life of the product is 3 years Shelf life is 2 years It is not recommended for oper ation after 2 years of storage from the date of manufacture which is indicated in the serial number on the label of the instrument without preliminary verification for the definition of the date of manufacture see the User s ...

Page 12: ...подходящие штепсельные розетки снижают риск по ражения электротоком Предотвращайте телесный контакт с заземленными поверхностями как то с трубами элементами отопления кухонными плитами и холодильника ми При заземлении Вашего тела повы шается риск поражения электротоком Защищайте электроинструмент от до ждя и сырости Проникновение воды в электроинструмент повышает риск поражения электротоком Не раз...

Page 13: ...ю вилку от розетки или отсоедините съёмный аккумулятор Этим предотвращается неконтролируе мый повторный запуск Квалифицированный персонал в со ответствии с настоящим руководством подразумевает лиц которые знакомы с регулировкой монтажом вводом экс плуатацию обслуживанием электроин струмента К работе с электроинструментом допу скаются лица не моложе 18 лет изучив шие техническое описание инструкцию...

Page 14: ...с правилами и правильную работу цепного тормоза Регулярно проверяйте все винтовые соединения Перед использованием убедитесь что в рабочей зоне нет людей или животных Убедитесь что рабочая зона свободна от препятствий Всегда следите за своим окружением чтобы убедиться что вы не подвергаете опас ности людей или животных своей рабо той Посторонние лица или животные не должны присутствовать на площади...

Page 15: ...ктрическим током пожара и тяжелых травм Применение по назначению Электрическая цепная пила предназначена для легкой и быстрой распиловки свежей сухой и влажной древесины ДСП заго товки древесины а также работает в саду Важным преимуществом электрической цепной пилы в сравнении с бензиновой является отсутствие выхлопных газов и паров бензина благодаря чему электриче ская цепная пила может работать ...

Page 16: ...ю цепь так чтобы при оттягивании цепи посередине шины она отходила приблизительно на 4 5 мм не выходя из пазов шины и свободно дви галась от руки Затяните рукоятку и проверьте натяже ние цепи еще раз При необходимости повторите действия по натяжению цепи Проверка натяжения пильной цепи Во время обкатки повторно натяните пиль ную цепь максимум после 5 разрезов Проверка натяжения пильной цепи ПРЕДУП...

Page 17: ... вызвать крайне тяжелые травмы ОПАСНОСТЬ Риск получения травмы При работе с устройством могут возникать Медленно откройте и снимите крышку бака Аккуратно залейте масло Не проливай те Контролируйте уровень масла через контрольное окно Затяните крышку бака вручную Если вы пролили масло обязательно протрите его Инструкции по безопасности Устройство имеет несколько видов защит ного оборудования которы...

Page 18: ...я которых вы недостаточно квалифицированы Неосторожное обращение с устройством может привести к серьезным или даже смертельным травмам Перед каждым использованием Проверьте тормоз цепи чтобы убедить ся что он работает правильно Проверьте заднюю защитную накладку на предмет повреждений Проверьте переключатель на предохра нителе и кнопку пуска чтобы убедиться что они работают правильно Проверь те на...

Page 19: ...те примерно одну треть диаметра ствола сверху вниз Если пользователь не уравновесит силу с которой пильная цепь отталкивается назад существует опасность что кончик пильной шины соприкоснется с деревом и таким образом произойдет отскок Валка дерева ОПАСНОСТЬ Риск получения травмы Работы по рубке и обрезке сучьев могут выполняться только обученными людьми Существует риск смертельных травм Перед нача...

Page 20: ... зуйте только пластиковый шпатель но ни когда не стальной инструмент Снимите направляющую пилы у р Н р В Очист Д Очистите грязь и масло из направляю щей канавки пильной шины с помощью подходящего инструмента Натяжение пильной цепи Ослабьте крепежный болт примерно на один оборот Слегка приподнимите кончик пильной шины Затяните регулировочное кольцо цепи для натяжения цепи до тех пор пока цепь не ля...

Page 21: ...по вине изготовителя На период гарантийного ремонта эквива лентный исправный инструмент не предо ставляется Заменяемые детали переходят в собственность служб сервиса Компания Р I Т не несет ответственности за вред который может быть причинен при работе с электроинструментом 3 В гарантийный ремонт инструмент при нимается в чистом виде при обязательном наличии надлежащим образом оформлен ных докумен...

Page 22: ...оторая указана в серийном номере на этикетке инструмента без предварительной проверки определе ние даты выпуска смотрите ранее в Руко водстве пользователя О возможных нарушениях изложенных выше условий гарантийного обслуживания владельцу сообщается после проведения диагностики в сервисном центре Владелец инструмента доверяет проведе ние диагностики в сервисном центре в свое отсутствие Запрещается ...

Page 23: ...e the Warranty Card the boxes shall be filled out by a seller and to affix the seal of the trade organization in the Guarantee Certificate and the Warranty Card Warranty By this Warranty Certificate P I T company guarantees the absence of defects of the production nature In the event any of the above defects are detected during the warranty period the specialized P I T service centers shall repair the ...

Page 24: ...рантийного талона графы Заполняются продавцом и простановки печати торговой организации в гарантийном свидетельстве и гарантийных талонах Гарантия На основании данного гарантийного свидетельства компания Р I Т гарантирует отсутствие дефектов производственного характера Если в течение гарантийного срока в Вашем изделии обнаружатся указанные дефекты то специализированные сервисные центры Р I Т беспл...

Page 25: ...me_______________________________ Serial Number___________ Sale Date ____________20__ Place of Seal Filled out by a Seller WARRANTY REPAIR CARD Date of Acceptance for Repair _______20___ Application for Repair ___________________ Customer _____________________________ Phone Address ________________________ Cause of Application_____________________ Date of Receipt from Repair ____________20__ The T...

Page 26: ... Place of Seal Заполняется продавцом КАРТА ГАРАНТИЙНOГO РЕМОНА Дата приема ремонт _______20___ Заявка на ремонт ___________________ Заказчик _____________________________ Телефон адрес ________________________ Причина обращения_____________________ Дата получения от ремонта ____________20__ Инструмент проверен в моем присутствии____________ Заказ заполняется в Сервисном Центре Подпись Наименование...

Page 27: ......

Reviews: