STEP 7 – INSTALL GEAR LOFT
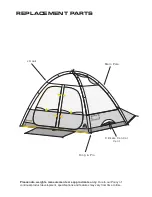
This tent comes with a convenient gear loft. To install, simply hook the S Hook on each of the 4
corners through the fabric loops inside the roof of the tent.
STEP 8 – USING THE CLIMATE CONTROL VENTING SYSTEM
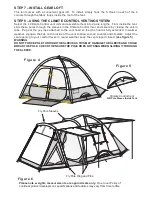
Select the 4 Climate Control vent rods and assemble them into 2 pole lengths. From inside the tent,
slide these poles through the sleeves in the Climate Control Vent and secure by closing the velcro
tabs. Peg out the guy rope attached to the vent hood so that the hood is fully extended. In warmer
weather, zip open the flap on the inside of the vent to allow cool air to enter and circulate. Adjust the
vent opening to your comfort level. In cooler weather, keep the vent zipped closed.
(see figure 5)
WARNING
DO NOT FORCE POLE THROUGH THE SLEEVE AS THIS MAY DAMAGE THE SLEEVE AND COULD
BREAK THE POLE. CHECK TO ENSURE THE POLE DOES NOT SNAG WHEN SLIDING IT THROUGH
THE SLEEVE.
Figure 4
Please note
,
weights measurements are approximate only.
Due to our Policy of
continual product development, specifications and features may vary from time to time.
Figure 5
Figure 6
Climate Control Vent
N.B Pole Sleeve Inside Tent
Fly Pole Sleeves
Fly Pole Ring and Pins


