background image

13

14

EN

16

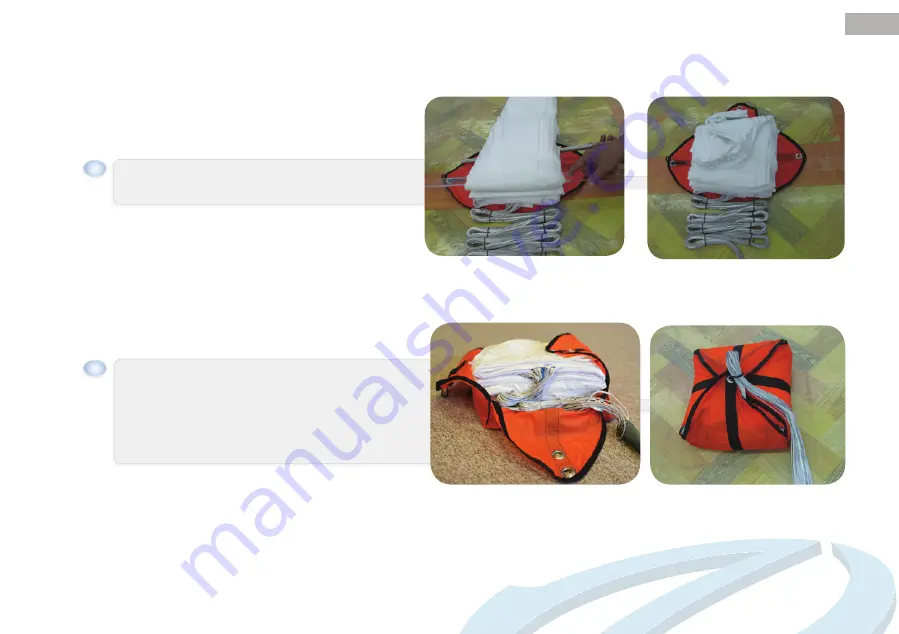
Place  the  deployment  bag  under  the  skirt  and  fold 
the parachute in an accordion fashion to the size and 
shape of the deployment bag. 

Before  closing  the  pod,  we  recommend  to  turn  the 
parachute  over  so  that  the  skirt  is  uppermost  and 
closest  to  the  clover  leaves.  Close  the  deployment 
bag around the parachute, neaten the edges to ensure 
that the parachute is contained completely within. Use 
the remaining free line to secure the main loop of the 
deployment bag.

Summary of Contents for Angel v1

Page 1: ...v1 v2 Pilots Manual...

Page 2: ......

Page 3: ...01 Thank You 02 Team Ozone 03 Your Angel v1 v2 04 Harness Installation 06 Deploying your Angel 07 Packing 08 Care and Maintenance 17 Ozone Quality Guarantee 18 Technical Specifications 19 Materials 19...

Page 4: ...een completed using the inner container supplied Use of any other inner container may produce different results including failure Ensure your parachute is maintained properly and is regularly re packe...

Page 5: ...h of France This area which includes the sites of Gourdon Monaco and Col de Bleyne guarantees us more than 300 flyable days per year This is a great asset in the development of the Ozone range We know...

Page 6: ...l of experience both flying paragliders and designing harnesses Between them they bring a wealth of knowledge ideas and experience and work closely together in the design development and testing proce...

Page 7: ...ments even in the most extreme situations Certified EN and LTF to the EN 12491 and LTF 91 09 standards the Angel is available with maximum loads from 90kgs to140kgs There are 2 bridle options The shor...

Page 8: ...Skirt Apex Bridle Gores Double Apex Lines Suspension lines Angel Parachute 05...

Page 9: ...e the short bridle option Only attach the Y bridle to the loops located on top of the shoulder straps which have been specifically designed for mounting the rescue system Maillons must be closed tight...

Page 10: ...es e g parachutal stall grab the reserve bridle and give it a strong pull This will help encourage the parachute to open faster As the parachute deploys the next stage is to concentrate on disabling t...

Page 11: ...should have a thorough visual check of the cloth lines and bridles Do not use a parachute with any sign of visible damage The parachute must be completely dry and free of dirt dust or any other conta...

Page 12: ...you go The Angel 90 95 110 have 18 gores and the Angel 140 has 20 The gores are numbered in red and black at the skirt of the parachute near to the line attachment points Sort the parachute so that h...

Page 13: ...f the double apex line Now fold panels 9 to 1 on top of panel 10 so that they lay neatly and so that the lines are organised either side of the apex lines 140 Start by organising the panel 9 and 10 ei...

Page 14: ...ts to keep them neat whilst you do the other side Fold over all of the remaining panels and repeat the above process this time in the opposite direction so that the panels are neatly folded on top of...

Page 15: ...he apex lines until the bridle lines are the same length as the main lines This will pull the material of the apex within the canopy remove any weights if necessary Completely fold the gores of one si...

Page 16: ...side ensuring that seams are neatly aligned including the top part where the apex has been pulled through Make sure that you make your fold exactly as shown in the photo you can look at the existing...

Page 17: ...the other side Once finished the canopy should be neatly folded with panels 1 10 and 11 20 clearly separated either side of the apex line Once finished the canopy should be neatly folded with panels 1...

Page 18: ...8s should be made to the same width as the deployment bag Leave approximately 0 5m of line free at the end before the bridle Working from the skirt fold the right hand side using S folds to approxima...

Page 19: ...yment bag Before closing the pod we recommend to turn the parachute over so that the skirt is uppermost and closest to the clover leaves Close the deployment bag around the parachute neaten the edges...

Page 20: ...ter before it is allowed to dry It is of vital importance to remove all traces of salt before drying otherwise permanent damage may occur It may take several rinses to completely remove all traces of...

Page 21: ...can be repaired at reasonable charges We always welcome customer feedback and are committed to excellent customer service If you are unable to contact your dealer then you can contact us directly at...

Page 22: ...load kgs 95 95 110 140 Recommended Min load kgs 50 50 50 60 Sink rate at Max Load m s 5 47 5 2 5 2 5 24 Container volume cm3 3588 3588 3588 3588 Certification EN LTF EN LTF EN LTF EN LTF Cloth Porcher...

Page 23: ...1258 Route de Grasse Le Bar sur Loup 06620 France...

Reviews: