1
PLTBC-460
5. STARTING & STOPPING
OPERATION
Starting the engine when cold
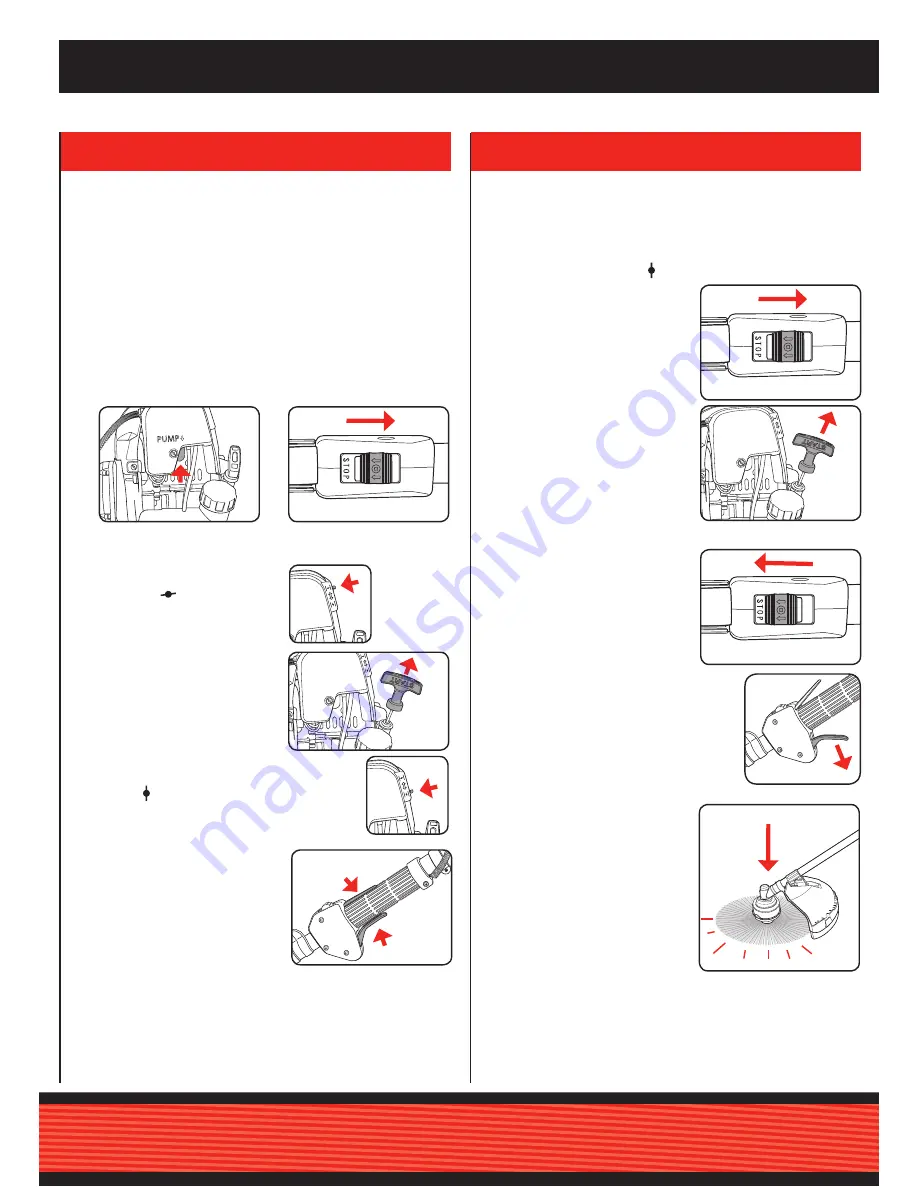
1. Set the trimmer down on a hard, level surface.
2. Press the fuel pump (primer)
10 times.
4. Set the choke lever to the
on position “
”.
5. With your right hand, pull out the
starter cable until you feel it start
to resist. Pull firmly on the starter
cable 4 times. The trimmer should
start.
6. Once the engine has started, move the choke
lever to “
” (choke off) and allow the trimmer to
warm up for approx. 10 seconds.
Note:
If the engine does not start up,
repeat steps 4-6 above.
7. With the engine running depress the
throttle for operation
Note:
Always pull the starter cord out in a straight line. If it is pulled out at
an angle, then friction will occur on the eyelet. As a result of this friction,
the cable will become frayed and will wear away faster. Always hold the
starter handle when the cable retracts. Never allow the cable to snap
back when it has been pulled out.
Pre-startup checks
1. Ensure that the safety guard, shaft and forward handle are fitted and
are secure.
2. Check that the blade is not damaged if installed.
3. Make sure that the harness is connected and adjusted to the correct
height
4. Ensure that there is sufficient fuel and oil in their tanks before starting
the engine.
Starting the engine when warm
The line trimmer is fitted with a clutch that will allow the engine to idle
without the attachment turning. This prevents injuries while starting the
engine.
1. Leave the choke in the run “
” position (choke off). Set the trimmer
down on a hard, level surface.
2. Move the Ignition switch forward,
away from “STOP”.
3. With your left hand, hold the trimmer
firmly, but do not
depress the throttle lever.
4. With your right hand, pull out the
starter cable until you feel it start
to resist. Pull firmly on the starter
cable. The trimmer should start
after 1-2 pulls If the trimmer does
not start after 6 pulls, repeat steps
1 – 7 of the procedure for
starting
the engine when cold
.
Switching off the engine
Emergency Stop procedure:
If it becomes necessary to stop the
trimmer immediately, set the Ignition
switch to “STOP”.
Normal procedure:
Let go of the throttle lever and wait until the
engine has changed to idling speed. Then set
the Ignition switch to “STOP”.
Extending the cutting line
To extend the cutting line, run the
engine at full speed and tap the
line spool on the ground. This will
automatically extend the line. The
blade on the safety guard will cut the
line to the appropriate length.
3. Move the Ignition switch forward,
away from “STOP”.
x10
x4


