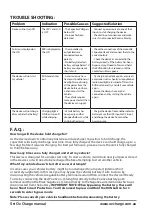
3 • Oz Charge manual
www.ozcharge.com.au
HOW IT WORKS?
This device must be charged before each use and in most cases can be charged up from your
vehicles existing flat battery as it contains a built in converter circuit which allows the device to be
charged up from a flat battery providing it’s at least 3 Volts. If your vehicles flat battery is below 3V
then you’ll need to use another vehicles battery / power source or use the USB input to charge up
the device.
STEP 1 - CHARGING THE DEVICE
12 Volt Battery in a vehicle
- Connect the Red clamp to the Positive (+) battery terminal and the
Black Negative (-) clamp to the vehicles chassis if it’s a negatively earthed vehicle.
Refer to diagrams below.
Note:
If the battery is not located under the bonnet, connect the device
to the vehicles Positive (+) and Negative (-) jump starter connection points. Refer to vehicles hand-
book for connection details.
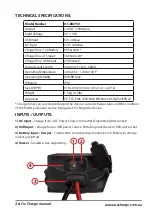
DC Input / Cigarette lighter charge lead
- Connect the supplied cigarette lighter charge lead to
the devices DC input then connect the cigarette lighter plug to a 12V outlet.
USB
- Connect the supplied Micro USB cable to the USB input on the device, then connect it to a
USB power source.
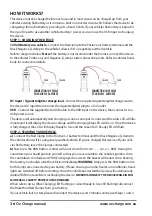
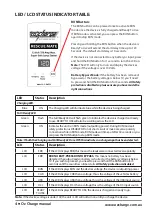
The device will automatically start charging as soon as an input is connected, the units LCD will illu-
minate and it will display the device voltage and the charging blue LED will be on. Once the device
is fully charged, the LCD will display Ready to Use and the Green Full / Ready LED will flash.
STEP 2 - STARTING YOUR VEHICLE
a)
Connect the Red Clamp to the Positive (+) battery terminal and the Black Negative (-) clamp to
the vehicles chassis if it’s a negatively earthed vehicle. (If you’ve charged this device off your vehi-
cles flat battery, leave the Clamps connected)
b)
Now press the RUN button. A timer will count down from 10, 9 ... ... 4, 3, 2, 1, RUN. During this
countdown you should position yourself so that you are accessible to the vehicle’s ignition. Once
the countdown concludes and “RUN” is displayed on-screen the buzzer will sound. Once hearing
the buzzer you should crank the vehicle immediately.
WARNING:
Only press the RUN button once
both clamps are connected to your battery. (Please ensure your radio, heater, air conditioner, head-
lights are switched off before starting). Once the vehicle has started the device will automatically
disable RUN mode and start recharging the device.
NEVER DISCONNECT THE DEVICE WHILE IN RUN
MODE AS ALL SAFETY PROTECTION IS DISABLED.
When safe to do so, (Blue Charging LED Flashing or Green Ready to Use LED flashing) disconnect
the Black then Red Clamps from your battery.
If your vehicle fails to start, please disconnect the device, wait 5 minutes and repeat Steps 1 and 2.
Charging Full /
Ready
RUN
RESCUE MATE
12 Volt 750 Amp Max.
Super Safe Jump Starter
Model: OC-RM750
Model: OC-RM750
RED
BLACK
CONNECTION
IN
VEHICLE
(
NEGATIVELY
EARTHED
)
Model: OC-RM750
RED
BLACK
CONNECTION
IN
VEHICLE
(
POSITIVELY
EARTHED
)
Model: OC-RM750


