background image

Studio D Operations Manual 


© Oxygen College 22407 


V2 – 01/20                            Page | 7 

TC Electronic M350 Effects/Reverb Processor 

This unit is set up to provide reverb effects to the console for use in the monitoring process, 
and can also be applied to your to channels during your outboard summed mixdown

.   

During the monitoring process this is useful when a vocalist likes having a reverb effect on 
their voice as they track, but as the engineer you want to capture a clean signal, and add 
effects later on in Pro Tools.  When mixing down, you can add outboard effects to each 
channel.  Some of the M350’s features are: 


15 true and stunning stereo reverbs 


15 legendary effects 


5 seconds of delay 


256 multi-effect/reverb p 99 user preset locations, a total of 355 presets 


Dual send/return & serial style setups 


Auto-sensing 24 bit S/PDIF digital I/O, 44.1-48 kHz 


Tap tempo 


Basic Operation 

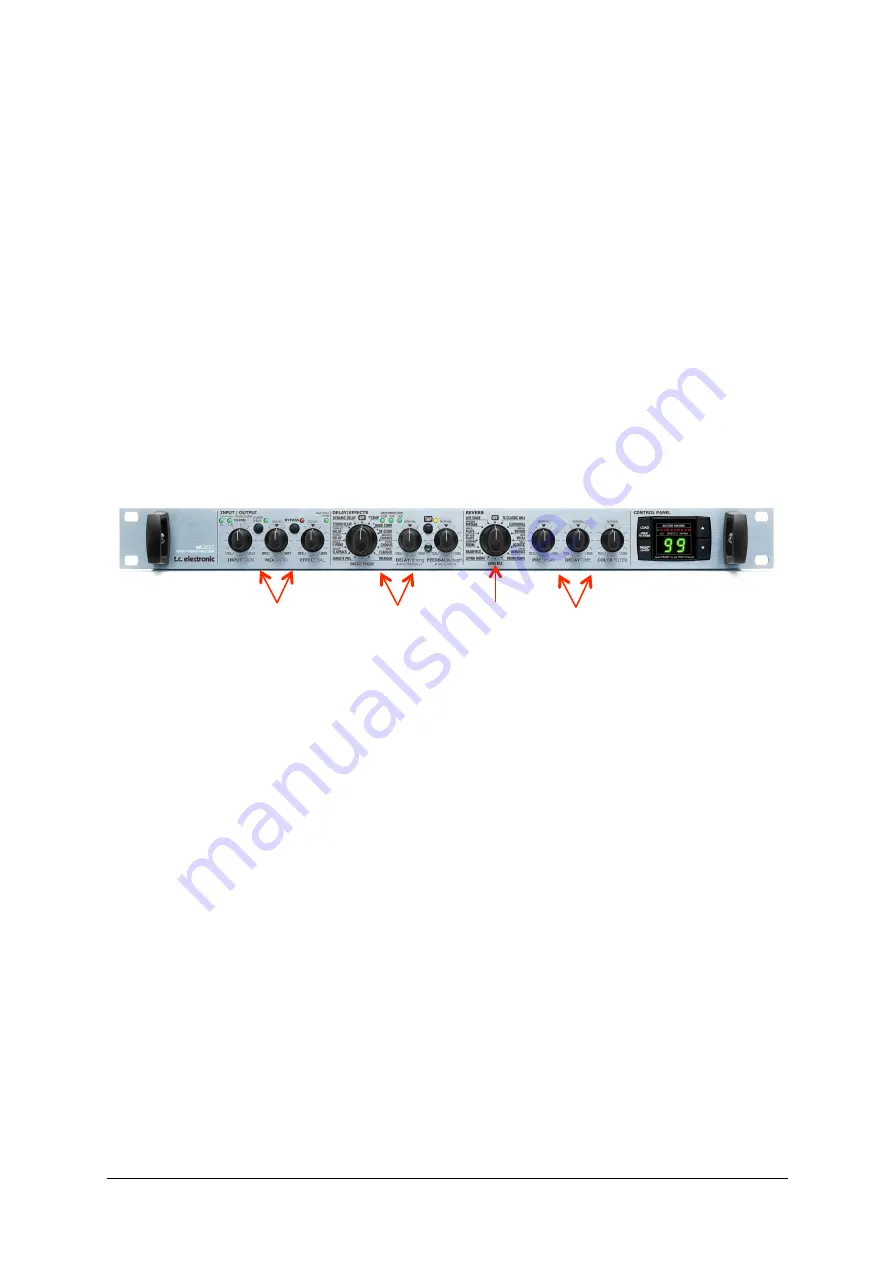
This unit will be most commonly used for reverb, which can be set using the 

Reverb Control 

dial as shown above.  You also have the option to make the following setting adjustments: 


Pre Delay 


Decay Time 


Color Filter 

In the 

Input/Output 

section you can control: 


Input Gain 


Mix Ratio 


Effect Balance 

There are also other effects that can be applied as required by the engineer, using the 

Delay/Effects 

section. 

THE TC M350 HAS MANY OTHER USEFUL FEATURES THAT ARE NOT COVERED IN THIS MANUAL, FOR MORE INFORMATION 
CONTACT YOUR TRAINER OR VISIT TCELECTRONIC.COM TO READ MORE. 


Setting 

Adjustment 

Reverb 

Control 

Input/Output 

Delay/Effects 

Summary of Contents for STUDIO D MIX LAB

Page 1: ...Studio D Operations Manual Oxygen College 22407 V2 01 20 Page 1 STUDIO D MIX LAB OPERATIONS MANUAL ...

Page 2: ...ire connection It provides the ability to use analogue summing to record before the signal is converted to digital and sent to Pro Tools Its key features are Record multi channel via FireWire or ADAT 18 FireWire inputs and 18 outputs Monitor each recording track via the FireWire inputs Use the FireWire connections to and from each channel to insert processing plug ins such as gates or compressors ...

Page 3: ... in your session Alternatively you will need to set the I O on each channel in your session to its corresponding console channel Monitoring your mix in the control room Signal needs to be returned to the console from Pro Tools in order for you to be able to monitor your session To do this you need to set all channel outputs in Pro Tools to their corresponding channels on the console Studio D Defau...

Page 4: ...neer to communicate to the performers via Auxiliary Sends 1 2 To use this feature ensure the To Aux 1 2 button is engaged hold down the Talk button and speak into the microphone You can control the level of the talk back microphone with the Talk Lev control A diagram of the talk back section is shown below THE ZED R16 HAS MANY OTHER USEFUL FEATURES THAT ARE NOT COVERED IN THIS MANUAL FOR MORE INFO...

Page 5: ...o operate the unit correctly Balance control turned FULLY to the right Aux setting Mono L engaged in the mono control section Patch cable from the rear of the headphone output connected to the appropriate headphone send in the patch bay shown in photo below Only headphone amps 1 3 are connected Individual Bass Treble Control Individual channel volume Balance between Main Aux signal Overall unit vo...

Page 6: ...sert Classic dbx Auto mode Basic Operation Compressor Section This unit operates like most standard compressors with adjustment for Ratio Attack Release Output gain It is up to the engineer to set these controls as they require to achieve the sound they are after Patching the unit into the signal path will be discussed later in this manual Stereo Coupling The 226XL unit has the ability to be used ...

Page 7: ...ffects 5 seconds of delay 256 multi effect reverb presets 99 user preset locations a total of 355 presets Dual send return serial style setups Auto sensing 24 bit S PDIF digital I O 44 1 48 kHz Tap tempo Basic Operation This unit will be most commonly used for reverb which can be set using the Reverb Control dial as shown above You also have the option to make the following setting adjustments Pre...

Page 8: ...D has a live space for recording with a separate control room with a window to maintain visual contact with the performers The live space has a wall box to connect cabling to and from the control room with the patching shown in the following pictures and diagrams Studio D Layout Live Space Wall Box ...

Page 9: ...sing the insert sends and returns from the ZED R16 Console It s configuration is shown below Channel 1 16 Half Normalled Channel 17 20 Isolated Channel 21 24 Half Normalled AUX Sends HP 1 3 HP 1 3 Ch 24 Ch 17 20 Ch 21 23 Insert 1 16 Return Inserts 1 16 Send Aux Send 1 4 Ch 1 16 Headphone Amp ZED R16 Console DBX 266XL Inch Patch Bay TC M350 Live Space Pro Tools Ch 1 16 FireWire Insert 1 16 Return I...

Page 10: ... channels and also ensure the AUX 1 Master is turned up You can then control the overall volume for the performer using the headphone amp Setting up a session Example The following instructions are an example of how to setup a recording session in Studio D with 16 channels of input output and 2 headphone sends This example session will use an external summing method allowing you to use the console...

Page 11: ...console Step 5 Ensure the console channels have the DIG RET Pre INS enabled and are assigned to master bus L R button enabled Recommend Signal Flow The audio signal is taken to Pro Tools from the ZED R16 after the High Pass Filter HPF and is returned from Pro Tools before the insert and the remainder of the channel strip This means the faders will not affect the signal going to Pro Tools only the ...

Page 12: ...as the correct I O settings Input Ch 17 18 Output Ch 17 18 Step 2 Engage record enable on the BOUNCE channel and ensure that no other channels in your session are record enabled Step 3 Start recording you will notice that the audio from your channels will play through using the mix you have on the console and will be recorded on the stereo BOUNCE track Step 4 Once your recording has finished press...

Page 13: ...reat option for mixing and mix reviewing Euphonix MC Control The Euphonix MC Control is a digital control surface that links directly with Pro Tools It features four faders that are scrollable through either different banks of four or can be nudged one channel at a time It also allows the arming of tracks altering of sends and control of plugins through the touchscreen On the bottom right of the s...

Reviews: