background image

1.General Safety Requirements


General Safety Requirements   

Before any operations, please read the following safety precautions to avoid any 

possible bodily injury and prevent this product or any other products connected from 

damage. In order to avoid any contingent danger, this product is only used within the 

range specified.   


Use Proper  Power Cord. 

Use only the power cord supplied with the product and 

certified to use in your country.   


Product Grounded. 

This instrument is grounded through the power cord grounding 

conductor. To avoid electric shock, the grounding conductor must be grounded. The 

product must be grounded properly before any connection with its input or output 

terminal.   


Limit operation to the specified measurement category, voltage, or amperage 

ratings. 


Check all Terminal Ratings. 

To avoid instrument damage and the risk of electric shock, 

check  all the Measurement Limits and markers of this product. Refer to  the user's 

manual for the Measurement Limits before connecting to the instrument.  Do not 

exceed any of the Measurement Limits defined in the following section. 


Do not operate without covers

. Do not operate the instrument with covers or panels 

removed. 


Use Proper Fuse. 

Use only the specified type and rating fuse for this instrument.   


Avoid exposed circuit

. Do not touch exposed junctions and components when the 

instrument is powered.   


Do not operate  if in any doubt. 

If you suspect damage occurs to the instrument, 

have it inspected by qualified service personnel before further operations.   


Use your instrument in a well-ventilated area. 

Inadequate ventilation may cause 

increasing of temperature or damages to the device. Please keep well ventilated and 

inspect the intake regularly.   


Do not operate in wet conditions.

 In order to avoid short circuiting to the interior of 

the device or electric shock, please do not operate in a humid environment. 


Do not operate in an explosive atmosphere.   


Keep product surfaces clean and dry. 


Only the qualified technicians can implement the maintenance.   


Summary of Contents for XDM2041 Series

Page 1: ...XDM2041 Series Digital Multimeter User Manual www owon com cn ...

Page 2: ...place all materials published The information in this manual was correct at the time of printing However LILLIPUT will continue to improve products and reserves the rights to change specification at any time without notice is the registered trademark of the LILLIPUT Company Fujian LILLIPUT Optoelectronics Technology Co Ltd No 19 Heming Road Lantian Industrial Zone Zhangzhou 363005 P R China Tel 86...

Page 3: ...This warranty shall not apply to any defect failure or damage caused by improper use or improper or inadequate maintenance and care OWON shall not be obligated to furnish service under this warranty a to repair damage resulting from attempts by personnel other than OWON representatives to install repair or service the product b to repair damage resulting from improper use or connection to incompat...

Page 4: ...nspection 5 Dimensions 5 Foot Stool Adjustment 6 Front Panel Overview 6 Rear Panel Overview 8 User Interface 9 Power On 10 Measurement Connections 11 3 Functions and Operations 13 To Set The Range 13 Measurement Speed 14 Basic Measurement Functions 14 Measuring DC Voltage 14 Measuring AC Voltage 15 Measuring DC Current 16 Measuring AC Current 17 Measuring Resistance 18 Continuity Test 19 Diode Tes...

Page 5: ...lock 31 Default 31 4 Measurement Tutorial 33 Loading Errors DC Voltage 33 True RMS AC Measurements 34 Loading Errors AC Voltage 35 Crest Factor Errors non sinusoidal inputs 36 5 Troubleshooting 37 6 Technical Specifications 38 7 Appendix 40 Appendix A Enclosure 40 Appendix B General Care and Cleaning 40 Appendix C Line Fuse Replacement 40 ii ...

Page 6: ... instrument or other property might occur Safety Symbols Symbols on the Product The following symbol may appear on the product Direct current DC Warning risk of electric shock Alternating current AC Caution risk of danger refer to this manual for specific Warning or Caution information Both direct and alternating current Conforms to European Union directives Ground terminal Chassis Ground IEC Meas...

Page 7: ... this product Refer to the user s manual for the Measurement Limits before connecting to the instrument Do not exceed any of the Measurement Limits defined in the following section Do not operate without covers Do not operate the instrument with covers or panels removed Use Proper Fuse Use only the specified type and rating fuse for this instrument Avoid exposed circuit Do not touch exposed juncti...

Page 8: ...y frequency period capacitance diode and temperature test measurements Two Measurement Limits are defined for these terminals HI Input to LO Input Measurement Limit The Measurement Limit from HI Input to LO Input is 1000 VDC or 750 VAC which is also the maximum voltage measurement This limit can also be expressed as 1000 Vpk maximum LO Input to Ground Measurement Limit The LO input terminal can sa...

Page 9: ...ategory II Inputs may be connected to AC mains power up to 600 VAC under Category II overvoltage conditions Measurement category definition Measurement CAT I applies to measurements performed on circuits not directly connected to the AC mains Examples are measurements on circuits not derived from the AC mains and specially protected internal mains derived circuits Measurement CAT II applies to pro...

Page 10: ...r there is any loss of accessories with reference to this description If it is found that there is any accessory lost or damaged please get in touch with the distributor of OWON responsible for this service or the OWON s local offices 3 Check the Complete Instrument If it is found that there is damage to the appearance of the instrument or the instrument can not work normally or fails in the perfo...

Page 11: ...t panel overview Item Name Description 1 LCD Display the user interface 2 Menu selection Keys Activate the corresponding menu 3 Operation Keys Save Collect data in manual record The instrument saves current reading each time the Save key is pressed See page 29 Manual Record Record Access menus of manual record and auto record See page 29 Data Record Function 6 ...

Page 12: ... to enable manual range and increase or decrease the measurement range When setting a parameter press to move the cursor press to increase or decrease the value 7 Current Terminal Fuse The rating is 10 A 250 VAC To replace the fuse Turn off the multimeter and remove the power cord Use a flat blade screw driver to turn the fuse holder counter clockwise and pull out the fuse holder Put the new speci...

Page 13: ...rview 1 3 2 5 4 Figure 2 2 Rear panel overview Item Name Description 1 RS232 Connect the PC through this port 2 Line Fuse The fuse rating is 250 V F1AL To replace the fuse see page 40 Appendix C Line Fuse Replacement 3 AC Mains Input AC mains input connector 4 Chassis Ground Screw To ground the chassis 5 Instrument Cable Lock You can lock the instrument to a fixed location using the security lock ...

Page 14: ...t Status Icon Figure 2 3 User interface Single display Secondary function Primary function reading Primary function Figure 2 4 User interface Dual display Trigger Mode Status Icon Display Description Trigger Auto trigger Icon Description Auto record function is running Manual record 9 ...

Page 15: ...Connect the instrument to the AC supply using the supplied power cord Warning To avoid electric shock the instrument must be grounded properly 2 Press down the power button at the front panel the screen shows the boot screen 10 ...

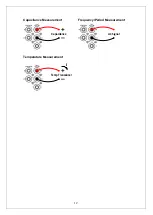
Page 16: ...ument damage do not discretionarily switch the measurement function when measuring DC Voltage Measurement DC Voltage AC Voltage Measurement AC Voltage DC Current Measurement DC Current AC Current Measurement AC Current 2 wire Resistance Measurement I 2 wire Resistance 4 wire Resistance Measurement I 4 wire Resistance Continuity Test Open or Closed Circuit I Diode Measurement Forward Bias I 11 ...

Page 17: ...2 Quick Start Capacitance Measurement Capacitance Frequency Period Measurement AC Signal Temperature Measurement Temp Transducer I 12 ...

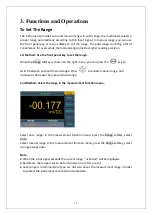
Page 18: ...n on the right menu you can press the key to switch between auto and manual range Press to enable manual range and increase or decrease the measurement range 2nd Method Select the range in the measurement function menu Select auto range In the measurement function menu press the Range softkey select Auto Select manual range In the measurement function menu press the Range softkey select a range ex...

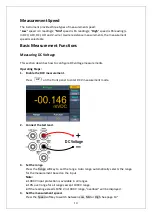
Page 19: ...oltage measurements Operating Steps 1 Enable the DCV measurement Press on the front panel to enter DCV measurement mode 2 Connect the test lead DC Voltage 3 Set the range Press the Range softkey to set the range Auto range automatically selects the range for the measurement based on the input Note 1000 V input protection is available in all ranges 10 over range for all ranges except 1000 V range I...

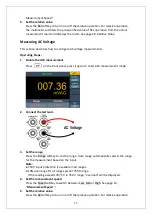
Page 20: ... on the front panel press it again to enter ACV measurement mode 2 Connect the test lead AC Voltage 3 Set the range Press the Range softkey to set the range Auto range automatically selects the range for the measurement based on the input Note 750 V input protection is available in all ranges 10 over range for all ranges except 750 V range If the reading exceeds 787 5 V in 750 V range overload wil...

Page 21: ...nge for the measurement based on the input Note The multimeter uses two kinds of fuses for current protection the 10 A current input fuse on the front panel and the built in 12 A current input fuse 10 over range for all ranges except 10 A range If the reading exceeds 10 5 A in 10 A range overload will be displayed 4 Set the measurement speed Press the Speed softkey to switch between Low Mid or Hig...

Page 22: ...two kinds of fuses for current protection the 10 A current input fuse on the rear panel and the built in 12 A current input fuse 10 over range for all ranges except 10 A range If the reading exceeds 10 5 A in 10 A range overload will be displayed 4 Set the measurement speed Press the Speed softkey to switch between Low Mid or High See page 14 Measurement Speed 5 Set the relative value Press the Re...

Page 23: ...is recommended to reduce the measurement error caused by test lead resistance and contact resistance between the probe and the testing point because these two resistances can not be ignored any more compared to the measured resistance Operating Steps 1 Enable the Ω2W Ω4W measurement Press on the front panel to enter resistance measurement mode Press the Model softkey to switch between Ω2W and Ω4W ...

Page 24: ...relative operation For relative operation the multimeter subtracts the pre specified value of REL operation from the actual measurement result and displays the result See page 28 Relative Value Tip If the measured resistance is small relative operation is recommended in order to reduce the error caused by test lead Both ends of the measured resistance should be placed far away from your hands and ...

Page 25: ... cursor press to increase or decrease the value The range for the 1 Ω to 1000 Ω The default is 50 Ω 5 Continuity measurements behave as follows Circuit resistance to be measured Display and beep Short circuit resistance Displays measured resistance and beeps if beeper enabled Short circuit resistance to 1000Ω Displays measured resistance without beeping 1000Ω Displays Open with no beep Diode Test ...

Page 26: ...Diode measurements behave as follows Forward pressure drop of diode Display and beep 0 to 3 V Displays measured voltage and the multimeter beeps when the voltage is below 0 7 V if beeper enabled 3 V Displays Open with no beep Measuring Capacitance This section describes how to configure capacitance measurements Operating Steps 1 Enable the capacitance measurement Press on the front panel to enter ...

Page 27: ...0000 μF range overload will be displayed 4 Set the relative value Press the Rel softkey to turn on or off the relative operation For relative operation the multimeter subtracts the pre specified value of REL operation from the actual measurement result and displays the result See page 28 Relative Value Measuring Frequency and Period When measuring AC voltage or AC current you can use the dual disp...

Page 28: ...the relative value Press the Rel softkey to turn on or off the relative operation For relative operation the multimeter subtracts the pre specified value of REL operation from the actual measurement result and displays the result See page 28 Relative Value Measuring Temperature This section describes how to configure temperature measurements Temperature measurements require a temperature transduce...

Page 29: ... Meas Val only the measurement value will be displayed All both the temperature value on the main display and the measurement value will be displayed 5 Set the temperature unit Press the Units softkey to display temperature in degrees Celsius degrees Fahrenheit or K Kelvin The conversion relations between these units are 9 5 32 K 273 15 6 Set the relative value Press the Rel softkey to turn on or ...

Page 30: ...to the primary function configure in the right menu then switch back 4 Press to disable the dual display The primary measurement functions and their associated secondary measurements are gray back color indicates valid combinations Primary measurement function DCV DCI ACV ACI FREQ PERIOD 2WR 4WR CAP Secondary DCV DCI ACV ACI FREQ PERIOD 2WR 4WR CAP Note The multimeter makes the primary and seconda...

Page 31: ...rimary and secondary readings auto record function can only save the primary reading Data Hold Data hold keeps the current reading on the display 1 Press the Run Stop panel key to Stop the trigger and the current reading is kept on the display screen 2 Press the Run Stop key again to continue triggering 26 ...

Page 32: ...lue Press the front panel key press the dB dBm softkey to access the menu Press the Model softkey to enable or disable the function Press the Function softkey to select the operation function as dB or dBm dBm Function dBm function represents the absolute value of the power The function calculates the power of the reference resistance according to the measured voltage relative to 1 mW dBm 10 x log1...

Page 33: ...lue must be from 120 to 120 dBm default 0 Relative Value When the relative operation is turned on the reading displayed on the screen in relative operation is the difference between measured and preset values The value is specific to the present function and will persist even if you leave this function and return to it later Reading Measured value Preset value In the measurement function menu pres...

Page 34: ... The measurement function can be switched during manual record Save only the main display readings 2 View the manual record Press the front panel key press the Manual record softkey to display the data table Press keys to turn the page When the data table is shown you can still save current reading by pressing the key Note When the recording data exceeds the current range the data will be marked a...

Page 35: ...the Stop softkey to stop recording the data table shows the readings taken press keys to turn the page Note Automatic recording function supports switching measurement function In auto range the relay switch may cause jitter the data at this time is invalid It will last about a few hundred milliseconds and the data acquired in this period will be marked as invalid When the dual display is enabled ...

Page 36: ...em related functions in utility menu Press the panel key to view the instrument model firmware version serial number and checksum Language Press the front panel key press the Language softkey to switch display languages Backlight Press the front panel key press the BLight softkey to adjust the brightness Clock Press the front panel key press the Clock softkey The clock menu displays the date and t...

Page 37: ...tility BLight 100 Math dB dBm Off On Off Function dB Rel R 50Ω Db Rel 0Ω Max Min Static Off Record Auto Clear Manual Clear Point 100 Interval 1S Aoto On Off Off Other Run Stop Run Rel Off Beeper Off Threshold 50Ω Freq Model Freq Unit Dual Off Display All Load KITS90 Model DVC Range Aoto Speed Low 32 ...

Page 38: ...tance of the DUT Device Under Test is an appreciable percentage of the multimeter s input resistance as shown below HI LO Ideal Meter Rs Vs Ri Vs ideal DUT voltage Rs DUT source resistance Ri multimeter input resistance Error i s s 100 R R R For the mV range input impedance 5 MΩ For other range input impedance 10 MΩ 33 ...

Page 39: ...mponents of the input waveform are measured DC is rejected As seen in the figure above for sine waves triangle waves and square waves the AC coupled and AC DC values are equal because these waveforms do not contain a DC offset However for non symmetrical waveforms such as pulse trains there is a DC voltage content which is rejected by the multimeter s AC coupled true rms measurements The AC couple...

Page 40: ... adds capacitance and loading The table below shows the multimeter s approximate input resistance at various frequencies Input Frequency Input Resistance 100 Hz 1 MΩ 1 kHz 850 kΩ 10 kHz 160 kΩ 100 kHz 16 kΩ For low frequencies the loading error is Error s s 100 R 1 R M Ω At high frequencies the additional loading error is Error 2 S in 1 100 2 1 1 F R C π Rs source resistance F input frequency Cin ...

Page 41: ...or errors do not apply for input signals below 100Hz You can estimate the measurement error due to signal crest factor as shown below Total Error Error Sine wave Error Crest factor Error Bandwidth Error Sine wave error for sine wave as shown in Technical Specifications Error Crest factor crest factor additional error as shown in Technical Specifications Error Bandwidth estimated bandwidth error as...

Page 42: ...nal is input 1 Check whether the test lead is correctly inserted into the current input terminals I terminal and LO Input terminal 2 Check whether the current terminal fuse at the front panel is burned out Please refer to 7 Current Terminal Fuse in Front panel overview on page7 3 Check whether the DCI or ACI measurement function is enabled 4 Check whether the DCI measurement function is used to me...

Page 43: ...0 15 10 50 mA 0 001 mA 0 15 20 500 mA 0 01 mA 0 15 10 5 A 0 0001 A 0 5 10 10 A 0 001 A 0 5 10 True RMS AC Current 500 uA 500 mA 0 5 20 5 A 10 A 1 5 20 Resistance 500 Ω 0 01 Ω 0 1 10 5 kΩ 0 0001 kΩ 0 1 5 50 kΩ 0 001 kΩ 0 1 5 500 kΩ 0 01 kΩ 0 1 5 5 MΩ 0 0001 MΩ 0 25 5 50 MΩ 0 001 MΩ 1 10 Four wire Resistance 500 Ω 0 01 Ω 0 1 10 5 kΩ 0 0001 kΩ 0 1 5 50 kΩ 0 001 kΩ 0 1 5 Diode 3 0000 V 0 0001 V Contin...

Page 44: ...ing Storage Temperature 20 to 70 Electromagnetic compatibility Conforming to EMC 2004 108 EC and EN 61326 1 2013 Safety Conforming to EN 61010 1 2010 and low voltage instructions 2006 95 EC Remote Interface RS232 Programmer Language Standard SCPI compatible with commands of main stream multimeters Warm Up Time 30 minutes Dimension W H D 235 x 110 x 295 mm Weight Approx 2 3 kg 39 ...

Page 45: ...and disconnect all test leads before cleaning 2 Clean the outside of the instrument using a wet soft cloth not dripping water Do not make any scuffing when cleaning the LCD screen To avoid damage to the instrument do not use any corrosive chemical cleaning agent Caution To avoid any damage to the instrument do not exposed it to any sprays liquids or solvents Warning Before power on again for opera...

Page 46: ...the correct fuse type Failure to do so could result in personal injury or instrument damage Voltage Fuse 90 240 V AC 250 V F1AL To perform the line fuse replacement follow these steps 1 Turn off the multimeter remove all measurement leads and other cables from the instrument including the power cord 2 Use a flat blade screwdriver to remove the fuse box 3 Replace the fuse with a new one install it ...

Reviews: