background image

3

Get started

3

Warning!

• 

The in-wall smart plug must be installed and serviced only by qualified 

electrical person.
•  Do not touch the terminals of the device during the testing.
•  Turn off all power supplying this equipment before installing.
•  Make sure that the power supply is off before connecting or disconnecting 
it to the auxiliary device.

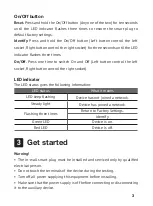
On/Off button

Reset. 

Press and hold the On/Off button (Any one of the two) for ten seconds 

until the LED indicator flashes three times to restore the smart plug to 
default factory settings.

LED indicator

The LED status gives the following information:

LED status

What it means

LED keep flashing

Device has not joined a network.

Steady light

Device has joined a network.

Flashing three times

Return to Factory Settings.

Identify.


Green LED

Device is on.

Red LED

Device is off.

Identify. 

Press and hold the On/Off button (Left button control the left 

socket, Right button control the right socket) for three seconds until the LED 

indicator flashes three times.

On/Off. 

Press one time to switch On and Off (Left button control the left 

socket, Right button control the right socket)

.

Summary of Contents for WSP406UK-2G

Page 1: ...WSP406UK 2G In wall Smart Plug Quick Start Guide ...

Page 2: ...your home appliances and set schedules to automate via mobile phone It also helps users to monitor the energy consumption remotely This guide will provide you with an overview of the product and help you get through the initial setup Get to know your device 2 On Off button LED indicator ...

Page 3: ... flashes three times to restore the smart plug to default factory settings LED indicator The LED status gives the following information LED status What it means LED keep flashing Device has not joined a network Steady light Device has joined a network Flashing three times Return to Factory Settings Identify Green LED Device is on Red LED Device is off Identify Press and hold the On Off button Left...

Page 4: ...nstalled by qualified electrical person keep the wiring diagram below for future reference Cut off all power supplying this equipment before installing 3 2 Installation Ground wire Live wire Neutral wire Wiring Diagram L N MADE IN CHINA Always use a properly rated voltage sensing device to confirm power is off Replace all devices doors and covers before turning on power to this equipment ...

Page 5: ...and remote switch have joined in the same gateway 2 Press the On Off button of in wall smart plug for 3 second until LED flash 3 times then release when the smart plug enter pairing mode LED will start flashing 3 Press the reset button of remote switch for 3 seconds until LED flash 3 times then release to enter pairing mode 4 Waiting the in wall smart plug and remote switch pair automatically when...

Page 6: ...W smaller than 2 Dimensions 86 x 146 x 27 mm L W H 5 Technical Specifications Q 2 How to clear the accumulative power consumption of the in wall smart plug Way 1 Login the relative gateway on your app enter the edit mode IOS Slid left the corresponding equip bar Android click the edit button then click the clear accumulative power consumption button arrow icon Way 2 Reset the in wall smart plug to...

Page 7: ...ing the In wall smart plug 6 Avoid high humidity or extreme temperatures Avoid long exposure to direct sunlight or strong ultraviolet light Do not drop or expose the unit to intense vibration Do not disassemble or try to repair the unit yourself Do not expose the unit or its accessories to flammable liquids gases or other explosives Do not change the structure safety capability and design without ...

Reviews: