06
INSTALLATION
2.1 ASSEMBLY
This section describes the process of installing drives into the miniStack STX. If you purchased the miniStack
STX with drives pre-installed, please proceed to section 1.7 OWC Drive Guide. The Installation video can be
watched by visiting
go.owc.com/ministackstx/install
Required Tools: Philips PH02 Driver
INSTALLATION
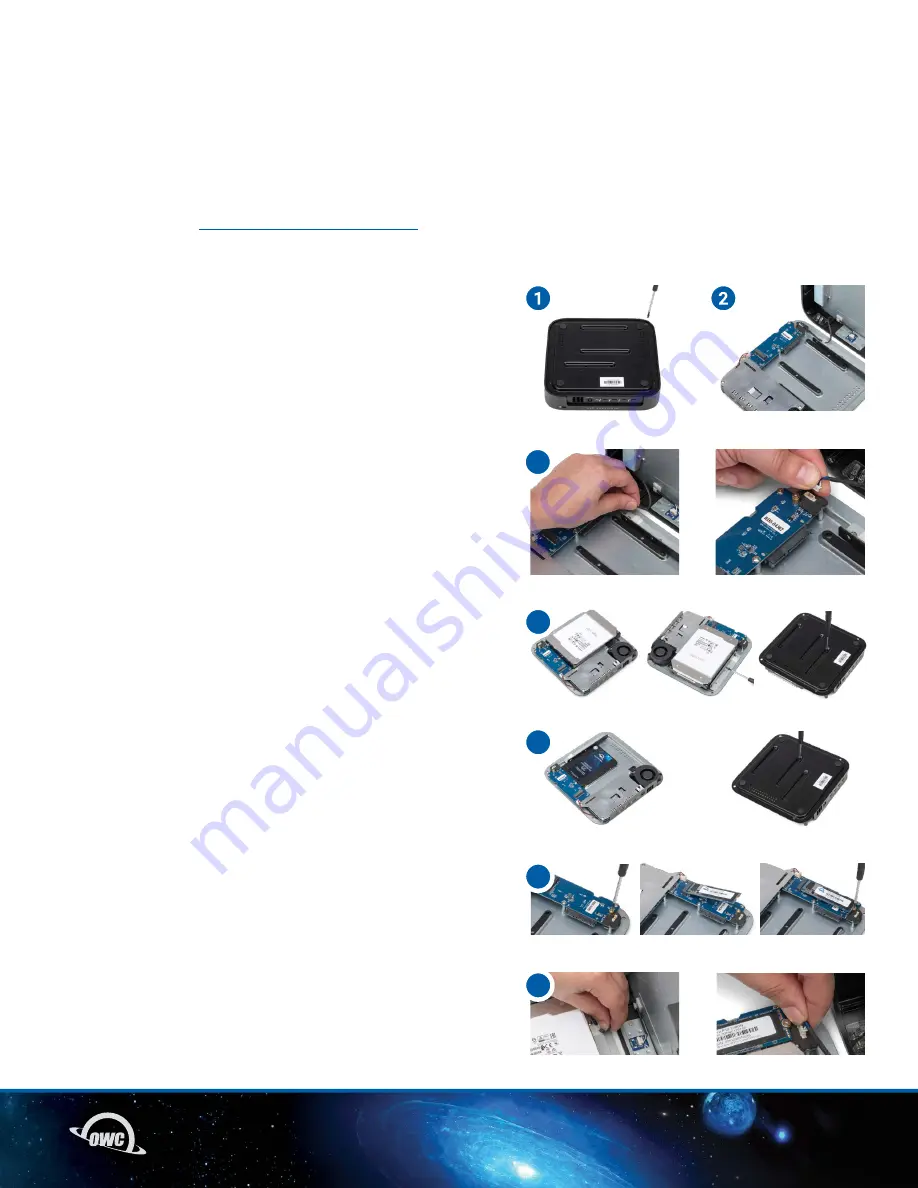
1. Place the miniStack STX upside-down and remove the four
screws on the bottom side of the outer case.
2. While gripping the miniStack place it right-side up with the OWC
logo facing forward. Slowly life the top case off from back
to front. NOTE: There is a cable clipped inside to the outer case
and connected near the NVMe M.2 SSD circuit board. Opening
slowly helps prevent unintendedly disconnecting the cable.
3. Carefully remove the cable from the routing clip. Then carefully
disconnect the cable by pulling on the cable connector near
the NVMe M.2 SSD circuit board. Please do not directly pull
on the cable.
4. Drive Installation (Note: Either a 3.5-inch or 2.5-inch drive
and a NVMe M.2 SSD can be installed.)
A. Place the 3.5-Inch drive into the chassis and connect
into the SATA connector on the circuit board. Make sure
the drive is fully seated. Secure the drive from the inside
using the included HDD Mounting Screws. Turn over the
miniStack and further secure the drive using the HDD
Mounting Screws.
B. Place the 2.5-Inch drive into the chassis and connect
into the SATA connector on the circuit board. Make sure
the drive is fully seated. Turn over the miniStack and
further secure the drive using the SSD Mounting Screws.
C. Remove the NVMe M.2 SSD mounting screw and insert
a NVMe M.2 SSD fully into the connector at a slight angle.
Press the NVMe M.2 SSD down so the drive’s notch fits
around the mounting post. Secure the drive by using the
NVMe M.2 SSD mounting screw that was first removed.
5. Carefully place the cable back into the cable routing clip.
Then carefully connect the cable back into the connection
near the NVMe M.2 SSD circuit board.
6. Place the top case back on the miniStack from front to
back and while gripping, flip the unit upside down. Secure
the miniStack by using the four removed case screws.
7. Move onto Mac & PC Formatting found in Section 3.2
to complete the setup of the miniStack STX drive(s).
3
4a
4b
5
4c
Summary of Contents for MINISTACK STX
Page 1: ...MINISTACK STX USER GUIDE...


