P1
Note:
Installation Step:
1. Remove the switch and accessories from the package.
2. Connect power to the switch. Make sure that “
Power
” LED is on.
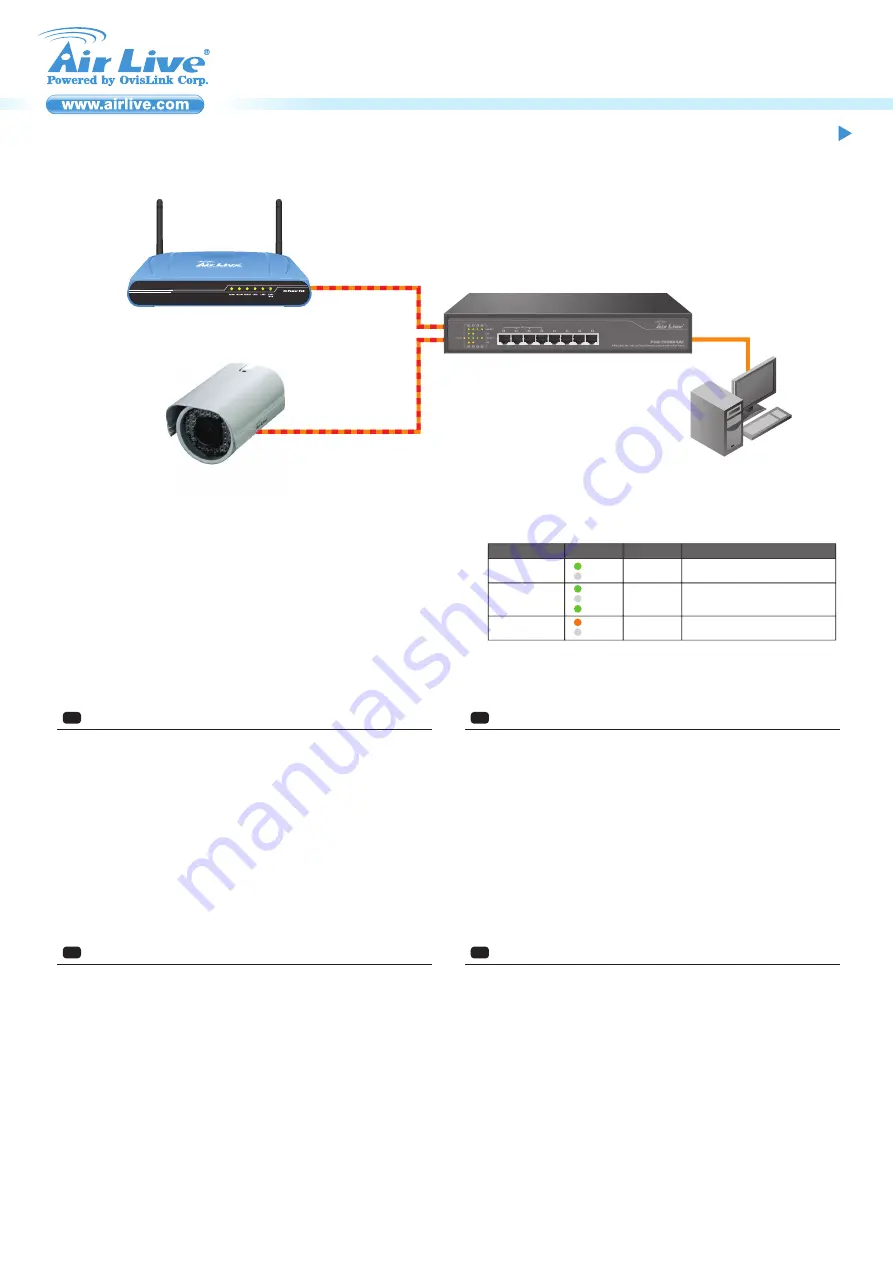
3. Connect your IEEE802.3af/at compliant Power Devices (PD) to Ports 1 to 4 and the Switch will
automatically supply power through these ports (see Figure A).
Note:
If you connect a legacy device that is not PoE compatible, the Switch will not deliver power
to the legacy device. This feature allows you to freely and safely mix legacy and PoE
compatible devices on your network
4. Check the “
PoE
” LED indicator status. When PoE device is connected and the port is supplying
power, it light on.
5. Port 5 to 8 are standard Ethernet. Connect any legacy device to these ports.
6. Check whether the “
Link/ACT
” light is on. If not, please make sure that power is on for the
other device or PC.
English
EN
Č
esky
CZ
Instala
č
ní kroky :
1. Vybalte switch a p
ř
íslušenství.
2. P
ř
ipojte switch k elektrické energii. Ujist
ě
te se, že LEDka “
Power
” svítí.
3. P
ř
ipojte Vaše IEEE802.3af/at kompatibilní za
ř
ízení k portu 1 až 4 a switch automaticky za
č
ne
napájet elektrickou energií (obr. A).
D
ů
ležité:
Když p
ř
ipojíte za
ř
ízení, které nepodporuje PoE, switch nebude posílat elektrickou
energii. Díky tomu, m
ů
žete bezpe
č
n
ě
p
ř
ipojit jakékoliv sí
ť
ové za
ř
ízení.
4. Zkontrolujte “PoE” LED. Když je p
ř
ipojeno PoE za
ř
ízení a je doru
č
ována elektrická energie,
LEDka svítí.
5. Porty 5 až 8 jsou pro standardní sí
ť
ová za
ř
ízení.
6. Zkontrolujte LED “
Link/ACT
”. Když nesvítí, zkontrolujte p
ř
ipojené za
ř
ízení.
- It is recommended that you install the switch with an UPS (Un-interrupted
Power Supply) to prevent costly equipment damage and to protect power surge.
- The Quick Installation Guide can be downloaded on the website,
www.airlive.com
Deutsch
DE
Installationsschritte:
1. Nehmen Sie den Switch und das Zubehör aus der Verpackung.
2. Verbinden Sie den Switch mit dem Stromnetz. Stellen Sie sicher, dass die “
Power
” LED
leuchtet.
3. Verbinden Sie Ihr IEEE802.3af/at kompatibles Gerät mit einem Anschluss (Port 1 bis 4) und der
Switch wird automatisch Strom an das Gerät liefern. (vgl. Abb. A).
Hinweis:
Falls Sie ein normales Gerät ohne PoE anschließen wird kein Strom geliefert. Diese
Funktion ermöglicht es Ihnen, frei und mühelos alle Gerätetypen zu mischen
4. Prüfung des “PoE” Status. Ist ein PoE Gerät angeschlossen, leuchtet die LED PoE und
signalisiert somit den Strom.
5. Port 5 bis 8 sind normale Ethernet Anschlüsse. Verbinden Sie hier Ihre normalen
Netzwerkgeräte.
6. Verbindungsstatus prüfen. Ist die LED “
Link/ACT
” an, bedeutet dies eine Verbindung. Sollte
Sie aus sein, prüfen Sie das Kabel oder ob das Gerät eingeschaltet ist.
Español
ES
Pasos de instalación:
1. Sacar de la caja el switch y los accesorios.
2. Conectar la corriente. “
Power
” LED debe estar encendido.
3. Conectar el IEEE802.3af/at compatible con los dispositivos de corriente (Power Devices, PD) a
los puertos 1 a 4 y el switch automáticamente proveerá energía por medio de estos puertos
(Figura A).
Nota:
Si conecta un dispositivo legacy que no es compatible con PoE, el Switch no enviará
corriente. Esta característica le permite libremente y seguramente mezclar los dispositivos
legacy y PoE en su conexión de red.
4. Para verificar el estado del “PoE” LED. Cuando el dispositivo PoE está conectado y el puerto
está proporcionando corriente, se iluminará.
5. Puerto 5 a 8 son conexiones Ethernet estándar, conectar dispositivos legacy a estos puertos.
6. Para verificar el estado del “
Link/ACT
” debe estar encendida. Si no, favor de asegurarse de
que la corriente esté encendido para otros dispositivos o PC.
Figure A
POE-FSH804AT
Power
Data
PoE-AP
IPCam
LED Indicator
POWER
Green
ON
OFF
Power is on
Power is off
ON
OFF
Flashing
Port is for connection.
No connection.
Data is transmitting or receiving
Link/ACT
Color
Status
Meaning
LED indicators
PoE
Orange
ON
OFF
Port is linked to Power Device
No Power Device is connected
Green
Green
AirLive POE-FSH804AT
8-Port 802.3at/802.3af Fast Ethernet Switch with 4 PoE Ports
Quick Setup Guide


