background image


2.


Kliknij dwukrotnie adres IP kamery w narzędziu Wyszukiwarki. Spowoduje to automatyczne uruchomienie 

domyślnej przeglądarki, która poprosi o podanie nazwy użytkownika oraz hasła. W obu przypadkach należy 
wtedy wpisać 

admin


Uwaga:


Zarówno nazwa użytkownika, jak i hasło, to 

admin


(W celach bezpieczeństwa, po zalogowaniu się zalecana jest zmiana danych konta)


Wprowadź poprawny


login i hasło. Na ekranie pojawi się okno logowania (za pośrednictwem Internetu może 

je obserwować maksymalnie 6 odwiedzających w tym samym czasie)


Uwaga:


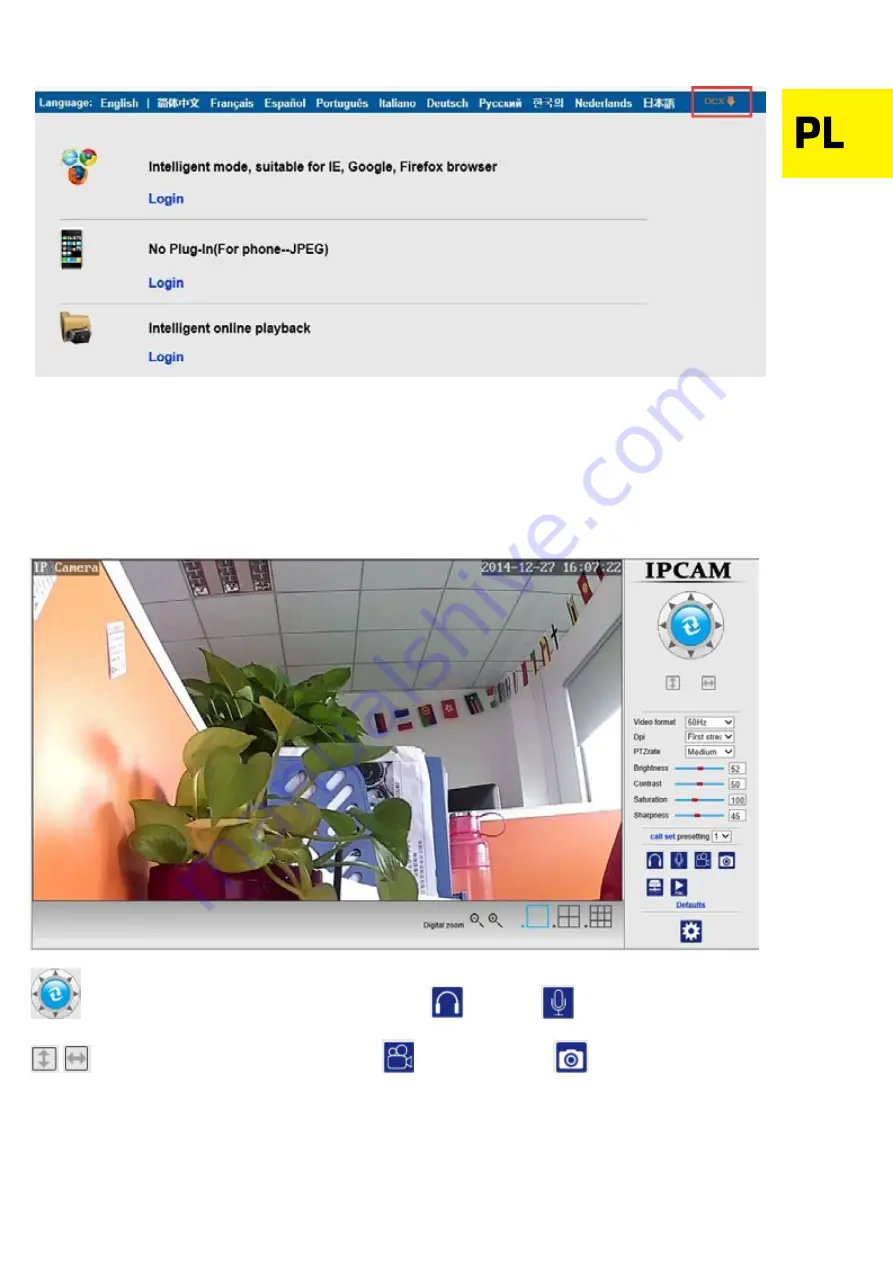
Jeśli OCX zostało już wcześniej zainstalowane, przejdź bezpośrednio do logowania.


A. Kliknij 

OCX

, aby je pobrać i zainstalować. 


B. Odśwież stronę i zaloguj się ponownie. Na ekranie wyświetlony zostanie interfejs wideo kamery, jak na 
obrazku poniżej.


Obraz z kamery 

na żywo

” 

w przeglądarce IE:


Sterowanie kamerą (PTZ)                        


Słuchanie   

Mówienie 


Ruch kamery                                                           

 Nagrywanie wideo    

Zdjęcie 


Summary of Contents for camspot 3.4

Page 1: ......

Page 2: ...LAN Wi Fi Połączenie przewodowe Połączenie bezprzewodowe Camspot 4 8 Ruter Wi Fi Przewód LAN Wi Fi PC MAC Smartfon Tablet PC MAC Smartfon Tablet Połączenie internetowe Camspot 4 8 Przewód lub Wi Fi Ruter bezprzewodowy Modem ADSL 3G 4G lub Wi Fi PC MAC Smartfon Tablet ...

Page 3: ...ić interfejs jak na obrazku poniżej Uwaga 1 Zakładka przedstawia model kamery 2 Zakładka przedstawia nadaną kamerze nazwę domyślnie jest to IPCAM 3 Zakładka przedstawia adres IP oraz port kamery 4 Zakładka przedstawia numer identyfikacyjny ID kamery używany w trybie zdalnego sterowania 5 Przycisk Należy nacisnąć go w przypadku gdy wyszukiwarka wyświetli komunikat o niedopasowaniu maski podsieci ...

Page 4: ...ytkownika oraz hasła W obu przypadkach należy wtedy wpisać admin Uwaga Zarówno nazwa użytkownika jak i hasło to admin W celach bezpieczeństwa po zalogowaniu się zalecana jest zmiana danych konta Wprowadź poprawny login i hasło Na ekranie pojawi się okno logowania za pośrednictwem Internetu może je obserwować maksymalnie 6 odwiedzających w tym samym czasie ...

Page 5: ...nia A Kliknij OCX aby je pobrać i zainstalować B Odśwież stronę i zaloguj się ponownie Na ekranie wyświetlony zostanie interfejs wideo kamery jak na obrazku poniżej Obraz z kamery na żywo w przeglądarce IE Sterowanie kamerą PTZ Słuchanie Mówienie Ruch kamery Nagrywanie wideo Zdjęcie ...

Page 6: ...eo 2 Wyświetlone zostanie okno z możliwością konfiguracji opcji zarówno strumienia głównego jak i pomocniczego oraz rozdzielczość obrazu wyświetlanego na urządzeniu mobilnym Ustawienia nagrywania 1 Kliknij kolejno Ustawienia Ustawienia nagrywania 2 Wyświetlone zostanie okno z możliwością konfiguracji długości nagrań włączenia wyłączenia nagrywania wyboru strumienia oraz ustalenia harmonogramu nagr...

Page 7: ...ć oraz harmonogramu Ustawienia poczty E mail 1 Kliknij kolejno Ustawienia Ustawienia E mail 2 Uzupełnij pola dokładnymi danymi poczty E mail kliknij przycisk Zastosuj a następnie Testuj 3 Funkcja ta jest dostępna gdy kamera IP jest dostępna w sieci Jeśli używasz poczty G mail w polu portu wprowadź numer 465 a SSL ustaw jako TLS Bardzo ważne jest także by Twój E mail posiadał aktywny serwer SMTP ...

Page 8: ...dają danym Twojego routera i wprowadź hasło sieci bezprzewodowej Wi Fi 4 Kliknij Sprawdź Po 30 sekundach wyświetlony zostanie komunikat z informacją o tym czy wprowadzone ustawienia są poprawne 5 Jeśli tak naciśnij przycisk Zastosuj i odłącz przewód internetowy Uwaga Jeśli Wyszukiwarce nie udało się odnaleźć adresu IP kamery należy ponownie podłączyć przewód internetowy i sprawdzić ustawienia Wi F...

Page 9: ...ona linia zmienia kolor na czerwony 3 Można także konfigurować rozmiar oraz miejsce danej strefy detekcji ruchu Zaczernianie stref kadru 1 Kliknij kolejno Ustawienia Zaczernianie nagrania 2 Funkcja ta umożliwia przypisanie 4 stref w których strumień wideo zostanie zakryty domyślnym kolorem jest czarny 3 Można także konfigurować rozmiar oraz miejsce danej strefy zaczernienia ...

Page 10: ...odstawowych Ustawienia FTP Ustawienia DDNS 1 Upewnij się że w dziale UPNP aktywna jest opcja przekierowania portów na router główny 2 Następnie wprowadź dane serwera nazwę użytkownika hasło oraz domenę i zatwierdź wprowadzone zmiany ...

Page 11: ...2 Wyświetlone zostanie okno z możliwością konfiguracji takich parametrów obrazu jak jasność nasycenie kontrast czy ostrość 3 Jeśli wprowadzone zmiany nie przyniosą pożądanych przez nas efektów albo pogorszą jakość obrazu zawsze można kliknąć przycisk Domyślne aby przywrócić ustawienia domyślne ...

Page 12: ...je mogą pozostawać nieaktywne Należy wówczas wykonać następujące kroki Otwórz narzędzia przeglądarki IE Ustawienia widoku zgodności Dodaj tę witrynę sieci Web wprowadź odpowiedni adres Widok w aplikacji mobilnej A Uruchom aplikację patrz Zdjęcie 1 B Dodaj kamerę patrz Zdjęcie 2 ...

Page 13: ...sk Skanuj kod QR i użyj smartphone a aby zeskanować kod QR Aplikacja automatycznie pozyska adres IP kamery Następnie wprowadź nazwę użytkownika oraz hasło i kliknij przycisk Zapisz Sposób 3 Kliknij Wyszukaj aby wyświetlić w telefonie listę dostępnych lokalnie kamer Wybierz kamerę do której konta chcesz się zalogować wprowadź nazwę użytkownika oraz hasło i kliknij Zapisz Interfejs operacyjny aplika...

Page 14: ...ży upewnić się że przewód sieciowy jest podłączony i wyłączyć zaporę sieciową oraz oprogramowanie zabezpieczające komputera 3 Dlaczego kreator wyświetla komunikat Nie można uzyskać dostępu do kamery Proszę pozyskać adres IP kamery automatycznie lub wprowadzić dane ręcznie mimo iż zostało to już zrobione Należy podłączyć kamerę do routera routera ADSL NIE należy podłączać kamery bezpośrednio do kom...

Page 15: ... obsługi wideo nie obsługują nadawania ani odbierania komunikatów dźwiękowych Jeśli zależy nam na obsłudze dźwięku kamery należy poszukać odpowiedniej aplikacji alternatywnej 7 Obraz jest rozmazany Należy upewnić się że z obiektywu kamery została zdjęta folia ochronna Następnie należy odpowiednio pokręcić obiektywem w celu uzyskania jak najlepszej jakości obrazu 8 Kamera nie obraca się nie przechy...

Page 16: ...Cable Wi Fi LAN Wired connection Wireless connection Camspot 4 8 Router Wi Fi Cable Wi Fi LAN PC MAC Smartphone Tablet PC MAC Smartphone Tablet Internet connection Camspot 4 8 Cable or Wi Fi Wireless router ADSL modem 3G 4G or Wi Fi PC MAC Smartphone Tablet ...

Page 17: ...to the camera account 1 Double click The following interface will pop up Note 1 indicates the camera model 2 shows the camera name the default name is IPCAM 3 shows the IP address and port of the camera 4 Shows the camera ID used for remote access 5 button click it if the search tool prompts the Subnet mask does not match message ...

Page 18: ...ote Both the user name and password are admin After successful login it is recommended to change the account data for safety purposes Enter the correct user name and password The login screen will pop up It supports up to 6 online visitors at the same time Note If the OCX has already been installed skip the A step and login directly A Click OCX to download and install it ...

Page 19: ...wser Camera control PTZ Listen Talk Cruise Video recording Photo Digital zoom Video photo saving folder Settings Video photo online playback Chapter 3 Settings configuration Video settings 1 Click in sequence Settings Video settings 2 In the pop up window you can set the main stream sub stream and mobile picture resolution options ...

Page 20: ... of the recordings enable and disable recording processes choose the stream and set the recording schedule Alarm settings 1 Click in sequence Settings Alarm settings 2 In the pop up window you can configure such parameters as path relay time signal preset positions number of captured photos or set the alarm schedule ...

Page 21: ...n access to the network If you use G mail enter 465 in the port field and set SSL as TLS It is also very important that your e mail has SMTP server enabled Wireless settings 1 Click in sequence Settings Wireless settings 2 Click the Search button and then enter the SSID of your choice 3 Make sure that the entered data is the same as the router s and enter your wireless network Wi Fi password ...

Page 22: ...able to find the camera s IP address please re connect the Internet cable and check your Wi Fi settings Checking the Wi Fi signal connection status Motion detection 1 Click in sequence Settings Motion detection 2 This function allows you to set up to 4 motion detection areas In the event of an alarm the green line turns red 3 You can also modify the size and position of a given motion detection ar...

Page 23: ...ngs Video shade 2 This function allows you to set up to 4 areas in which the video stream is hidden the default colour is black 3 You can also modify the size and position of a given shade area Chapter 4 Basic function settings FTP settings ...

Page 24: ... Then enter the server user name password and domain and confirm the changes with the Apply button Multiple devices settings Image settings 1 Click in sequence Settings Image settings 2 In the pop up window you can configure such options as brightness saturation contrast or sharpness ...

Page 25: ...Default button to restore the default settings Note In case of computers with Windows 8 operating system some functions may be unavailable Then you should complete the following steps Click in sequence the IE browser tools icon Compatibility View settings Add this website Then enter the correct address ...

Page 26: ... user name and password of the camera manually Then click Save Method 2 Scan the QR code There is a label with the QR code at the bottom of the camera Click the Scan QR code button and use your smartphone to scan the QR code The app will automatically obtain the IP address of the camera Then enter the user name and password and click the Save button ...

Page 27: ...rch The list of available local cameras will appear on the screen of your smartphone Choose the camera you want to log in enter the user name and password and click Save The operation interface A Device list B Live video ...

Page 28: ...in and turn off the firewall and computer security software 3 Why does the wizard prompt a massage The camera cannot be accessed Please choose Auto IP Set or set it manually after we have already gone through this process Connect the camera to a router ADSL router Do NOT connect the camera directly to a computer 4 Why does the camera always ask for user name and password or prompt the Incorrect Us...

Page 29: ...bile applications although they support video do not support audio If you want to use the audio functions of the camera please look for an alternative 3rd party application supporting the audio features 7 Why is the image blurry Remove the protective film from the camera lens Rotate the lens of the camera to get a clear image 8 Why doesn t the camera pan tilt properly Make sure the camera is not s...

Page 30: ...l Wi Fi LAN Kábeles csatlakozás Vezeték nélküli kapcsolat Camspot 4 8 Router Wi Fi Kábel Wi Fi LAN PC MAC Okostelefon Tablet PC MAC Okostelefon Tablet Internet kapcsolat Camspot 4 8 Cable vagy Wi Fi Wireless router ADSL modem 3G 4G vagy Wi Fi PC MAC Okostelefon Tablet ...

Page 31: ...a való belépés 1 Klikkeljen duplán A következő felület jelenik meg Megjegyzés 1 jelzi a kamera modelljét 2 a kamera nevét mutatja alapértelmezett név IPCAM 3 IP címet és a kamera portjait mutatja 4 Megjelenik az kamera ID ja a távoli hozzáféréshez 5 gomb klikkeljen rá ha kereséskor megjelenik a következő üzenet Subnet mask does not match ...

Page 32: ...a felhasználónévre és a jelszóra admin t adjon meg mindkettő mezőben Megjegyzés A felhasználónév és a jelszó is admin A sikeres bejelentkezés után javasoljuk hogy változtassa meg a biztonsága érdekében az adatokat Adja meg a helyes felhasználónevet és jelszót A bejelentkezési képernyő megjelenik Egyszerre 6 látogató támogatott ...

Page 33: ...elenik a kijelzőn Élő videó felület IE böngésző Kamera ellenőrző PTZ Hallgatás Beszéd Kurzor Video rögzítés Fénykép Digitális zoom Video fénykép mentési mappa Beállítások Video fénylép online lejátszás 3 fejezet Beállítások konfigurálása Video beállítások 1 Klikkeljen a következő módon Beállítások Settings Video beállítások settings 2 A felugró ablakban beállíthat többféle funkciót mint a mobil ké...

Page 34: ... A felugró ablakban beállíthatja a rögzítés idejét a rögzítési folyamatot engedélyezheti letilthatja stb Ébresztő beállítások 1 Klikkeljen a következő módon Beállítások Settings Ébresztő beállítások Alarm settings 2 A felugró ablakban olyan paramétereket tud beállítani mint ébresztőhang szundi ideje késletett idő stb ...

Page 35: ...ra hálózathoz van csatlakoztatva Ha G mail t használ gépelje be a port mezőbe a 465 t és az SSL t állítsa TLS re Nagyon fontos hogy az e mail SMTP szerverhez legyen engedélyezve Wireless beállítások 1 Klikkeljen a következő módon Beállítások Settings Wireless beállítások settings 2 Klikkeljen a Keresés Search gombra majd válassza ki az SSID t 3 Győződjön meg róla hogy a megadott adatok megegyeznek...

Page 36: ...eresési eszköz nem találja a kamera IP címét kérjük csatlakoztassa újra az internet kábelt és ellenőrizze a Wi Fi beállításokat Wi Fi jelkapcsolat állapotának ellenőrzése Mozgásérzékelő 1 Klikkeljen a következő módon Beállítások Settings Mozgásérzékelő Motion detection 2 Ebben a funkcióban 4 mozgásérzékelő területet tud beállítani Ébresztéskor a zöld piros fényre vált 3 Módosíthatja a megadott moz...

Page 37: ...tások Settings Video árnyék shade 2 Ebben a funkcióban 4 területet állíthat be amelyben a videó képét tudja elrejteni alapértelmezett a fekete 3 Módosíthatja a megadott terület méretét és pozícióját 4 fejezet Alapvető funkció beállításai FTP beállítások ...

Page 38: ...rt engedélyezett e 2 Majd adja meg a szervert felhasználói nevet jelszót és domain t majd módosításokat hagyja jóvá az Alkalmaz Apply gombbal Multiple eszköz beállítások Képbeállítások 1 Klikkeljen a következő módon Beállítások Settings Képbeállítások Image settings ...

Page 39: ...ű kép a Default gombbal visszaállíthatja az alapértelmezett beállításokat Megjegyzés A Windows 8 operációs rendszerrel rendelkező PC k esetében egyes funkciók nem elérhetőek A következő lépéseket javasoljuk Klikkeljen az IE böngésző eszközök ikonra Kompatibilis Nézet beállítások Compatibility View settings Weboldal hozzáadása Add this website Adja meg a megfelelő címet ...

Page 40: ...módon tud IP kamerát hozzáadni 1 mód Adja meg a kamera P2P ID felhasználónév user name és jelszó password adatait majd klikkeljen a Mentés Save ikonra 2 mód Szkennelje be QR kódot A kamera alján találja a QR kód címkét Klikkeljen a Scan QR code gombra és a QR kód szkenneléséhez ...

Page 41: ...szót majd klikkeljen a Mentés Save gombra 3 mód Klikkeljen a Keresés Search re Az okostelefonján megjelenik az elérhető helyi kamerák listája Válassza azt a kamerát amibe be szeretne jelentkezni és adja meg a felhasználónevet és jelszót majd klikkeljen a Mentés Save gombra A használati felület A Eszközök listája B Élő videó ...

Page 42: ...ti kábel be van e dugva és a tűzfal továbbá a számítógép antivírusa ki van e kapcsolva 3 Miért jön a varázslóból a következő üzenet A kamera nem csatlakoztatható Kérjük válassza ki az automatikus IP beállítást vagy adja meg manuálisan The camera cannot be accessed Please choose Auto IP Set or set it manually Csatlakoztassa a kamerát a router hez ADSL router hez NE csatlakoztassa a kamerát közvetle...

Page 43: ...ámogatja a Firefox módot és többi típusú böngésző sem támogatja az ActiveX komponenseket Kérjük válassza ki a megfelelő videó módot a megfelelő böngészőhöz Egyes mobil alkalmazások bár támogatják a videót nem támogatják a hangot Ha a kamera hang funkcióját szeretné használja kérjük keressen egy megfelelő alkalmazást 7 Miért homályos a kép Távolítsa el védőfóliát a kamera lencséjéről Forgassa a kam...

Page 44: ...uter Cablu LAN Wi Fi Conexiune prin cablu Conexiune fără fir Camspot 4 8 Ruter Wi Fi Cablu LAN Wi Fi PC MAC Smartfon Tableta PC MAC Smartfon Tableta Conexiune internet Camspot 4 8 Cablu sau Wi Fi Ruter fără fir Modem ADSL 3G 4G sau Wi Fi PC MAC Smartfon Tableta ...

Page 45: ...a afișa interfața așa cum se arată mai jos Atenție 1 Fila arată modelul camerei 2 Fila prezintă denumirea camerei denumirea implicita este IPCAM 3 Fila arată adresa IP și portul camerei video 4 Fila prezintă numărul de identificare ID al camerei utilizate în modul de control de la distanță 5 Buton Apăsați l atunci când browser ul va afișa un mesaj despre masca de nepotrivire subrețea ...

Page 46: ...dmin Atenție Atât numele de utilizator și parola este admin Din motive de securitate vă recomandăm după prima conectare să modificați informațiile contului dvs Introduceți numele de utilizator și parola Ecranul afișează o fereastră de conectare prin intermediul internetului poate fi observată până la 6 vizitatori în același timp Atenție În cazul în care OCX a fost deja instalat accesati direct con...

Page 47: ... video PTZ Ascultare Vorbire Mișcarea aparatului înregistrare video imagine Zoom cyfrowy Înregistra dosarelor video și imagini Setare Redare video și vizualizarea imaginilor on line Capitolul 3 Configurarea setarilor Setare video 1 Faceți clic pe Setări Setări video 2 Se afișează fereastra cu opțiunile de configurare atât pentru fluxul principal și secundar precum și rezoluția imaginii afișate pe ...

Page 48: ...istrări de lungime configurabile activare dezactivare înregistrare selectați fluxul și calendarul înregistrărilor Setare alarme 1 Faceți clic pe Setări Setări alarmă 2 Apare fereastra cu informatii cu privire la configurare durata semnal de alarmă pozițiile predefinite numărul de fotografii și programul ...

Page 49: ...e disponibilă atunci când camera IP este disponibilă în rețea În cazul în care utilizați de e mail câmp G mail introduceți numărul portului 465 și SSL setat ca TLS De asemenea este important ca dvs de e mail au activat serverul SMTP Setarea rețelelor fără fir 1 Faceți clic pe Setări fără fir 2 Faceți clic pe butonul de căutare apoi selectați SSID ul dorit ...

Page 50: ...nternet Indicație În cazul în care browser ul nu este capabil sa găseasca adresa IP a camerei video vă rugăm să va re conectați la Internet și verificați setările Wi Fi Verificarea stării Wi Fi Detectare mișcare 1 Faceți clic pe Setări Detectare mișcare 2 Această funcție vă permite să atribuiți 4 zone de detectare a mișcării În cazul unei alarme linia verde devine roșu 3 De asemenea aveți posibili...

Page 51: ...istrarea imaginii Această funcție vă permite să atribuiți 4 zone în care fluxul video va fi acoperit culoarea implicită este de uloare negra Puteţi configura de asemenea mărimea şi locaţia zonei de înnegrire a imaginei Capitolul 4 Setarea funcțiilor de bază Setare FTP ...

Page 52: ...ter 2 Apoi introduceți numele serverului numele de utilizator parola și domeniul și confirmati modificările Setare a mai multor dispozitive Setarea imaginei 1 Faceți clic pe Setări Setări imagine 2 Se afișează fereastra cu parametri configurabile cum ar fi luminozitatea video saturație contrast și ...

Page 53: ...ricând sa faceți clic pe Setari implicite pentru a restabili setările Atenție În cazul computerelor cu sistem de operare Windows 8 unele caracteristici pot rămâne inactive Trebuie să efectuaţi următorii paşi Deschideți Instrumente de IE Compatibilitate Vizualizare Setari Adăugați acest site introduceți adresa corespunzătoare ...

Page 54: ... ul P2P numele de utilizator și parola a camerei Apoi faceți clic pe Salvați Mod 2 scanarea codului QR În partea de jos a camerei este o etichetă cu un cod QR Faceți clic pe Scanează codul QR și de a folosi un smartphone pentru a scana codul QR Aplicația obține automat adresa IP a camerei Apoi introduceți numele de utilizator și parola și faceți clic pe Salvați Mod 3 ...

Page 55: ...ta de camere de telefon locale disponibile Selectați camera la care contul pe care doriți să vă conectați introduceți numele de utilizator și parola și faceți clic pe Salvați Aplicațiile de interfață A Lista cu dispozitive B Vizualizare video live ...

Page 56: ...era Vă rugăm să obțineți adresa IP a camerei în mod automat sau manual introduceți date cu toate că acest lucru a fost deja făcut Conectați camera la un router router ADSL NU conectați aparatul video direct la un calculator 4 De ce aparatul video solicită întotdeauna un nume de utilizator și o parolă și trimite mesajul utilizator nevalid Numele de utilizator și parola implicite este admin In cazul...

Page 57: ...i să caute aplicarea corespunzătoare alternative 7 Imaginea este neclară Asigurați vă că obiectivul aparatului video este îndepărtată pelicula protectoare Apoi ar trebui să fie rândul său a cristalinului în scopul de a obține cea mai bună calitate a imaginii 8 Aparatul video nu se rotește nu se înclina în mod corespunzător Asigurați vă că aparatul nu este blocat Pentru a face acest lucru încercați...

Page 58: ...IP Camera OV Camspot 3 4 ...

Page 59: ......

Page 60: ......

Reviews: