background image


Installing the Ladder 


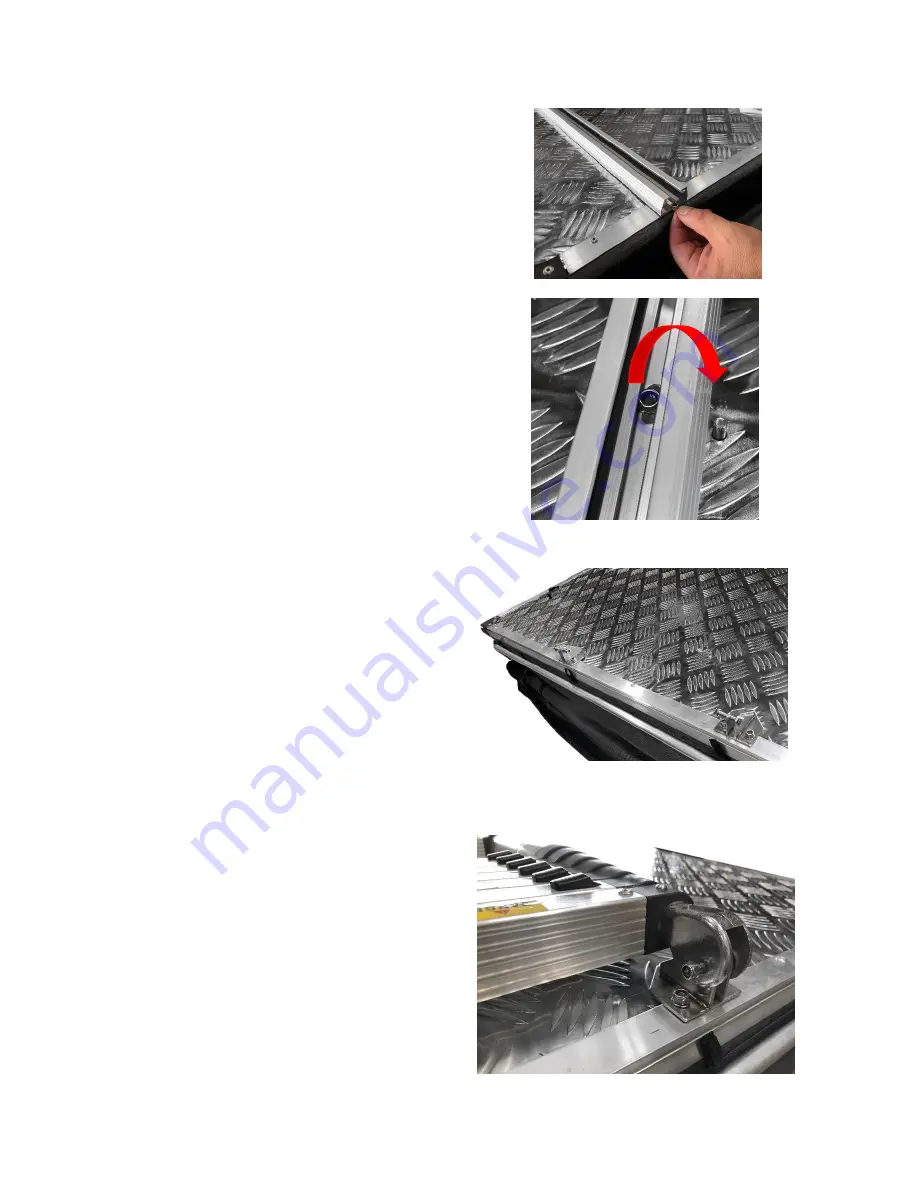
4.


Slide 2 or 3 6mm Nyloc nuts into the 
mounting rails and align the mounting 
holes.  Locate  the  mounting  holes 
under the mattress and insert the M6 
x  40mm  bolts  and  flat  washers  from 
the inside out. 


5.


Attach the mounting rails to the tent 
floor  using  the  M6  (4pcs)  bolts  and 
tighten firmly. 


7.


Turn  over  tent  and  locate  the  pre-
drilled  holes.  Attach  the  ladder 
brackets  as  shown,  using  the  M6 
bolts, washers and Nyloc nuts. 


6.


Attach  the  ladder  to  the  brackets 
using  the  M6  bolts,  flat  washers  and 
Nyloc nuts.  


Summary of Contents for Nomadic

Page 1: ...assembled at the factory except for attaching the mounting tracks and the ladder to the base of the tent Installation is composed ofunpacking attaching mounting tracks to the base of the tent attaching the ladder attaching the tent cover and then mounting your Overland Vehicle Systems Tent onto your roof rack or aftermarket roof bars All the tools and hardware required for installation are include...

Page 2: ...tes x4 Stainless steel ladder hinge mounts x2 M6x35mm Stainless steel hex bolts x2 M6 Nyloc hex nut x2 M6x40mm Stainless steel hex bolts x4 M6 Nyloc hex nut x4 M6 Flat washers x4 M6x40mm Stainless steel hex bolts x4 M6 Nyloc hex nut x4 M6 Flat washers x8 Open end wrenches 10mm 13mm x2 Stakes x2 Enclosed Hardware List ...

Page 3: ...face a sturdy table is a good option Undo all the Velcro straps so that you can open the tent enough to unzip the door and remove the contents 2 Locate the four mounting holes under the tent floor and lay the tent with this side facing upwards See illustration for hole locations 3 Release all the Velcro securing straps and open the tent enough to access all the items stored inside the tent Remove ...

Page 4: ... mounted option Benefits of a rear mounted tent image 1 Fits into narrow camping spaces 1 Trunk or tail gate area at the rear of your vehicle is accessible from inside the annex Note if you opt to rear mount your tent you will need to cut off any excess mounting rail material see image 2 Benefits of a side mounted tent image 3 1 Allows for bicycle racks and other tow hitch baraccessoriestobeinstal...

Page 5: ...rt the M6 x 40mm bolts and flat washers from the inside out 5 Attach the mounting rails to the tent floor using the M6 4pcs bolts and tighten firmly 7 Turn over tent and locate the pre drilled holes Attach the ladder brackets as shown using the M6 bolts washers and Nyloc nuts 6 Attach the ladder to the brackets using the M6 bolts flat washers and Nyloc nuts ...

Page 6: ...ng bolts do not contact the roof as this will cause damage to the vehicle In some cases the mounting bolts might need to be shortened to clear the roof In some cases the 6 5M soles will need to be drilled through roof bars to secure the tent The installation orientation of your Nomadic rooftop tent can be attached will depend on the type of roof rack roof bars fitted to the vehicle Placethe tent o...

Page 7: ... included nuts and wrench Check all the mounting bolts andbracketsperiodicallyduring use 3 After ensuring the tent is positioned correctly and all eight bolts are tightened securely insertrubberend capsintotheends of the mounting tracks This may require light tapsfrom a hammer 4 Undo the Velcro strap that is holding the ladder compressed Slide ladder out until complete ladder locks in place as sho...

Page 8: ... is vertical walk backwards away from the vehicle allowing the tent to unfold 6 Remove support bow from under mattress above ladder 5 When tent is fully unfolded the end of the ladder should touch the ground 7 Remove support bow from under mattress above ladder ...

Page 9: ...erted into the side windows and the short rods are inserted into the rear rain fly 8 Push bow away from the tent and insert ends into bow brackets on corners of tent base Note Although the tent is self supporting we recommend the use of guy ropes and pegs in case of potential gust of wind 8 Flex the support bow to the engage the hook end with the eyelet on the side windows or rain fly ...

Page 10: ...easier access to sail the track onto the base of the tent 3 Slide material of the annex into the sail track as shown in the image 1 Remove the Velcro strip insert that secures your cover to the tent Place it somewhere safe as you will reinstall it when you remove your annex ...

Page 11: ...4 Attach the annex to the tent base using the attached zipper 5 Continue to zip the annex all the way around of the tent base 6 Secure the annex to the ground using the provided ground pegs ...

Page 12: ...Top Tent thoroughly before you close it If unable to properly dry your Roof Top Tent prior to closing open it up and air dry it at your next opportunity Failure to properly dry your tent out can lead to the growth of mold and mildew which can degrade the tent material cause discoloration and foul odor Mold and mildew growth is not covered under your Roof Top Tent warranty cover and machine wash ge...

Page 13: ...om dirt Prior to closing your Roof Top Tent lift your mattress and ensure the underside is dry Remove mattress and air dry if necessary To clean mattress cover remove Keep your mattress dry and free from dirt Prior to closing your Roof Top Tent lift your mattress and ensure the underside is dry Remove mattress and air dry if necessary To clean mattress cover remove cover and machine wash gentle cy...

Page 14: ...fect we will repair or replace the product at our option without charge How to obtain warranty service Return the product freight prepaid to Overland Vehicle Systems or contact Overland Vehicle Systems Customer Satisfaction Department for return authorization toll free 833 226 4863 Collect shipments or shipments without return authorization cannot be accepted Repairs If your tent needs service or ...

Reviews: