
NEO 8000e Quick Start Guide
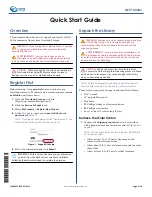
Unpack the Library
10400292-002 05/2013
©2010-13 Overland Storage, Inc.
Page 3 of 4
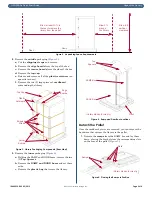
2.
Remove the
rear hardware
holding the library on the
pallet:
a.
To access the hold-down bolts and leveling legs,
remove the
rear crosspiece
(
Figure 6
).
Use a #2 Phillips screw driver to remove the
crosspiece screws. Then, lift and slide to remove.
Figure 6. Removing the Rear Crosspiece
b.
Using the 9/16” wrench, remove the two
bolts and
hold-down brackets
.
c.
Use a 10” adjustable wrench to raise the two
leveling legs
at least to the wheel tops (
Figure 7
).
Figure 7. Raising the NEO 8000 Leveling Legs
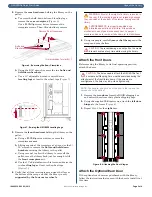
3.
Remove the
front hardware
holding the library on the
pallet:
a.
Using a #2 Phillips screw driver, remove the
crosspiece
screws
.
b.
Lifting one end of the crosspiece at a time, use the 9/
16” wrench to remove the
bolts and hold-down
brackets
securing the library to the pallet.
c.
Using care not to allow the library to come off the
pallet, move the library back just far enough to lift
the
front crosspiece
out.
d.
Use the 10” adjustable wrench to loosen and raise the
two
leveling legs
at least to the wheel tops
(
Figure 7
).
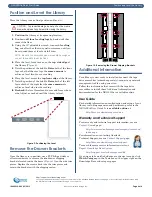
4.
Verify that all four leveling legs can clear the floor at
the bottom of the ramp and that the library is only
supported by the four caster wheels
.
WARNING:
Most of the weight of a library is located in
the rear. If the leveling legs are not raised high enough,
they can catch at the bottom of the ramps, tipping over the
library.
AVERTISSEMENT:
la plupart des poids d'une
bibliothèque est située à l'arrière. Si les pieds de
nivellement ne sont pas élevés assez haut, ils peuvent
prendre au bas de la rampe et faire basculer la bibliothèque.
5.
Using two people, carefully
move the library
down the
ramps and onto the floor.
CAUTION:
To prevent damage, do not pull on the media
drawer handles at any time while moving the library.
Attach the Front Doors
Before moving the library to its final operating position,
attach the doors.
CAUTION:
The holes used to attach the NEO 8000e front
doors are self-tapping. Care must be exercised during the
attachment of the front library doors. If the screws are
overtightened, the hole may strip. Hand tighten only.
NOTE: The square, straight end of the door is the top and the
curved end is the bottom.
1.
Remove the
two doors
from the DOOR shipping box
and extract them from their plastic shipping bags.
2.
Using the supplied Phillips screws, attach the
left door
hinges
to the frame (
Figure 8
).
3.
Repeat
Step 2
for the
right
door.
Figure 8. Attaching the Door Hinges
Attach the Optional Rear Door
If the optional rear door was purchased with the library,
follow the instructions that came with the door to install it at
this time.
Remove Rear Crosspiece
Bolts and
(Library hidden for clarity)
Brackets


