background image

Page 4

For technical questions, please call 1-888-866-5797.

Item 56226


Installation Instructions

Read the ENTIRE IMPORTANT SAFETY INFORMATION section at the beginning of this 
document including all text under subheadings therein before set up or use of this product.

1.   Insert the MicroSD card into the Dashcam 

gently until it locks into place.

2.  If it has not been formatted, the memory card may 

need to be formatted before it can be used.  This 
will erase all information currently on the card.

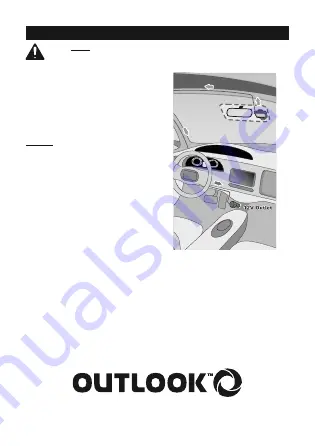
3.  Determine mounting location in accordance 

with vehicle safety regulations.  Do not obstruct 
the driver’s view or in the operational area of 
any airbag.  An example location is shown 
which may be appropriate for some vehicles.

WARNING!

 Do not leave Camera unsecured.

4.  Clean the mounting location using rubbing alcohol 

(not included).  Allow it to dry completely.

5.  Determine which Mounting Bracket to use for 

the best filming and viewing angle.  Remove 
the adhesive backing and carefully attach the 
Dashcam Mounting Bracket to the windshield.

6.  Attach the Dashcam to the Mounting Bracket.

7.  Connect Charger cable to the Dashcam.

8.  Route cable around windshield so 

it is not obstructing visibility.

9.  Plug the Charger into the 12V socket.

10.  Adjust the angle of the Camera as needed.

Summary of Contents for 56226

Page 1: ...unpacking make sure that the product is intact and undamaged If any parts are missing or broken please call 1 888 866 5797 as soon as possible Copyright 2019 by Harbor Freight Tools All rights reserv...

Page 2: ...ag 5 Having this item installed may be prohibited in certain municipalities or areas including near some military facilities Restrictions may apply even if item is turned off or disconnected Make sure...

Page 3: ...Page 3 For technical questions please call 1 888 866 5797 Item 56226 Controls Mode Power Card Slot AV Out Reset USB Port Menu Lock Up Mic Down OK...

Page 4: ...dance with vehicle safety regulations Do not obstruct the driver s view or in the operational area of any airbag An example location is shown which may be appropriate for some vehicles WARNING Do not...

Page 5: ...lect the video picture Briefly press UP DOWN buttons to change volume Press the MODE button twice to exit playback 5 Briefly press the POWER button to turn off the screen 6 Press and hold the POWER bu...

Page 6: ...hey are locked Exposure Motion Detection This determines whether the Camera will start recording when motion is detected or not Record Audio Date Stamp Photo Menu Capture Mode Photo Resolution Compres...

Page 7: ...ised since the Camera contains delicate wiring and ribbon cables that can be permanently damaged in the process of battery removal 1 Remove the four screws from the back of the camera housing 2 Gently...

Page 8: ...usion or limitation of incidental or consequential damages so the above limitation of exclusion may not apply to you THIS WARRANTY IS EXPRESSLY IN LIEU OF ALL OTHER WARRANTIES EXPRESS OR IMPLIED INCLU...

Reviews: