Outland Living FMPPC2E-410 Manual Download Page 15


1-888-514-1663  

|  WWW.OUTLANDLIVING.COM

En-15

STEP 22 

Your Outland Fire Table is now converted to Natural Gas. 
Follow normal igniting procedures as per your Owner’s Manual.

STEP 21 (continued)

IN STRICT COMPLIANCE WITH CSA GUIDELINES, THE 
RESPONSIBLE PARTY SHALL AFFIX THE MARKING & 
WARNING LABEL IN CLOSEST PROXIMITY TO EXISTING 
PRODUCT RATING PLATE, IN A CONSPICUOUS 
LOCATION, ON THE APPLIANCE BEING CONVERTED: 

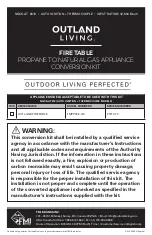
After Steps A and B above are complete, affix the label on the appliance, using the supplied hang 
strap, in the location as shown on the applicable model appliance picture below.

MODEL

HANG TAG LOCATION

FMPPC2E-410 
(FT410-TC)

HANG TAG HOLE 

LOCATION

PLASTIC HANG STRAP

CSA TAGS

CAUTION!

HOSE IS A TRIP HAZARD

!


WARNING:

TRIP HAZARD! ENSURE 
THE GAS HOSE IS PLACED 
IN AN AREA WHERE 
IT IS UNLIKELY TO BE 
TRIPPED OVER (SUCH AS 
PATHWAYS OR TRAILS) 
OR SUBJECT TO OTHER 
ACCIDENTAL DAMAGE.

Summary of Contents for FMPPC2E-410

Page 1: ...E MODELS TICK SERIES NAME MODEL NUMBERS SERIES NUMBERS OUTLAND FIRE TABLE FMPPC2E 410 FT410 TC WARNING This conversion kit shall be installed by a qualified service agency in accordance with the manuf...

Page 2: ...par FMI BRANDS INC 101 3570 Rue 194 Surrey C B Canada V3Z 1A5 1 888 514 1663 518 OUTLAND NATURAL GAS CONVERSION KIT Distributed by FMI BRANDS INC 101 3570 194 Street Surrey BC Canada V3Z 1A5 1 888 51...

Page 3: ...t 5 which should be installed by a professional certified natural gas fitter Once the quick disconnect is properly installed proceed to the next step NATURAL GAS CONVERSION KIT RATINGS GAS ORIFICE SIZ...

Page 4: ...T SHOWN SIDE PANEL OFF STEP 1 a Ensure the fire table gas control knob is in the OFF position b Remove side panel STEP 2 a Close the valve on the LP propane cylinder b Disconnect and remove the LP cyl...

Page 5: ...o release the wire d Locate the black OUTLAND heat shrink tubing on the gas hose coupling and carefully remove it using a utility knife e Remove the propane hose Uncouple it from the gas appliance val...

Page 6: ...ASE RING FACEPLATE MOUNTING BRACKET PROPANE GAS VALVE GAS HOSE COUPLING 2X SCREWS GAS KNOB CSA TAGS THERMOCOUPLE SOCKET GAS ORIFICE VALVE STEM IGNITER GAS HOSE COUPLING GROUND TERMINAL GROUND TERMINAL...

Page 7: ...e knob should be aligned with the OFF indicator on the valve cover at this point NATURAL GAS VALVE OFF GAS HOSE COUPLING ENSURE COUPLING FACES DOWN STEP 7 Slide the heat shrink tubing part 3 over the...

Page 8: ...ong Have a steady hand and use a slow back and forth motion with the flame Ensure the heat shrink tubing cinches snugly over the entire circumference and no visible gaps in the ends remain The heat sh...

Page 9: ...oss thread the coupling during tightening Do not over tighten Max torque 33 9 N M ATTACH THE NATURAL GAS HOSE CONNECT THE IGNITER CABLE CONNECT THE THERMOCOUPLE CABLE CONNECT THE THERMOCOUPLE GROUND W...

Page 10: ...disconnect should be installed by a professional certified natural gas fitter Once the quick disconnect is properly installed proceed to the next step Low Pressure Natural Low Pressure Natural Gas Ho...

Page 11: ...table gas valve If growing bubbles appear it indicates that there is a gas leak If a leak is detected immediately shut off the gas at the source Retighten all connections and try again If the leak pe...

Page 12: ...deed burning as demonstrated in the image here The presence of flames will confirm that the burner is burning To test the adjustment of the gas input rate flame height and intensity turn the gas knob...

Page 13: ...cover and connected to the gas valve The thermocouple is designed to shut off the gas supply to prevent un burnt gas from free flowing through the burner if the table top flames go out unexpectedly TI...

Page 14: ...2 TIQUETTE 1 C T 2 TAG 2 SIDE 2 TIQUETTE 2 C T 2 2 5 in x 4 in 63 5 mm x 101 6 mm STEP 21 AFFIX MARKING AND WARNING LABEL AFTER CONVERSION TESTING AND VERIFICATION SEQUENCES ABOVE ARE COMPLETE AND PR...

Page 15: ...G PLATE IN A CONSPICUOUS LOCATION ON THE APPLIANCE BEING CONVERTED After Steps A and B above are complete affix the label on the appliance using the supplied hang strap in the location as shown on the...

Page 16: ...the fire table Please ensure that all adults and children which use or are near a unit in use are aware of the hazard of high surface temperatures present on the unit during use and should use cautio...

Page 17: ...Clean any plugged burner orifices with a small paper clip The burner must be replaced prior to the appliance being put into operation if there is evidence of damage Replacement burners are available f...

Page 18: ...RUCTIONS STEP 1 Ensure the appliance valve s are OFF and the natural gas supply valve is closed STEP 2 Locate and remove the gas valve body assembly mounting screws WARNING Small critters like spiders...

Page 19: ...to clean out any debris or nest material An air tool to blow out the burner is helpful but please wear eye protection STEP 5 When the burner tube is determined to be clear reinstall the gas valve bod...

Page 20: ...ries replacement rocks and parts can be purchased at www outlandliving com or by calling 1 888 514 1663 The Owner s Manual is available as a free download from www outlandliving com Replacement part o...

Reviews: