background image

THE OUTDOOR PLUS

USA MANUFACTURER OF FIRE & WATER FEATURES

WWW.THEOUTDOORPLUS.COM

PAGE 8

909.460.5579

Section 5

Flame Sense Installation Instructions

INSTALLATION STEPS:

1.  Set fire pit in properly constructed enclosure, 

read 

Section 4 – Fire Pit Enclosure 

Requirements.

2.  Position fire pit following safety 

recommendations with access to all gas 

connections for testing. Read 

Section 3 – 

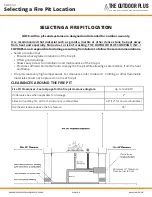
Selecting the Fire Pit Location

 for more 

details.

3.  Shut off gas supply to fire pit.
4.  Connect fire pit to main gas supply. 


Warning:

 avoid sharp bends with flex line 

to prevent whistling.

5.  Turn on gas supply, purge gas lines of air and 

perform leak test on all inlet connections. 

Repair as needed.

6.  Light fire pit. It may take several cycles to 

purge air from the lines. Read 

Section 7 – 

Operating the Fire Pit

.

7.  Once fire pit is lit, perform leak test on all gas 

connections. Repair as needed.


8.  Turn off fire pit and allow it to cool.
9.  Apply media as described in 

Section 6 - 

Burning Media

. When filling the pan with lava 

rock and/or decorative glass, the instructions 

in Section 8 must be followed.

10.  Turn on fire pit again and perform leak test 

with media correctly installed. If gas leak is 

detected verify correct media application and 

repair as needed.

11.  Verify correct operation and lighting.
12.  Review safety manual with end-user. Instruct 

end- user that fire pit or media must not be 

changed or modified.

13.  Leave manual with end user.
14.  Apply the Start Up and Shutdown decal next 

to control box in an obvious and highly visible 

position.


»

To prevent damage, unhook the fire pit from the gas supply for pressure leak tests.


»

Burn Testing: It is the responsibility of the qualified installer to test for gas leaks at all connections.


»

Gas Plumbing Connections: Use joint compound or tape that is resistant to all gases. Apply joint 

compound only to all male pipe fittings. DO NOT use on flex line flared fittings. Be sure to tighten 

every joint securely.


»

Perform all leak tests with leak detector or leak reactant.


»

For The Outdoor Plus/TOPFIRES Flat & Drop-In Pans, the flames will appear lower in height without 

media around the burner.

INSTALLATION

We  suggest  that  our  products  be  installed  by 

professionals  that  are  locally  licensed  by  the 

authority having jurisdiction in gas piping.

SERVICE

We suggest that our products be serviced by a 

professional certified in the US by the National 

Fireplace Institute (NFI) as NFI Gas Specialists.

Section 5

 - Flame Sense Installation Instructions

Summary of Contents for TOP-FSI-LP

Page 1: ...h could cause property damage personal injury or death INSTALLER Leave this manual with the appliance CONSUMER Retain the manual for future reference Installation We suggest that our products be installed by professionals that are locally licensed by the authority having jurisdiction in gas piping Service We suggest that our products be serviced by a professional certified in the US by the Nationa...

Page 2: ...ge DANGER FIRE OR EXPLOSION HAZARD If you smell gas 1 Shut off gas to appliance 2 Extinguish any open flame 3 If odor continues leave the area immediately 4 After leaving the area call your gas supplier or Fire department Failure to follow these instructions could result in fire or explosion which could cause property damage personal injury or death INSTALLER Leave this manual with the appliance C...

Page 3: ...ting Contact with liquid contents of cylinder will cause freeze burns to the skin Do not allow children to tamper or play with the cylinder When not connected for use keep cylinder valve turned off Self contained appliances shall be limited to a cylinder of 30lb capacity or less Do not use store or transport cylinder where it would be exposed to high temperature Relief valve may open allowing a la...

Page 4: ...ion 2 Important Safety Information 5 6 Section 3 Selecting a Fire Pit Location 7 Section 4 Clearance Requirements 8 9 Section 5 Fire Pit Enclosure Requirements 10 Section 6 Flame Sense Installation Instructions 11 Section 7 Burning Media Instructions 12 Section 8 Flame Sense Operation Instructions 13 Section 9 Maintenance 15 16 Section 10 Troubleshooting Guide 17 ...

Page 5: ...ain information critical to the safe installation and operation of the fire pit Instructions are updated as needed It is the responsibility of the installers to check for product updates and installation manual updates at www theoutdoorplus com documents prior to installation It is the responsibility of the installer to follow The National Fuel Gas Code ANSIZ223 1 NFPA54 or International Fuel Gas ...

Page 6: ... installation of the fire pit Offers good drainage Allows easy access for installation and maintenance of the fire pit Provides sufficient horizontal room to enjoy the fire pit while allowing a safe distance from the heat and flame Fire pits create very high temperatures For clearances refer to table 3 1 Clothing or other flammable materials should not be placed on or near fire pit CLEARANCES AROUND...

Page 7: ... our products will be perfectly flat and will not warp due to heat There must be a minimum of 2 inches under the valve box for proper ventilation and drainage see clearance drawings on page 8 an 9 The product must be accessible for service CONSTRUCTION MATERIALS Use non combustible materials and construction for gas supply power and enclosure The interior void space of the enclosure surrounding th...

Page 8: ... perform leak test with media correctly installed If gas leak is detected verify correct media application and repair as needed 11 Verify correct operation and lighting 12 Review safety manual with end user Instruct end user that fire pit or media must not be changed or modified 13 Leave manual with end user 14 Apply the Start Up and Shutdown decal next to control box in an obvious and highly visi...

Page 9: ...ure is not covered under any warranty IMPORTANT Lava rock glass coverage should be at a minimum to prevent smothering of the flame and for correct operation See Lave Rock Glass Application instructions before applying IMPORTANT The use of concrete logs is not recommended LIST OF ACCEPTABLE MEDIA FOR FIRE FEATURES Fire Rated Lava Rock or other Igneous Rock Fire glass approved for use in fire featur...

Page 10: ...rn knob counter clockwise to light main burner NOTE If the burner fails to light wait 5 minutes for gas to clear then repeat steps 3 8 9 Ensure fire pit children and patrons are supervised by a responsible adult who is familiar with emergency shut down 10 Flammable materials should not be placed on or near the fire pit This product is intended to be connected to fixed piping systems or an LP tank ...

Page 11: ...er fails to ignite properly then the burner holes may require cleaning The appliance can be cleaned by carefully removing the logs and media to allow access to burner Use a brush to carefully remove dust spider webs and loose particles from base logs and fire ring itself If evidence of damage fire ring must be replaced with fire ring specified by the manufacturer Thermocouple cleaning of soot Once...

Page 12: ...th battery 3 Remove old battery from cap install a new AA battery We recommend using an Alkaline battery 4 Holding by cap slide battery into the battery slot as seen on image 5 Tighten cap lightly DO NOT over tighten INSTALLATION We suggest that our products be installed by professionals that are locally licensed by the authority having jurisdiction in gas piping SERVICE We suggest that our produc...

Page 13: ... 30 seconds after pilot lights Small pilot flame pilot orifice dirty or clogged Remove pilot orifice and clean Dirty thermocouple Clean using soft brush Section 10 Faulty thermocouple or valve Replace thermocouple or valve Burner will not stay lit Gas pressure improper Confirm proper gas pressure See Section 1 Important Information for Installers Burner obstructed Confirm no water or debris in bur...

Page 14: ... 6 Months Residential 12 Months This commences from the date of original sale shipment from The Outdoor Plus This warranty is for the parts and in house TOP labor The defective product must be sent back to TOP with a Return Merchandise Authorization RMA issued by TOP for that specific product and any other additional information for the nature of the defect or warrant claim The warranty does not c...

Reviews: