Worldwide Corporate Offices
North America
Tel: +1 360.435.6030
Fax: +1 360.435.6019
Europe
Tel: +49 9122.79889.0
Fax: +49 9122.79889.21
Latin America
Tel: +1 561.792.9651
Fax: +1 561.792.7157
Asia Pacific
Tel: +852 2736.8663
Fax: +852 2199.7988
p/n 044-026-B0-001, Rev. A (03/2015)
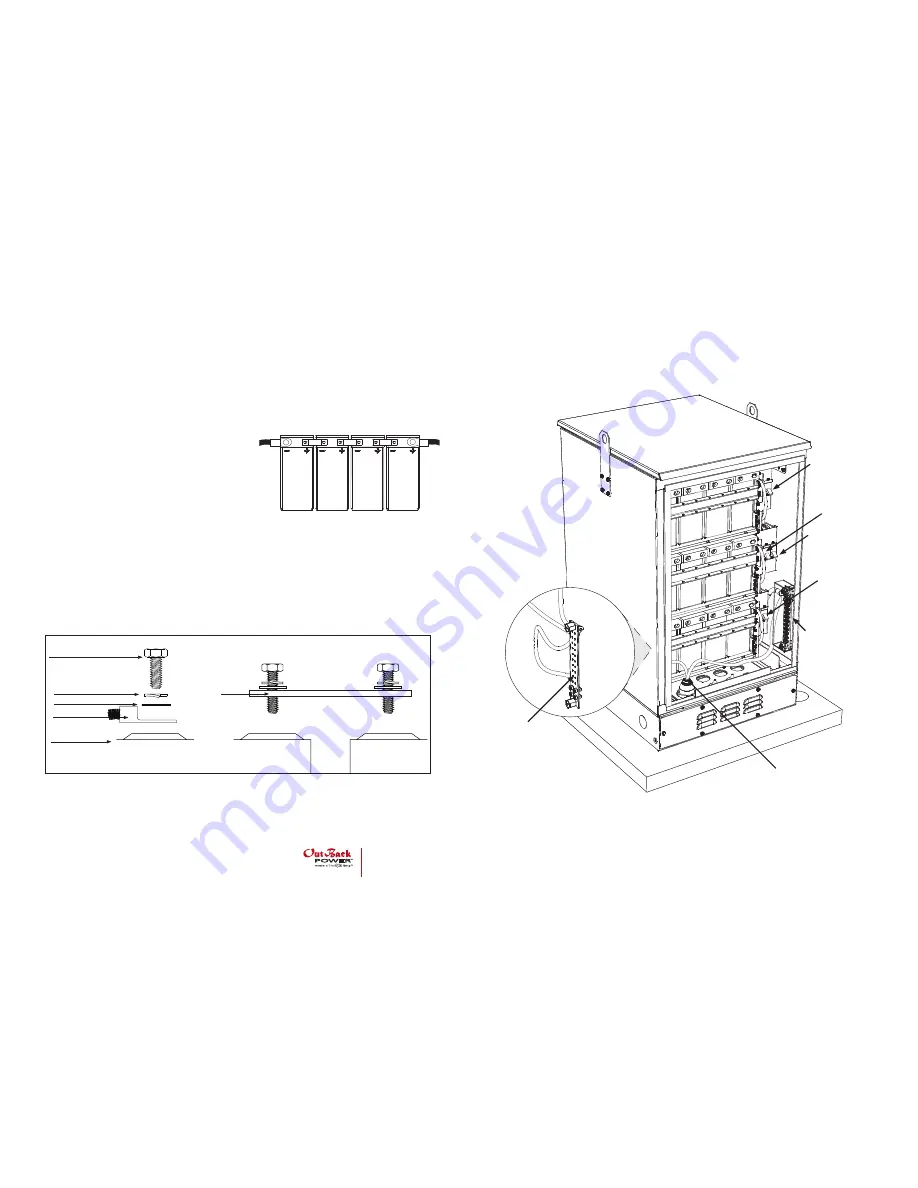
Figure 12, Breaker and Busbar Locations
Positive Busbar with
Transparent Cover
Negative Busbar
Load Cables
Main Breaker
String 1 Breaker
String 2 Breaker
String 3 Breaker
Battery Installation
Figure 11, Battery Wiring / Bus Connections Stackup
Figure 10, Battery Positive and
Negative Positioning/Wiring
7. Using the positive battery cable located at the top
of the enclosure, wire the cable to the rightmost
positive battery terminal on the top of the shelf of
the enclosure.
8. Apply corrosion inhibitor to the terminals and
connections.
9. Re-install the securing bar using the 8 screws
removed in step 2.
10. Repeat steps 2-7 for the middle and bottom shelf,
respectively.
11. Feed the load cables through the bottom of the
enclosure's rubber grommet. An LB with a 2" (5.1 cm)
conduit may be connected to any of the knockouts
on the riser if required.
12. Connect the positive load cable to the busbar on
the right of the enclosure wall and the negative load
cable to the busbar on the left of the enclosure wall
(See Figure 12).
13. Installation is complete. Activate the breakers per
installation needs.
Battery Installation
3/4" x 1/4-20 Bolt
Split Washer
Flat Washer
Battery Cable
Battery Terminal
Busbar
Battery Interconnect
Battery Cable Wiring
Top-Down View


