


8
www.ostermann.eu
2
Aluminium-Schiebetür-Systeme
Inhaltsverzeichnis
1 Warnungen / Informationen
3
2 Benutzung/ Haftung
3
3 Montage
4-7
3.1 Werkzeuge
3.2 Montage
4 Benutzung
7
5 Problembehandlung
8
6 Daten
8
7 Einstellung der LED-Rücklaufhöhe
8-9
8 Einstellung der oberen und unteren Grenzen
9
7
Duty Cycle: Max.10% or 2 min on and 18 min pause
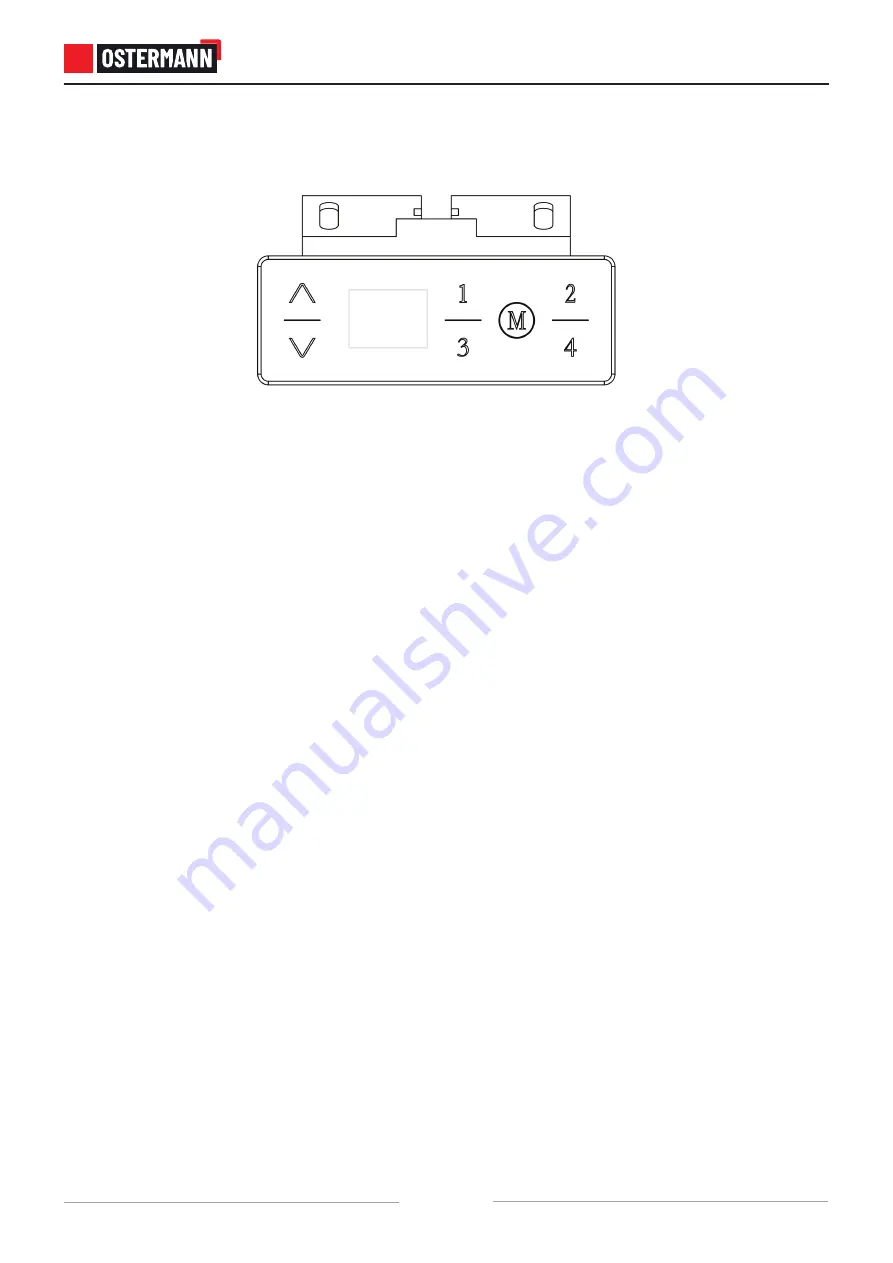
Control Panel Operation and Programming Instructions
1. Make sure all components are connected correctly (control box, control panel, power cable and
connecting cable, lifting columns).
2. Connect the power cable to a 110/240VAC outlet. After the control panel will display "61.0" sign for a
few seconds, the system is turn on and the desk is ready for use.
3. Up and Down
Press and hold the "
UP" button to move up the desk to the desired height. The desk will stop when the
button is released.
Press and hold the "
DOWN" button to lower the desk to the desired height. The desk will stop when the
button is released.
4. Memory Settings
After adjusting the desk height using the "
UP"/"DOWN" buttons, press the "M" button and "S -" sign will
be displayed on the control panel. Then press the desired button from 1 to 4 to assign the current height to
a number on the keypad. Can be saved and memorized 3 different heights.
Moving the desk to a preset height can be done by pressing the corresponding button from 1 to 4.
During operation you can stop the desk by pressing one of the "
UP"/"DOWN" buttons.
5. Keypad Lock
To lock: Press and hold "
UP" and "DOWN" buttons for 5 seconds until "LOC" sign appears on the display,
indicating that the system is locked.
To unlock: Press the "
UP" and "DOWN" buttons for 5 seconds at a same time until the "LOC" sign
disappears and the height of the desk is displayed, indicating that the system is ready to be adjusted again.
6. Reset
When the system is experiencing a problem or the control panel displays "
RES", the system must be reset.
Press and hold the "
DOWN" button throughout the process. After 5 seconds, the desk will lower slightly
until it reaches its lowest height, then rises slightly and the display changes back to the numeric height
setting.After the desk stops, the reset process is successfully completed.
HANDSET
HANDSTEUERUNG
1. Stellen Sie sicher, dass alle Kabel korrekt angeschlossen sind
2. Verbinden Sie das Stromanschlusskabel mit einer 110/240V
AC Steckdose. Auf der Handsteuerung erscheint "61.0" für einige
Sekunden und das Gestell ist damit betriebsbereit.
3. Hoch & Runter
Drücken und halten Sie die "Hoch"-Taste bis die gewünschte Tisch-
position erreicht ist. Der Tisch stoppt sobald Sie die Taste loslassen.
Drücken und halten Sie die "Runter"-Taste bis die gewünschte Tisch-
position erreicht ist. Der Tisch stoppt sobald Sie die Taste loslassen.
4. Speichertasten
Nachdem die gewünschte Höhe über die "Hoch/Runter" Tasten
angesteuert ist, drücken Sie die "M" Taste und das Zeichen "S-" er-
scheint in der Anzeige. Drücken Sie dann die gewünschte Taste von
1 bis 4 um die gewählte Höhe dieser Taste zuzuweisen. Sie können
bis zu 4 Höhen speichern. Durch drücken der Tasten 1 bis 4 können
Sie das Gestell automatisch zu den gespeicherten Höhen fahren.
Durch drücken der "Hoch/Runter" Tasten können Sie die Fahrbewe-
gung jederzeit stoppen.
5. Bedienfeld sperren
Um den Tisch zu sperren, halten sie die beiden Tasten "Hoch" und
"Runter" gleichzeitig für 5 Sekunden gedrückt bis in der Anzeige
"LOC" erscheint. Um den Tisch zu entsperren wiederholen Sie den
Vorgang und die aktuelle Tischhöhe wird wiederum angezeigt.
6. Reset
Es kann möglich sein, dass Sie ein Reset durchführen müssen. Dabei
gehen Sie wie folgt vor: Drücken und halten Sie die "Runter" Taste
während der gesamten Dauer. Nach etwa 5 Sekunden beginnt der
Tisch langsam nach unten zu fahren bis er den niedrigsten Punkt
erreicht. Dann fährt er ein wenig in die Gegenrichtung und die Höhen-
anzeige erscheint erneut auf dem Display. Nachdem der Tisch stoppt
ist das Reset beendet.
1. Make sure all components are connected correctly.
2. Connect the power cable to a 110/240V AC outlet. After the
control panel will display "61.0" sign for a few seconds, the system
is turn on and the desk is ready for use.
3. Up and Down
Press and hold the "UP" button to move up the desk to the desired
height. The desk will stop when the button is released.
Press and hold the "DOWN" button to lower the desk to the desired
height. The desk will stop when the button is released.
4. Memory Settings
After adjusting the desk height using the "UP"/"DOWN" buttons,
press the "M" button and "S -" sign will be displayed on the control
panel. Then press the desired button from 1 to 4 to assign the cur-
rent height to a number on the keypad. Can be saved and memorized
4 different heights.
Moving the desk to a preset height can be done by pressing the
corresponding button from 1 to 4. During operation you can stop the
desk by pressing one of the "UP"/"DOWN" buttons.
5. Keypad Lock
To lock: Press and hold "UP" and "DOWN" buttons for 5 seconds
until "LOC" sign appears on the display, indicating that the system
is locked. To unlock: Press the "UP" and "DOWN" buttons for 5
seconds at a same time until the "LOC" sign disappears and the
height of the desk is displayed, indicating that the system is ready to
be adjusted again.
6. Reset
When the system is experiencing a problem the system must be
reset. Press and hold the "DOWN" button throughout the process.
After 5 seconds, the desk will lower slightly until it reaches its
lowest height, then rises slightly and the display changes back to
the numeric height setting. After the desk stops, the reset process is
successfully completed.


