background image

One Stop Systems 


2U EOS  | 10 


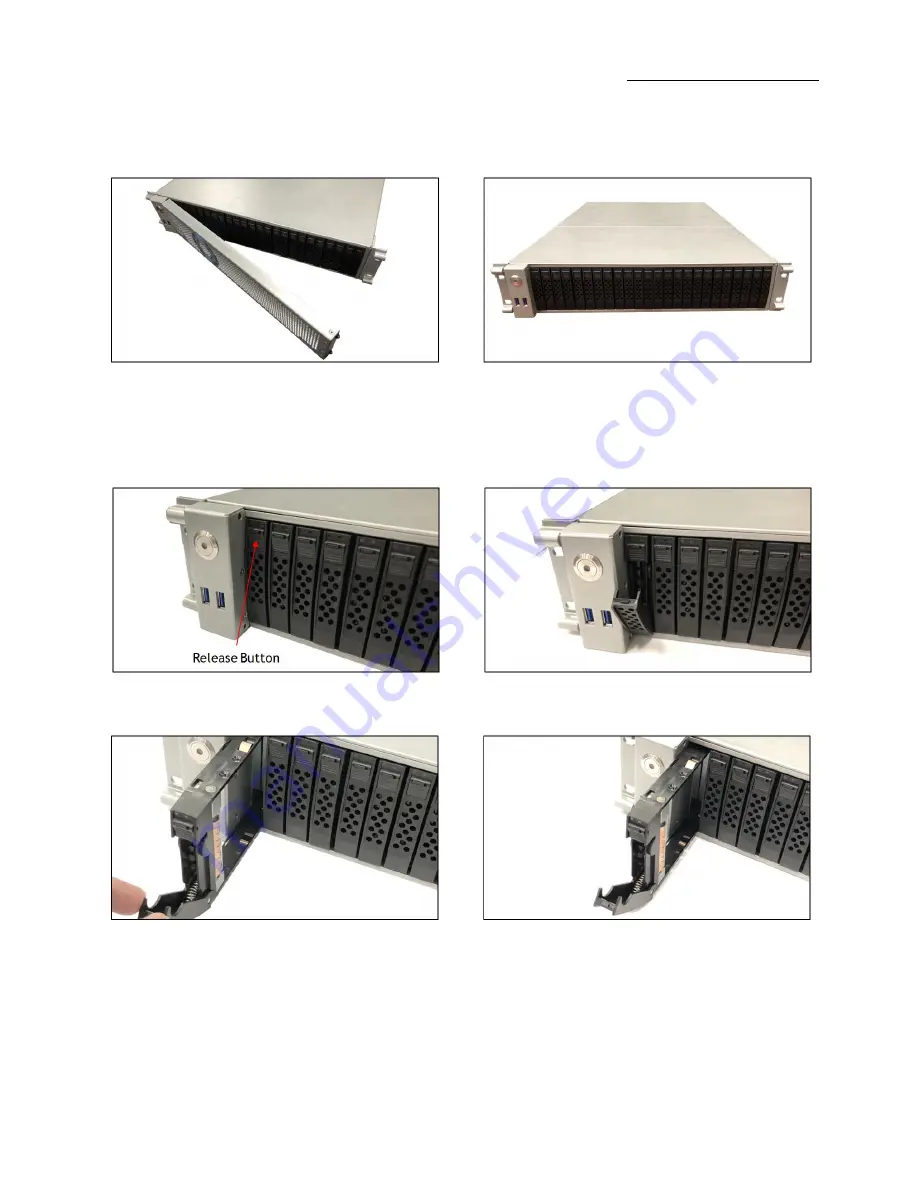
2.2      Remove face-plate 

 
Carefully remove the front face-plate of the unit. 


2.3      Removing Drive Tray 

 
Pull the drive tray out from the unit by pressing the release button. The drive tray handle will extend. 


Grasp the handle and gently pull the drive tray out of the chassis. 


Summary of Contents for OSS-MB-2U-X11Q

Page 1: ...User Manual 2U EOS Server Expansion Optimized Server SKU OSS MB 2U X11Q www onestopsystems com ...

Page 2: ...d for Installation 8 2 Hardware Set up Installation 9 2 1 Installation Procedures Overview 9 2 2 Remove face plate 10 2 3 Removing Drive Tray 10 2 4 Install Storage Drive 11 2 5 Connect External Devices 12 2 6 Power ON the system 13 2 7 PCIe Card Installation 14 2 8 How to Remove Top Cover 15 2 9 How to Remove Power Supply 16 3 Contacting Technical Support 17 4 Returning Merchandise to One Stop Sy...

Page 3: ...or to alert you to the potential for hardware damage or personal injury Disclaimer We have attempted to identify most situations that may pose a danger warning or caution condition in this manual However One Stop Systems does not claim to have covered all situations that might require the use of a Caution Warning or Danger indicator ...

Page 4: ...omputer Before taking covers off a computer perform the following steps Turn off the computer and any peripheral devices Disconnect the computer and peripheral power cords from their AC outlets or inlets in order to prevent electric shock or system board damage In addition take note of these safety guidelines when appropriate To help avoid possible damage to systems boards wait five seconds after ...

Page 5: ...s which can include wrist straps and smocks when servicing equipment You can also take the following steps to prevent damage from electrostatic discharge ESD When unpacking a static sensitive component from its shipping carton do not remove the component s anti static packaging material until you are ready to install the component in a computer Just before unwrapping the anti static packaging be s...

Page 6: ...iguration 4 x PCIe 3 0 x16 HH FL Double Width slots 2 x PCIe 3 0 x16 HH HL Single Width slots 1 x PCIe 3 0 x4 HH HL slot with x8 physical connector 1x PCIe3 0 x4 M 2 slot for 2280 and 22110 M Key modules NVMe configuration 2 x PCIe 3 0 x16 FH HL Single Width slots 2 x PCIe 3 0 x16 HH HL Single Width slots 1 x PCIe 3 0 x4 HH HL slot with x8 physical connector 1x PCIe3 0 x4 M 2 slot for 2280 and 221...

Page 7: ...V 83A at 12V 0 5A at 12V 22A at 3 3V and 3A at 5V Standby Environment Operating 5 C to 35 C 41 F to 95 F at 0 to 915m 3 000ft altitude 5 to 90 non condensing relative humidity max dew point 21 C max rate of change 5 C hr Non Operating 20C to 60 C 40 F to 140 F 5 to 90 non condensing relative humidity max dew point 27 C max rate of change 5 C hr Agency Tested to conform to the following standards F...

Page 8: ...rate with all OSS expansion products 1 3 Pre Installation Information Before using the One Stop Systems expansion chassis you should perform the following steps Inventory the shipping carton contents for all of the required parts Gather all of the necessary tools required for installation Read this manual 1 4 Tools Required for Installation To complete the installation of the product you will need...

Page 9: ...oltages are present inside the expansion chassis when the unit s power cord is plugged into an electrical outlet Disconnect the power cord from the AC outlet before removing the enclosure cover Turning the system power off at the power on off switch does not remove power to components High voltage is still present CAUTION Before touching anything inside the enclosure move to an ESD station and fol...

Page 10: ...ate Carefully remove the front face plate of the unit 2 3 Removing Drive Tray Pull the drive tray out from the unit by pressing the release button The drive tray handle will extend Grasp the handle and gently pull the drive tray out of the chassis ...

Page 11: ...ove the dummy drive from the hard drive tray Place the hard drive tray on a flat stable surface such as a desk table or work bench Slide the hard drive D into the tray with the printed circuit board side facing downward Carefully align the mounting holes in the hard drive and the tray Secure the hard drive using all four of the screws ...

Page 12: ...e carrier reaches the rear of the bay the release handle will retract Using the thumb push against the upper part of the hard drive handle Push the hard drive into the hard drive bay as illustrated below until the hard drive clicks into the locked position 2 5 Connect External Devices Plug in the mouse and keyboard Plug in the VGA external display and Ethernet cables ...

Page 13: ... the front Power Button Orange LED should come ON immediately upon powering ON the system Power Supply LED indicator will come UP as solid green During the boot up process splash screen will prompt to select boot drive Go to BIOS select initial boot device save settings and reboot system will restart ...

Page 14: ...entation Remove the top cover of unit see How to Remove Top Cover section The PCIe host card is a half height x16 capable PCIe card mounted to a full height bracket as shown below For low profile case applications change the mounting bracket to the low profile bracket You can order a low profile bracket by contacting our Sales Support Replacing the High Profile Bracket with Low Profile Bracket is ...

Page 15: ...t is best to carry the cards in anti static packaging If you need to set a PCIe card down be sure to place it inside or on top of an anti static surface For more information see Protecting Against Electrostatic Discharge in the Preface 2 8 How to Remove Top Cover Remove the screw located on each side of the panel see photo below Remove the screw located on the top end of the cover see photo below ...

Page 16: ...ont top cover next is to remove the back end top cover Lift the back end top cover and slide it out 2 9 How to Remove Power Supply Pressing and holding the lever towards your right and slowly pull the handle to remove power supply module CAUTION Turn OFF the unit first before removing the power supply ...

Page 17: ...red you must contact OSS Service Representative to obtain a Return Merchandise Authorization RMA number Put this number and your return address on the shipping label when you return the item s for service One Stop Systems will return any product that is not accompanied by an RMA number Please note that One Stop Systems WILL NOT accept COD packages so be sure to return the product freight and dutie...

Page 18: ...ation is subject to the following two conditions 1 this device may not cause harmful interference and 2 this device must accept any interference received including interference that may cause undesired operation Changes or modifications not expressly approved by the party responsible for compliance could void the service personnel s authority to operate the equipment NOTE The assembler of a person...

Page 19: ...One Stop Systems 2U EOS 19 ...

Reviews: