background image


RMD5733 LCD MONITOR              User Manual


12


5.2


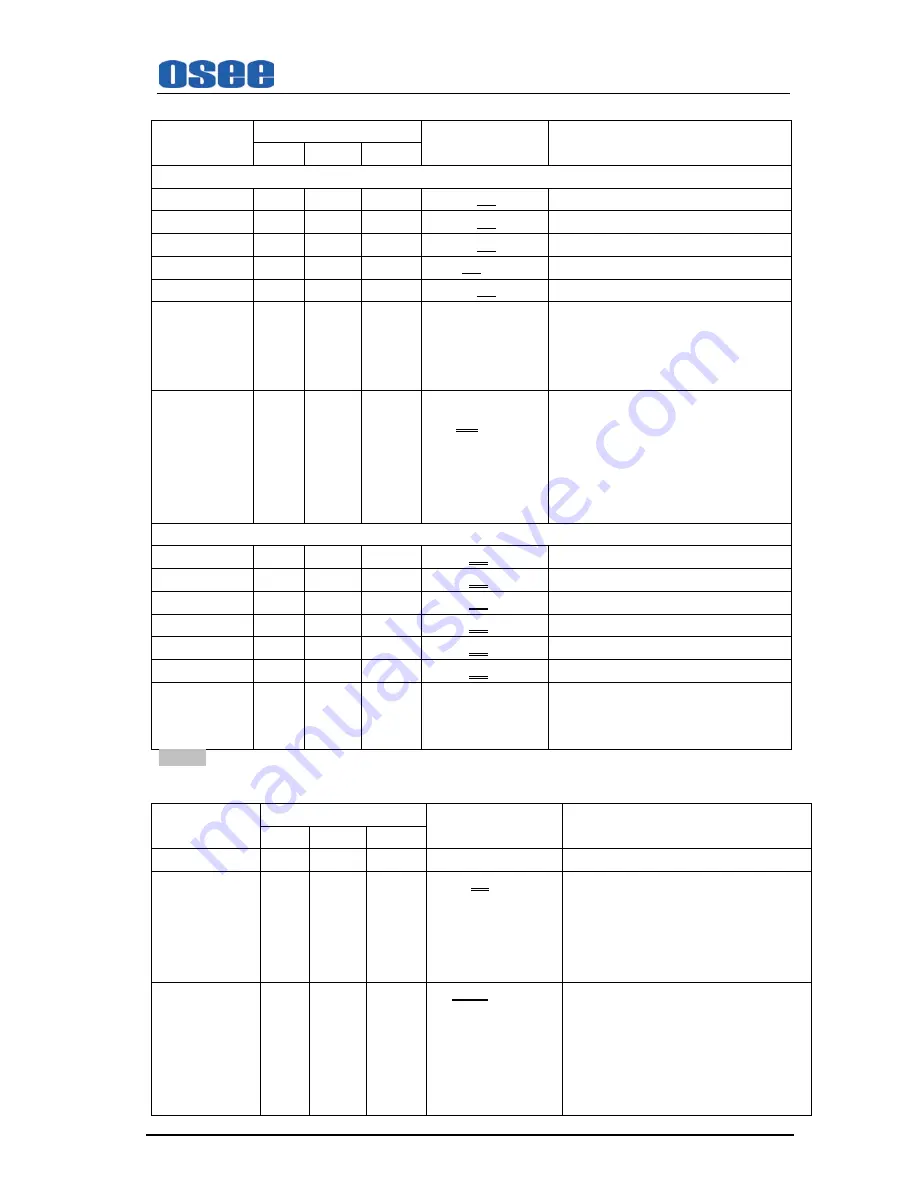
VIDEO Sub-menu 

Parameters 

Input Signal 

Domain Range 

NOTE 

CVBS 

SD-SDI 

HD-SDI 

VIDEO (1/2)


BRIGHTNESS 

-116…000

Adjust the picture brightness 

…139 

CONTRAST 

-128…000

Adjust the picture contrast 

…127 

SATURATION 

-128…000

Adjust the picture saturation 

…127 

SHARPNESS 

000

Adjust the picture sharpness 

…15 

HUE 

-32…000

Adjust the picture hue 

…31 

RESET 


Reset BRIGHTNESS, 

CONTRAST, 

SATURATION,  SHARPNESS,  HUE to 

default value. Once “Reset” is set, all 

parameters above will respond to change.   

COLOR TEMP 

USR…D56… 

D65…D93 

Used to select the color temperature that

  will become the basis for adjustments. 


<USR> Color temperature of user set.   


<D56> Color temperature around 5600K 


<D65> Color temperature around 6500K 


<D93>Color temperature around 9300K 

VIDEO (2/2)


R GAIN 

0…128…255 

Gain elements for RED are adjusted. 

G GAIN 

0…128…255 

Gain elements for GREEN are adjusted. 

B GAIN 

0…128…255 

Gain elements for BLUE are adjusted. 

R OFFSET 

0…128…255 

Offset elements for RED are adjusted. 

G OFFSET 

0…128…255 

Offset elements for GREEN are adjusted. 

B OFFSET 

0…128…255 

Offset elements for BLUE are adjusted. 

RESET 


  “R GAIN”-  “B OFFSET”  values are reset 

to color temperatures values selected in 

“COLOR TEMP”. 

NOTE:

 When adjusting, the item displays of “

BRIGHTNESS

”-“

HUE

” and “

R GAIN

”-“

B OFFSET

” move to 

the lower part of the screen.             

5.3


AUDIO Sub-menu 

PARAMETERS 

Input Signal 

Domain Range 

NOTE 

CVBS 

SD-SDI 

HD-SDI 

AUDIO (1/5) 


AUDIO MON 

ON…OFF 

Used for headphone. 

The default of left  panel is set to ON, others 

is  set to OFF. “AUDIO MON”  can be only 

set from “OFF” to “ON”

a reverse cannot be 

allowed. 

MON SOURCE


MET 1…MET 4 

Used to set the monitoring audio source 

  from  among audio meters.  

Note: For RMD5733-HSC, there are four 

audio meters (MET1~MET4).  

For  RMD5733-SC/  RMD5733-V, there are

  only two audio meters (MET1~MET2). 

Summary of Contents for RMD5032

Page 1: ...RMD5733 USER MANUAL...

Page 2: ...0 1 22 COMPANY NAME Beijing Osee Digital Technology Ltd CONTACT INFORMATION Address Room 702 Tower D Jinyujiahua Building No 9 3rd Shangdi Street Haidian District Beijing China Post code 100085 Tel 86...

Page 3: ...llowing device types RMD5733 HSC RMD5733 SC RMD5733 V The images of RMD5733 HSC are adopted in the following descriptions Any of the different specifications between the device types are elaborated Be...

Page 4: ...ontrols 5 4 3 Quick Button Descriptions 7 4 3 1 ENTER BUTTON 7 4 3 2 USER1 BUTTON 7 4 3 3 MENU BUTTON 8 4 4 Rear Panel 9 Chapter 5 Main Menu Structure 11 5 1 STATUS Sub menu 11 5 2 VIDEO Sub menu 12 5...

Page 5: ...Headphone Jack Built in speaker Support COLOR temperature correction Support Dynamic UMD and TSL and IMAGE VIDEO protocols RS485 connector Waveform and Vectorscope display for SDI signal Support OSD T...

Page 6: ...the power cord is damaged turn off the power immediately It is dangerous to use the unit with a damaged power cord It may cause fire or electric shock 11 Unplug this apparatus during lighting storms o...

Page 7: ...equired when installed to prevent possible damage to the RMD5733 internal components 3 Connect required cables for signal input and output Please note that power must be applied to the RMD5733 for all...

Page 8: ...settings to customize the UMD In Monitor Display text area to show a line of characters numbers and or some symbols 6 Speakers Audio may be selected for monitoring through the left and right speakers...

Page 9: ...ff Switch When the indicator in the power switch is in green it indicates that power is on When the indicator is flashing it indicates standby 2 INA B Press to select one input signal from two input c...

Page 10: ...d MUTE will show a continuous flickering lasting for 10S To cancel the mute function press the button again Press the button repeatedly the button function will circle as follows Audio Selection Mute...

Page 11: ...hue of image range 32 31 the typical 0 Note To regulate the option DEFAULT use the reset item in video 1 2 of the main MENU You can reset the following parameters of BRIGHTNESS CONTRAST SATURATION SHA...

Page 12: ...the top right of the screen Include three options of WFM VECTOR OFF SAFE MARKER Display CENTER mark 90 mark and 80 mark or not AREA MARKER Images show with one scale of 2 35 1 1 85 1 15 9 14 9 13 9 4...

Page 13: ...set other parameters In a word when you set a parameter the buttons of ENTER MENU and will be used frequently The function of each button is listed below ENTER Enter the sub menu and set the value of...

Page 14: ...D Open Green Open GND Open GND Amber GND GND GND GND The description of Screen 3 is similar with Screen 1 For IN OUT RS485 connector Female RJ 45 Support for dynamic UMD and updating the new firmware...

Page 15: ...on whereas X indicates the unit includes no such function The underlined values are factory preset setting values The presets are values adjusted before shipment from factories The available parameter...

Page 16: ...lements for RED are adjusted G GAIN O O O 0 128 255 Gain elements for GREEN are adjusted B GAIN O O O 0 128 255 Gain elements for BLUE are adjusted R OFFSET O O O 0 128 255 Offset elements for RED are...

Page 17: ...o set the audio meter types with the input signal from INA connector Note For RMD5733 HSC there are four audio meters MET1 MET4 For RMD5733 SC RMD5733 V there are only two audio meters MET1 MET2 IN A...

Page 18: ...and EXT1L EXT2R EBD1 IN B MET 1 R O O O For the input signal from INB connector it is used to assign the audio channel for right audio meter 1 display from among EBD1 EBD16 and EXT1L EXT2R EBD2 IN B...

Page 19: ...s available When SAFE MARKER is set to OFF the functions of CENTER 90 80 are not available 2 Refer to the AREA MARKER parameter Only when the image displaying in 16 9 format this function is available...

Page 20: ...11 O O STANDARD IMAGE VIDEO HW IMAGE VIDEO 422 STANDARD IV422 TSL NOTES 1 OSD TLY DISP OSD TLY MODE Use these settings to choose how tally is displayed on the screen The available OSD Tally options de...

Page 21: ...text UMD text can be justified on the left center or right of the screen This setting is overridden when using UMD text via the Image Video protocol alignment is set via Image Video protocol 6 UMD Pr...

Page 22: ...documentation for further information 10 UMD Baud Rate Use this setting to choose the baud rate The baud rate must be set in conjunction with the controlling device Available baud rates are 2400 4800...

Page 23: ...ter is unavailable The HD ZOOM function will be available and can be changed from 16 9 OFF and 4 3 ON For more detailed information see the Chapter 6 2 For Color bar parameter When opening the color b...

Page 24: ...2 5x42 mm Power Consumption 12V DC 10 watts 3 8 Amps max CE UL complied supply included Operating Temperature 0 C to 70 C Inputs 6 Auto sensing HD SDI SD SDI Analog Composite BNC 6pairs External analo...

Page 25: ...0P 1080 30P 1080P30 1080 29 97P 1080P29 97 1080 25P 1080 25P 1080P25 108024P 1080 24P 1080P24 1080 23 97 1080P23 97 1080 24PsF 1080 24PsF 1080sF24 1080 23 97PsF 1080Sf23 97 1035 60I 1035 60I 1035I60 1...

Page 26: ...22 USER IN A B POWER MENU ENTER MUTE BLUE MONO BLUE MONO MUTE IN A B POWER USER MENU ENTER BLUE MONO MUTE MENU POWER IN A B USER ENTER RMD5733 1 2 3 Dimensions Front View Unit mm Rear View and Side Vi...

Page 27: ...D ZOOM For the following table the Screen Display Ratio of the monitor s panel is 4 3 SD signal SD ASPECT 4 3 UNDER SCAN INVALID NORMAL INVALID SD ASPECT 16 9 UNDER SCAN INVALID NORMAL INVALID HD ZOOM...

Page 28: ...ded to the first consumer only and proof of purchase is necessary to honor the warranty If there is no proof of purchase provided with a warranty claim osee reserves the right not to honor the warrant...

Reviews: