EN
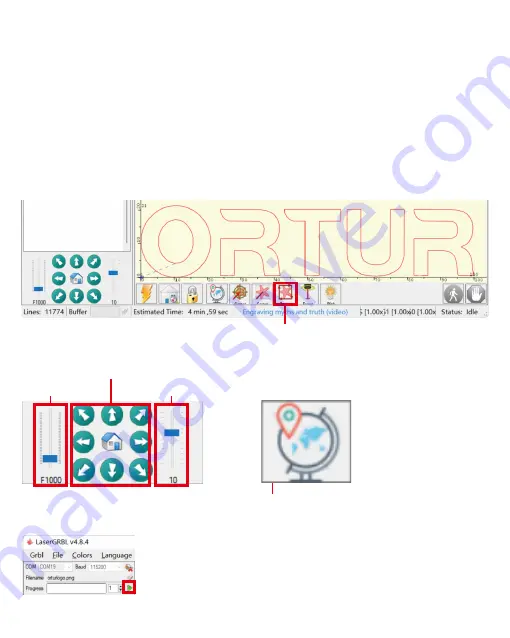
Click the button in the red box to view the engraving range, and then adjust the position according to the
engraving range.
Click the button in the red box to start cutting.
Moving Speed
After adjusting the engraving starting point,
you must click this button to record the position,
otherwise the movement will be invalid!
Use the moving direction buttons to adjust
the engraving starting point.
Moving Direction
Moving Distance
Note 1: The cutting parameters are for learning and reference only, and the actual use will be
affected by factors such as material and thickness!
Note 2: The same material, such as wood, will have different effects due to different tree ages
and resins. In order to achieve the best results, multiple attempts are required!
1. Select "Vectorize"
2. Click "Next"
3. The Border Speed is modified to 100mm/min
4. Select "M3-Constant Power" for laser mode
5. S-MAX 1000
6. The size can be modified according to your needs
7. Click "Create"
1
11
© 2022 ORTUR
Summary of Contents for OLM3
Page 1: ...User Manual...
Page 8: ...EN 3 Engraving 1 2 3 4 5 6 7 7 2022 ORTUR...
Page 11: ...EN 1 2 3 4 5 6 7 10 2022 ORTUR 4 Cutting...
Page 15: ...EN 8 Select COM19 9 Connection succeeded 14 2022 ORTUR...
Page 27: ...2 Click Run to start engraving or cutting 3 Click Con rm 26 2022 ORTUR EN...
Page 35: ...7 Click Run 34 2022 ORTUR EN...
Page 36: ...35 2022 ORTUR Laser Module Instructions 1 Focal Gauge Rod EN Focal Gauge Rod Engraved Object...
Page 40: ...39 2022 ORTUR Lighting Description EN...
Page 41: ......


