d
e
f
Contact Info:
Ortery USA
Tel: +1-949-859-5580
Web: www.Ortery.com
Ortery Taiwan
Tel: +886-2-2258-2180
Web: www.Ortery.com.tw
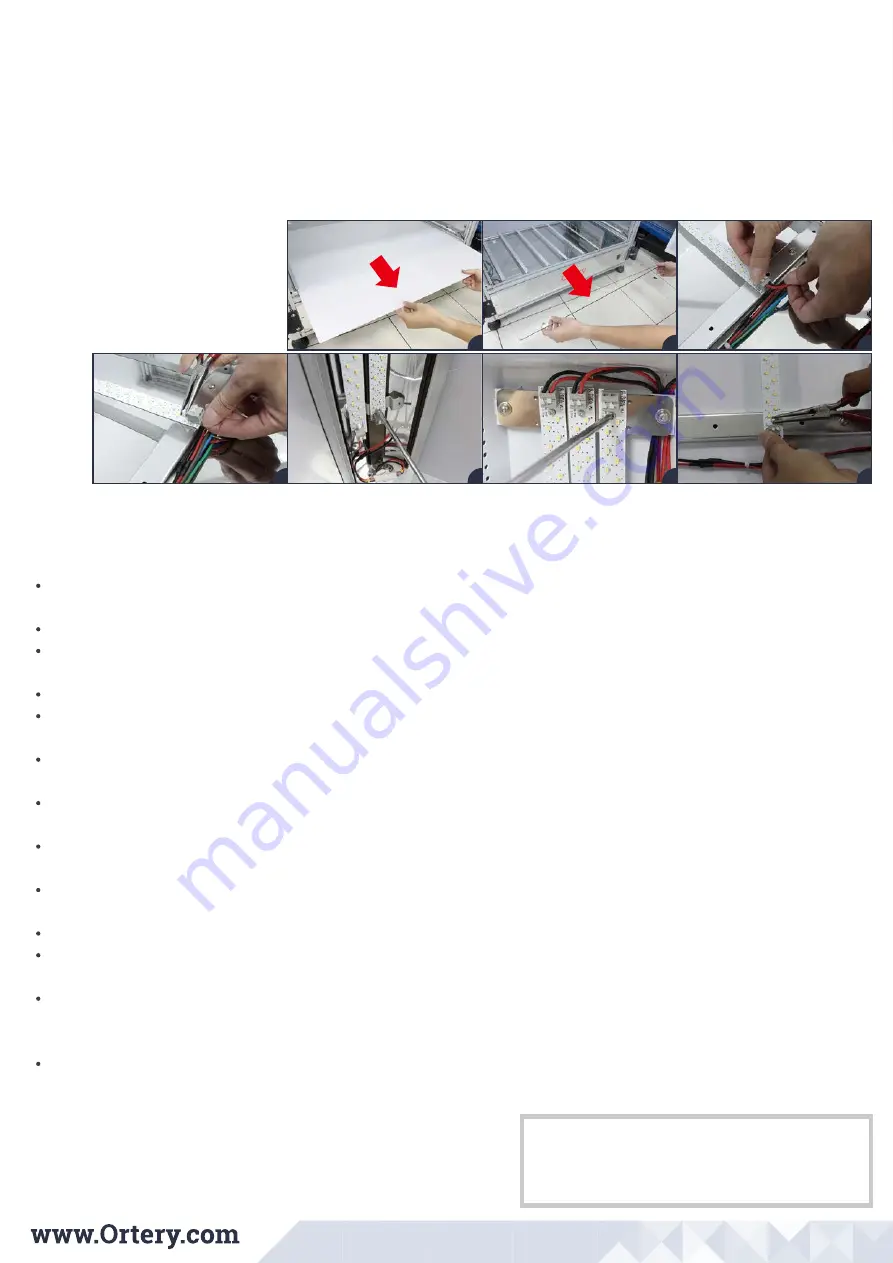
Pull the acrylic diffusion plate and the bottom transparent glass out.
Disconnect the two wires by pressing the connector node while pulling the wire out. Use a Philips screwdriver or pinch the LED holding clip with
pliers to remove the lamp.
Note:
The red wire is V+ and the black wire is V-.
Use the same method for replacing LED lamps on the columns, swing lights and back light panel.
Note:
Follow the steps
a-e
in the Guiding the Unit Through a Doorway section of the Installation Guide to separate the back light panel from the
main unit, then lay the back light panel on a piece of foam, remove the 6 small white hand screws and take off the acrylic diffusion plate to
access the LED lamps inside.
Caution:
Periodically check for and replace any broken LED crystals in this system. If one LED crystal fails, it can cause others in the same set to
malfunction.
g
h
j
k
i
e-f
g-h
i-k
Regarding the best light settings, we recommend using 30% on the left swing top, right swing top, left swing bottom, right swing bottom lamps, 1% on
the back, bottom, left rear and right rear columns. These settings work best for most products.
Keep acrylic and glass plate clean and dry to avoid dark spots forming inside moist air pockets between the acrylic and glass.
Instead of overexposing to get a pure white background, we recommend getting a good exposure on the object then using Levels to specifically make
the background pure white.
Use the AutoPNG or AutoBKG features to automatically create PNG files with transparent backgrounds, if required.
If the AutoPNG result eats into the object, for example the collar of a white T-shirt, try placing paper under the collar to minimize the light coming
through the object.
To avoid intense reflections, adjust camera or light settings first. Try changing the shooting distance, rotating the object or using a reflection controller
inside the light box. In addition, pieces of black or white material can be used inside the box to block or diffuse the light causing the reflection.
When shooting transparent or light colored objects, adjust dimming and camera settings first. Holding or taping a piece of black or grey material inside
the studio can give extra contrast to the edge of the item making it easier to recognize and separate from the background.
When shooting transparent items, place the item in the front of the box with the door open. Try dimming front and rear lights and use a grey or black
material along the side to help bring out product detail, increase contrast and separate the item from its background.
To suspend objects for still or 360 images (purse straps or to help an object stand) consider using our Hanging Kit accessory. For hanging objects
(turntable at the top) consider using our 360 Hanging Kit.
Use the Focus Stacking feature to ensure objects are in clear focus from front to back.
If you pictures need to be a square or a specific proportion (length and width), enable this feature by changing the Crop settings in the Preview Options
area.
If you are taking pictures of objects that have depth, either use the Focus Stacking feature or maximize the camera’s "depth of field" to reduce or
eliminate the chance of having certain portions of the photograph be blurry. To maximize depth of field, move the camera further away from the object
or use a higher aperture.
Caution:
while using a higher aperture increases overall depth of field, it reduces overall clarity.
By clicking the "?" in the upper right corner of the software you can access the Photography Tips, Operation Guide and User Guide.
Photography Tips:


