


Ensure the device is completely assem-
bled prior to operation
1. Attach the cable (19) from the hand-
held programming unit to the CPM
actuator.
2. Install batteries, or plug the AC
adapter into the hand-held program-
ming unit and a grounded wall outlet.
3. Turn the device on and off from the
POWER ON/OFF button on the hand-
held programming unit. The LCD
displays shows the current range of
motion position of the device.
4. Before programming ARTROMOT
®
-F,
ensure the device is not running.
If it is, stop the device by pressing
START/STOP button on the hand-held
programming unit.
1. Turn the device on by pressing the
POWER ON/OFF button on the hand
controller. The hand-held program-
ming unit momentarily flashes all the
system icons and then permanently
displays the present range of motion.
2. Press the SET button (system icons
flash). The yellow SET light will appear
indicating that the hand controller is
ready to receive new programming.
3. To program extension press EXT
button. The LCD will display the
extension icon and the currently
programmed extension setting.
4. To program the desired amount of
extension, press the + and – buttons
to increase or decrease the range.
5. To program flexion press the FLEX
button. The flexion icon will appear in
the LCD display.
6. To program the desired amount of
flexion, press the + or – buttons to
adjust the demanded range.
7. Once programming is complete, press
the SET button again to store the
settings in the hand-held-program-
ming unit (yellow light will go off).
Or, continue setting other operating
features.
8. To start the treatment press START/
STOP button on the hand controller.
1. With power on, press the SET button.
The yellow light will appear indicating
that the controller is ready to receive
new programming. The LCD will flash
all system icons.
2. Press the SPEED button. The LCD
now only displays the SPEED icon
and the currently programmed speed
setting. There are 4 speed settings:
1 is the lowest, indicated by a tortoise,
and 4 is the fastest, indicated by a
hare.
3. To increase or decrease speed,
press the + or – buttons.
4. When programming is complete,
press the SET button again to store
the setting in the hand controller
(yellow light will go off). Or do not
press the SET button but continue
setting other operating features.
23
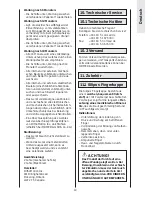
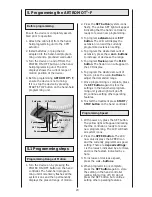
5. Programming the ARTROMOT
®
-F
Before programming
5.1 Programming steps
Programming Range of Motion
Programming Speed
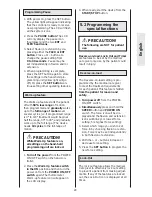
Speed
“+” key
Extension
LCD-Display
Flexion
“–” key
START/STOP
key
Pause
SET key


