background image

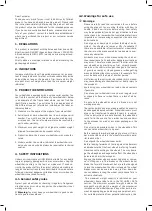
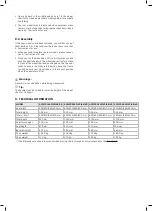
1.  front and back in the middle and pull up. Tilt the wheel-

chair to the side and press both sides together to complete 

the folding.

2.  The rear wheels may be removed when necessary when 

there is a lack of space by following the steps described in 

section 5, “Instructions for use”.

8.2. Assembly

If the rear wheels have been removed, you will have to put 

them back on first. Please follow the instructions in section 

5, “Instructions for use“.
1.  When you need to replace the rear wheels, please see sec-

tion 5, “Instructions for use”.

2.  Stand next to the wheelchair, tilt it a bit towards you and 

push the seat tube down. The wheelchair will unfold. Stand 

in front of the wheelchair and push again on the two seat 

tubes to ensure that they are directly above the frame. 

You can be sure your wheelchair is in the correct position 

when the upholstery is flat.


Warnings:

Never sit in you wheelchair while being transported.


g

Tip:

The backrest can be folded to lower the height of the wheel-

chair for transport.

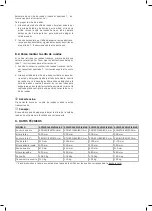
9.  TECHNICAL INFORMATION

MODEL

ACWC01#40/43/46/49 ACWC02#40/43/46/49 ACWC03#40/43/46/49 ACWC04#40/43/46/49

Seat width

400/430/460/490 mm

400/430/460/490 mm

400/430/460/490 mm

400/430/460/490 mm

Total height

900 mm

900 mm

900 mm

900 mm

Total width(*)

580/610/640/670 mm

600/630/660/690 mm

600/630/660/690 mm

580/610/640/670 mm

Total depth

910 mm

1050 mm

1100 mm

1100 mm

Seat-floor height

500 mm

500 mm

500 mm

500 mm

Seat depth

410 mm

410 mm

410 mm

410 mm

Backrest height

430 mm

430 mm

480 mm

480 mm

Chair weight

15,60 kg

17,80 kg

17,50 kg

16,00 kg

Chair weight

110 kg

110 kg

135 kg

135 kg

(*) The dimensions to take into account when moving chairs through doors corresponds to the Total Width

Summary of Contents for actius ACWC01#40

Page 1: ...ACWC01 40 43 46 49 ACWC04 40 43 46 49 ACWC02 40 43 46 49 ACWC03 40 43 46 49 by ES EN INSTRUCCIONES DE USO Y CONSERVACIÓN INSTRUCTIONS FOR USE AND CARE WHEELCHAIR SILLAS DE RUEDAS ...

Page 2: ......

Page 3: ... 3 Subida y bajada de rampas 5 4 Subir y bajar las escaleras 6 COMPONENTES DE LAS SILLAS DE RUEDAS 6 1 Componentes de la silla de ruedas 7 INSTRUCCIONES PARA EL CORRECTO USO 8 TRANSPORTE Y TRASLADO EN EL COCHE 8 1 Cómo desmontar la silla de ruedas 8 2 Cómo montar la silla de ruedas 9 DATOS TÉCNICOS 10 MANTENIMIENTO 10 1 Garantía 10 2 Ruedas 10 3 Frenos 10 4 Marcos transversales 10 5 Ruedas trasera...

Page 4: ...tizar un uso seguro 4 2 Advertencias y precauciones para un uso seguro Ρ Ρ Advertencias Por favor antes de usar el producto lea detenidamente las instrucciones de uso Debe familiarizarse con el ma nejo funciones y utilización del mismo antes de su uso Puede comprometer su seguridad si no presta atenció na estas instrucciones Tenga en cuenta además que esimposible una protección total así como el e...

Page 5: ...razos como soporte y empiece a moverse hacia el sitio donde quiere trasladarse Si fuera necesario podría utilizar una placa de traslado Para entrar Para poder sentarse en su silla de ruedas tendrá que realizar los mismos pasos que cuando quería bajar de la silla de rue das pero en orden inverso Alcanzar la silla de ruedas Le recomendamos encarecidamente que le pida ayuda a su asistente o ciudador ...

Page 6: ...scaleras Repita esta técnica hasta superar el último es calón Puede bajar las ruedas delanteras cuando el ayudante de delante acaba de dar el paso en el último escalón Bajar las escaleras Para bajar las escaleras la silla de ruedas tiene que estar orientada de cara hacia delante El ayudante de la parte de atrás tendrá que inclinar la silla hasta llegar a su punto de equilibrio El ayudante de la pa...

Page 7: ...EL REPOSABRAZOS Los paneles laterales junto con el reposabrazos pueden ser plegados hacia atrás para facilitar la transferencia del usuario Figura 7 Para levantar el panel lateral presione la palanca de bloqueo Figura 8 situada en la parte delantera del reposabrazos La altura del reposabrazos no es regulable Figura 7 Figura 8 FRENOS Los frenos manuales han sido diseñados para inmo vilizar la silla...

Page 8: ...a silla de ruedas se va a desplegar Ahora sitúese delante de la silla de ruedas y vuelva a apretar en los dos tubos para asegurarse que están directamente encima del marco Un tapizado plano confirmará una posición correcta de su si lla de ruedas Ρ Ρ Advertencias No se sienta nunca en su silla de ruedas cuando la están transportando g g Consejo El respaldo se puede plegar para bajar la altura de la...

Page 9: ...ervicio autorizado 4 Si el producto no está equipado con un número de basti dor del fabricante y su etiqueta de identificación como la descrita en el manual consulte el apartado 3 La silla de ruedas descrita y presentada en este manual pue de variar de su modelo en algunos detalles Sin embargo todas las instrucciones son relevantes independientemente de pequeños detalles que puedan ser diferentes ...

Page 10: ...o suelta las ruedas girarán pero la marcha será incómoda Si la tuerca está demasiado apretada la silla será difícil de llevar porque los rodamientos se empujarán sin que las ruedas puedan moverse libremente Asegúrese de que las horquillas de las ruedas delante ras no presentan signos de desgaste 10 7 Tapizado Es importante comprobar periódicamente el estado del tapi zado de su silla de ruedas Un t...

Page 11: ...sing on uneven surfaces 5 3 Going up and down ramps 5 4 Going up and down stairs 6 WEELCHAIR COMPONENTS 6 1 Weelchair components 7 INSTRUCTIONS FOR PROPER USE 8 TRANSPORT AND TRANSIT BY CAR 8 1 De assembly 8 2 Assembly 9 TECHNICAL INFORMATION 10 MAINTENANCE 10 1 Warranty 10 2 Wheels 10 3 Brakes 10 4 Cross frame 10 5 Rear wheels 10 6 Front wheels and front castor forks 10 7 Pholstery 10 8 Cleaning ...

Page 12: ...t be familiar with how to handle it and how it works before using Your safety may be jeopardised if you do not pay attention to these instructions Also remember that complete protection is impossible as is preventing unexpected circumstances and situations Do not go up or down stairs without the help of an as sistant You should use ramps or lifts if available If there are no available infrastructu...

Page 13: ...ker or assistant can help you in two different ways however we advise you to do it the first way 1 The first method for getting up onto pavement involves you and your assistant facing forward when doing so Your assistant must push the grips towards their body and put one foot on the stepper see figure 2 1 A leverage effect occurs that inclines the wheelchair when the assistant does the two tasks s...

Page 14: ...olding the side frames The wheelchair should then be slowly guided down each step Ρ Ρ Warning Never lift a wheelchair by the grips armrests or footrests Always hold a part of the main frame 6 WHEELCHAIR COMPONENTS 6 1 Wheelchair components 1 Grips 6 Brakes 2 Backrest upholstery 7 Rear wheel 3 Armrest removable 8 Front wheel 4 Seat upholstery 9 Footplate 5 Footrest 7 INSTRUCTIONS FOR PROPER USE Ref...

Page 15: ...NG The side panels next to the armrests can be folded back to more easily transfer the occupant Fi gure 7 To life the side panel press the lock lever Figure 8 on the front of the armrest The armrest height is not adjus table Figure 7 Figure 8 BRAKES The manual brakes were designed to immobilise the chair during long stops They must not be used to decrease the speed of the chair or be used for supp...

Page 16: ...ve the frame You can be sure your wheelchair is in the correct position when the upholstery is flat Ρ Ρ Warnings Never sit in you wheelchair while being transported g g Tip The backrest can be folded to lower the height of the wheel chair for transport 9 TECHNICAL INFORMATION MODEL ACWC01 40 43 46 49 ACWC02 40 43 46 49 ACWC03 40 43 46 49 ACWC04 40 43 46 49 Seat width 400 430 460 490 mm 400 430 460...

Page 17: ...ain details However all instructions are relevant independent of slightly different details We reserve the right to change the product in this manual without further notice All measurements drawings and capacities indicated in this manual are approximate and may be slightly different to your wheelchair specifications Ρ Ρ Warnings ORLIMAN will not be liable for any consequential or individual damag...

Page 18: ...n upholstery will no longer support human weight and this can create dangerous situa tions Check the textile lining for holes cracks and worn areas Check the upholstery mounting grommets to make sure that they are all correctly aligned and secure 10 8 Cleaning It is important to clean your wheelchair regularly Clean the upholstery chassis and plastic components on the wheelchair regularly with mil...

Page 19: ......

Page 20: ...ORLIMAN S L U C Ausias March 3 Pol Ind La Pobla L Eliana Apdo de correos 49 C P 46185 La Pobla de Vallbona Valencia España Spain MADE IN SPAIN EDICIÓN EDITION 2018 07 LBIACWC 1_ES_EN ...

Reviews: