


6
UM0972031 A 05
User manual
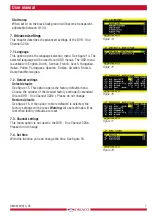
5. Camera tags
In this menu the text-label for the camera input can be defined, see
figure 8. The number of the tags is depending on the camera switch
option. (For more info please refer to the Orlaco Monitor User
Manual; UM0972080).
Select the camera C1 and the option opens the camera tag editor
menu. You can define a camera name. (max.6 characters), see
figure 9. For the DVR - One Channel 32Gb only C1 is used.
6. Recording settings
The ‘Recording settings’ menu offers the following possibilities for
the camera. See figure 10. For the DVR - One Channel 32Gb only C1
is used.
Record
In this menu you can turn the recording of the video data for each
camera (C1-C4) to the SD card on or off.
Rate
Select the recording rate. Note: A higher rate takes more space on
the SD-card, selections are: 1:1, 1:2, 1:3, 1:4, 1:5, 1:8, 1:10, 1:15,
1:20, 1:25, 1:30.
Quality
Choose the encoding quality. Note: A higher quality takes more
space on the SD card, selections are: NOR (normal quality), LOW
(Low quality) HI, (High quality).
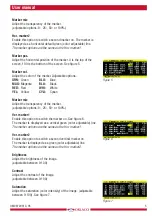
Status line
The status line provides information about the settings. Enable or
disable the status line, adjustable between 0-100. See figure 12.
Stat hpos
The status line horizontal position, adjustable between 0-100.
Stat vpos
The status line vertical position, adjustable between 0-100.
Stat color
Set the foreground color of the status line (background is black),
adjustable options:
GRN: Green
BLU: Blue
MAG: Magenta BLA: Black
RED: Red
WHI: White
YEL: Yellow
CYA: Cyaan
Figure 8
Figure 9
Figure 10
Figure 11
Figure 12